Tuesday, May 29, 2012

back to basics...

long time no blog...
YIKES...so sorry...
it's been a VERY busy 5 weeks...
I've been to Florida 2 times, Ohio, Detroit, Colorado & today I'm headed to Texas to demo at 
in Arlington...

if you're in the area...
come visit...
tell me you're a BLOG FRIEND 
& I'll have a little gift for you!

OK...
about the title...
BACK TO BASICS...

heat embossing is what got me hooked on stamping 
& it still amazes me...

it's such a simple thing...
but creates a big wow factor...

I needed a few new samples for Texas, so I made these...

the first is my background stamp, clear embossed over 

the base was inked with black soot stain...
then stamped with black soot distress ink & clear embossed...

I intended to do a strictly black & white piece, but somehow 
a broken china flower & peeled paint flourishes popped in...

the large clear flower is the large "clicker cutts" & the 2 white layers are the sm & medium CFA whiteout "clicker cutts"...

any stamping on CFA is always done with archival ink
 or the paint dabbers...


below you'll see that the
 large CFA clear "clicker cutts" flower is embossed...

after I heated it & shaped it, I ran it thru the Vagabond

it flattens the flower somewhat,
ok...kind of a lot...
 but the embossing still adds an extra little element of interest...

I tapped the jet black archival pad on it to darken the raised areas...
then dried it...

the clear embossing made the background quick & easy...
just stain, stamp & emboss...
done!


and...
back to basics with tim's markers...

always stamp your art parts, using jet black archival...
the archival ink is waterproof & permanent when dry...
which allows you to use the markers & the image stays crisp...

the markers make coloring art parts so simple & FUN...
her dress is barn door & her collar is broken china...

the little phone is another Blossom Bucket favorite...


and one more sample...

the background paper for this piece is from my friend Finn...
she designed this awesome paper for 7 dots studio...

she's got lots of really cool papers...
REALLY COOL...
I'm hoarding them...lol...
but I did cut into this one...

and another that I'll use for a CHA sample...

again...back to basics 
with clear embossing the art parts small square frame...

see the black metal corner?
it's another Blossom Bucket piece...
glue it to the frame & it creates a piece of ART 
that will stand alone...

hmmm...must be sold out...
can't find the corners on the site...
sorry!


I used tim's mustard seed marker to alter 
the little Blossom Bucket bouquet...
it's cream colored, right from the package...
the markers make it simple to change the flowers
 to any color you need for your art...

I added a dot to the center of each flower

LOVE LOVE LOVE the clear resin jar...
I designed it with a slit in the back, 
so the bouquet slips right in & then everything is flat 
& can be glued down easily...


OK...that's it...
demo stuff is all packed...
now it's time to find some clothes...
and a few sandals...
like 6 pair or so...
what is it with me & shoes???

have a good week!

come see us at GASC...
I guarantee our booth will be LOADED with THE COOLEST stamps & embellishments...
EVER!

if you stop by...

I'll show you how to...
make art!
wendy
ps...if you like to read the fine print...

you can expect the peeks & teasing to begin in just a few short weeks...
let me say that these new stamps & art parts & a "new" products have been a blast to play with...

and new "clicker cutts"...OMG...
just you wait to see...
and the ___ that coordinates with the ___
TOTALLY...in love!

Wednesday, May 16, 2012

tim holtz distress marker magic...


I love to play & experiment 
with Ranger products...

sometimes things don't work 
like I thought they might...
and they get trashed...

and sometimes 
I happen upon something really cool...

today I'll share a cool discovery...

keep in mind that these new distress markers 
are a water based product...
meaning that they are meant for porous surfaces...
like paper, art parts, specialty stamping paper etc...

and don't work on slick surfaces...

or do they work on some???

I designed some of my 
in neutral light colors, 
with the idea that they can be easily altered
  using tim's adirondack alcohol inks...

it works great...
and they look very cool...
so that's PLAN A...

but being a LOVER of all things distress, 
I HAD to try the distress inks on these pieces...

I used the distress inks with the blending tool, 
with not much success...

but I don't give up easily...
so...
I decided to try to alter these resin pieces with

I took photos along the way &
 I am VERY HAPPY to report that 
they work like MAGIC!

here's my cream colored resin bird, 
right from the package...
nice flat back, for easy gluing, 
with lots of detail & dimension on the front...

he can be used AS IS...
or...

Here comes PLAN B...


 in the photo below, 
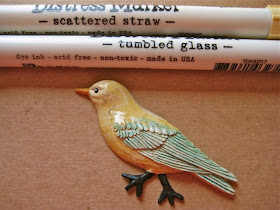
you'll see that I inked the body 
with the scattered straw marker & 
the wings with tumbled glass...
then dried him lightly with the heat tool...

don't over cook him!

you can also just let him sit in a sunny window to dry...
if you are a patient person...


now he looks like this...


then I added faded jeans to accent the wings...
and wild honey to add shading to the head & body...
and lightly dried him again...


now he looks like this..


then I added more shading 
with the rusty hinge marker...
dried that, 
then added saffron archival 
to accent the head & belly area...
& french ultramarine to darken the wings...

to apply the archival inks,
 I tapped a paper towel onto the pad, 
then tapped it on the areas 
that I wanted to highlight...
then I dried him again...


 looking good...
but I still wanted to use my stamps on him...


to add the mini polka dots 
& then dried the ink...

I just tapped the area of the stamp 
that I wanted to use 
onto the orange pad, 
without using the acrylic block...

this makes it very easy to stamp tiny areas...

to add the finishing touch, 
I tapped the coffee archival pad 
directly on the wings
 to aged them & dried them...


and here's the end result...
a simple transformation, 
that took less than 5 minutes to complete...

hmmm...
I might add a bit of 
rock candy distress stickles to the wings...

that thought just popped in...
so no photo of that...


with lots of awesome distress markers
to choose from, 
the possibilities for colors and 
color combinations are endless...

the thing that I LOVE 
is that you can customize these embellishments 
to any color you need for your project...

we have more neutral embellishments 
that can be altered with these awesome markers...

or  PLAN A...

now I want to alter these...

and these...

and THESE...

and for sure these...

but I have to pack for 
this weekends classes at
before I can

make art!
wendy


Tuesday, May 15, 2012

HUGE...Blossom Bucket peek...and THANKS...


it wasn't an earthquake yesterday...
it was Cindy & I jumping for joy & so flipping EXCITED......

Blossom Bucket & I made the 
for new products...

I *think* you'll like Cindy, (who owns Blossom Bucket)...
there are NO tiny peeks from her...

she lets you see 2 full brand new gift items that I designed for them...

and...if you get your magnifying glass out...

you just *might* spot a few others in the background...

these resin items & LOTS more, 
debut in just 2 short months @ the Atlanta Gift mart...

here's the write up from the newsletter...

School House

The houses shown here are designed by Wendy Vecchi, a

 premier designer in the scrapbooking industry who has

 recently partnered with Blossom Bucket. 

The one on the
 left is $12.99 and the one on the right is $8.99.

Lawrence, OH. 330.834.2551.

here they are...

believe me...
just as soon as soon as I can...
I'll be happy to show you the others...


much of the success I've had in this art adventure is due to the support of this guy...

the seriously funny, very hard working, lovable...
Mr. Stampers Anonymous...
aka...TED CUTTS!

it is because of Ted & his wife Michelle, that I get to design stamps, art parts & more...
that I met TIM, who has also been a true friend, teacher & mentor...

Tim lead me to Ranger & the senior educator position...

which then lead to Cindy at Blossom Bucket 
which resulted with the new 
and now the items for the gift industry...

and I have to add that Mario has been a great "advisor" many times...

a BILLION THANKS to...
Ted, Michelle, Tim, Mario, Alain, Justin and Cindy...

you all have made it so much fun to...

make (studio 490) art!
wendy


Monday, May 7, 2012

home for a day...


the studio 490 "kits for art" winner...


and the details on the Blossom Bucket sponsored contest...

but first...
THANKS so much to Cheryl & Rick and all the students who spent the weekend getting inky at Rocky Mountain Memories
in Estes Park, Colorado...
it was fun...
VERY FUN!

the Ranger technique class was very inspiring for all who attended...
I got the idea that you learned lots & I SAW that you did...

MAKE ART!

we had students from all over Colorado plus
 FLORIDA & ILLINOIS! 
wow...
 THANKS EVERYONE!

If you ever vacation there, or are within driving distance...
Rocky Mountain Memories is a definite MUST SEE store...
for a great selection of products...
great samples & cool vintage decor...

here's a Rocky Mountain memory for me...
Stacy was driving me to the store Saturday morning, when some elk crossed the road right in front of us...

they were not frightened by us pulling right up to them, for a photo shoot...

they are EVERYWHERE & very cool critters...


and speaking of cool...
if you ever vacation in Estes Park, I recommend Solitude Cabins...

I *thought* I was a queen...
talk about lovely & beautiful environment...

Cheryl housed me in a 2 bedroom *cabin*??
which was really like a house...

here's the full kitchen...


and the family room with an awesome fireplace...


and looking down from the balcony...

as you can see...
the decor is so cool...
and
100% CLEAN!

Solitude Cabins it THE place to stay...
I DID & I LOVED it...


now about the winner of my brand new "kits for art #3"...

CONGRATS to...

Blogger Yvonne said...
Please give my dear friend Cheryl a hug while your
 visiting her store this weekend!!! I wish I was there with
 you girls!!! Have fun!!!
May 3, 2012 8:41 AM
 Delete


Yvonne, please email me with your shipping info & we'll get it off to you...

remember a few days ago I mentioned a fun little

 contest/drawing?

here's the scoop...

we want to see how YOU have used YOUR Blossom Bucket items to ...
MAKE ART!


just upload a photo of your project to 


a random entry will be chosen on May 31st & the winner will receive a nice assortment of my new Blossom Bucket pieces...

so that you can...

make MORE art!


there's LOTS of Blossom Bucket goodies 
to choose from here...

that's it...

time to pack for the next art adventure...

this time I'm off to Novi, Michigan 


I hope to see some blog friends there again!

so...while I'm gone...
I hope you have time to...

make art (& don't forget to use some Blossom Bucket too)...
wendy

Thursday, May 3, 2012

ABC...

A is for AKRON...
here's a quick shot of my demo space before the crowd arrived...see all those wood mounted stamps in the background? that's just a tiny portion of the booth...
for as many stamps as I have...it still excites me to see a huge amount of wood mounted...

my Blossom Bucket embellishments are on the left side of the photo...


B is for Blossom Bucket...
                        what a lovely sight...
Akron was the first convention to have all the resin pieces...
thanks to everyone who took some home...
                             I hope you'll have fun with them...


C is for crowd...
this is the line up about an hour before the show started...
I guess the line was gigantic when the doors opened...
I didn't get to see that...


I'm headed to Rocky Mountain Memories in Estes Park, Colorado for some inky/stamping classes this weekend...
I'll spend 7 hours on Saturday teaching 
Ranger U comes to YOU...
my most favorite class to teach...
I LOVE techniques...
I LOVE stamps
I LOVE all types of inks...
so this is a great way to spend the day...

after that, I head to Novi, Michigan for Mega Meet...
I thought I should have a sample made using 
it's a perfect flower center...


I added a tiny bit of gold paint around the edge of the resin postmark with the gold paint dabber...
those little blings (is that a word?) you see on the flower are turquoise Perfect Pearls mist...


studio 490 kits for art #3 is shipping...

this was very popular in Akron...
everyone LOVED that the Blossom Bucket resin pieces are included in the kit, along with all the art parts, instruction & step out photos...
and there's also the black metal corner, which allows the shutters to be dimensional...not glued down flat...
the photo below shows the finished art...

there's 2 shutters, the clear resin bottle & the black metal corner in the kit...


 one of the best BB sellers @ the convention was this large fancy flower...
it's cream colored right from the package, but easily alterable, with tim's alcohol inks...
2 minutes or less & you can make it any color that fits your need...
I used caramel & butterscotch for this one...

other BB best sellers @ the show...

all of the eyeglasses...
the postmarks...
the sewing machine was the very first to sell out...
the yellow flower, which fits right in the clear bottle...
and the bouquet, which is a perfect fit for the large jar & 
the 2 clear resin pieces are unique, because I designed them with a slit/open area in the back, which allows you you insert flowers in the slot & everything still glues completely flat...
the red hearts were popular...these are fun to stamp on to customize them...just stamp with jet black archival ink
 these pink posies were gone in a flash...
and these large lips had everyone laughing...

how about a giveaway???


would anyone like my new kit for art that's shown above?

I have one to give to one random commenter...

just leave a comment...

I'll be back on Monday with the winner's name...


now it's time to pack, so I have all the supplies I need to...

make art!
wendy