I'm O V E R Halloween & on to...
CHRISTMAS...
but I DO have a Halloween treat for you today...
keep reading...
let's start today's project...
I originally planned to make an ornament, but this piece took me on another adventure...
I started with one of my original art parts...
art parts LOVE embossing powder, as you'll see...
starting on the left side of the solid base piece,
I used leaf green archival to stencil the large tree, then the smaller tree,
then the large tree again...
making sure to vary the height of the trees...
and also to vary the intensity of the leaf green...
it looked like this...
next,
I added gathered twigs to the whole background with the blending tool...
the next step was to use snow cap pigment ink with my spatter background stamp to add "snow" to the base...
psst...the spatter stamp is back in stock!
working on the smallest art parts house from the "residences" art parts set...
psst...these make cool ornaments & are fun to customize for gifts to package decor...
I'll be making some samples to post here...
I used tree branch archival with the mini blending tool to stencil the "yikes, stripes" stencil...
using it sideways makes it look like a log house!
hey...you might have to use your imagination on this one!
I inked the art parts roof with watering archival ink, then added the watering can embossing powder & heated it to melt the powder...
I inked the frame with forget-me-not archival ink & sprinkled on the cornflower blue embossing powder...
before melting the powder, I wiped away the powder from the edges of the frame...
I like this worn effect...
after the powder cooled, I added some potting soil archival ink over the frame...
I used jet black archival to stamp the sentiment at the top & bottom of the frame...
*remember* to give it a quick dry...
the frame looked like this...
I'm totally loving the texture the embossing powder creates...
I used a small piece of the industrious border sticker & altered it with tree branch archival...
I LOVE the industrious stickers so much...
they are so easy fun to change to any color with the archival inks...
this started out as a silver sticker...
I used Glue N Seal
(so HAPPY it's BACK!)
to add a dictionary page to the clear version of clearly for art...
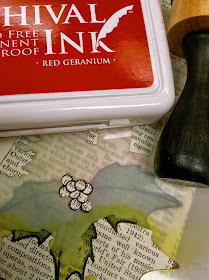
the coordinating stencil makes it fast to ink just the holly leaves...
I used fern green with the mini blending tool...
love how it works!
after repositioning the stencil, it was time to add red geranium to the little berries...
after I cut out the holly, I heated it to soften the CFA & then shaped the leaves...
after gluing the frame to the solid base,
I added a tiny bit of Glossy Accents to the lower left corner & sprinkled on
I wanted it to appear that the snow had accumulated in the corner...
this is where this piece took on a life of it's own...
I originally planned to make this a hanging tree ornament, but I felt it needed a larger base...
the base is the insert from the large square art parts frame...
I inked it with tree branch, sprinkled on the tree branch embossing powder...
wiped the powder off the edges & blasted it with the embossing tool to melt the powder...
I added potting soil to the edges & to the perimeter of the frame...
I knew the center would b covered...
here's a blast from the past...
this background stamp is from my very first stamp release, W A Y back in July of 2008...
it has teeny tiny script that says...
"have yourself a merry little Christmas"...
I stamped it over the base using potting soil...
after shaking the tarnished brass distress stain, I added a gold edge to the base...
*make sure the dabber top is fairly dry...NOT saturated*...
and here's everything all assembled...
do you see the log cabin?
after everything was glued in place, I added bits of "snow" to the roof & a little pile of "snow" just above the berries...
I used the glitter "snow" in 3 areas to create a visual triangle...
haha...almost makes me feel like I know what I'm talking about...
so instead of an ornament,
I have a fun little shelf-sitter...
NOW...
I HAVE A TREAT
for YOU...
I have the
and
the HOLIDAY ICONS SiSi to give away...
just leave a comment on this post & Rick will choose a lucky winner who will get BOTH the stencil & the SiSi...
HAPPY HALLOWEEN to you!
enjoy your weekend & remember to
get out your supplies, eat candy &
make art!
wendy


