Friday, August 26, 2016

butterfly specimen...

happy Friday, friends!

today I wanted to focus on
distress crayons,
 to create a specimen, 
that looks like it's under shattered glass...

here's my example...


working on a small piece of 
I painted on a thin layer of

I usually don't paint to the edges, because the areas that have no collage medium accept the color differently & organically create a cool distressed background layer...


after the distress collage medium was dry, 

 I lightly swiped the potting soil archival pad randomly over the les roses background stamp & added just a bit of stamping to the background, mainly to the edges...

next...
I used jet black to stamp
 my new butterfly & dried it...


I did the large area with the mini blending tool, then swiped the archival pads onto the craft sheet & used the detailer water brush to paint in the smaller areas...

then dried it...

the next step was to spread a layer of
 over the whole thing...

while the paste was wet, I lightly misted 
my new all cracked up background stamp with water, then stamped into the wet paste...

the paste looks white, right from the jar, but as it air dries, it creates a 100% clear surface...

***clean the stamp before the paste dries***
I used a toothbrush...
very quick to remove when the paste is wet...
and set it aside to dry...

when the translucent paste was dry, I scribbled the peeled paint and vintage photo distress crayons over the whole surface...
at this point
it looks terrible...
keep going...
just wipe off the surface gently with a moist paper towel...

the crayons tint the surface and remain in the cracks, to create a shattered glass effect...

now the butterfly is under the glass &
 looks like a specimen...

I added some tiny black pins in the corners...
I've had them for 100 years...
not sure where I got them...
but I thought they fit the theme well...


I added the tarnished brass paint to 
finish off the edges of all 4 pieces...

I mounted the butterfly piece onto a larger piece of black magic mat board, then

I mounted this piece onto a 4 x 4 canvas that was inked with fern green...

I added some remnant rubs...
yes...they stick very well to 
the embossing paste...

and I used the hex fasteners to attach it...

here's close up of the surface...
I think it's pretty cool & it shows another way to use 
this time for texture, with no color!


I frequently get asked about drying time 
for the paste...

there are several factors that are involved...

the thickness of the layer that's added & the humidity...

this paste needs to air dry...
if you blast it with the heat tool, 
it gets cloudy & never changes to clear...

to speed up the drying, I put it next to the air conditioner vent & that cool air did help...
you could use a fan too...

this piece, done in Illinois in HUMID August, 
took about 2 hours to dry...

give it a try...
make a specimen!

it's really very fun...

I hope your weekend is fabulous & 
YOU
can
make art!
wendy

Wednesday, August 24, 2016

thank you!


thanks so much for the kind words 
about the new release...

I seriously have had a blast making samples...
and once my TO-DO list gets worked on, 
I can play again...

here's a quickie card sample for today...

in the background you'll see 


sometimes I use the distress markers 
to color in the letters...
that's super quick...

A LOT!


the flower & leaves are also new mat minis...

there's lots of fun combos in the package...
the flower is the scalloped circle in the package...


I used it with this stamp-it stencil it......
always think about other ways to use what you have...


it's not designed as a perfect fit, so I just inked the stamp with black soot archival & pressed the mat mini flower onto the inked stamp...
then dried it & inked the flower
I LIKE it!

keep in mind that all the mat minis can be inked, painted, stamped, stenciled & also embossed with an embossing folder to add texture...
they are very light weight for cards, 
but they are very strong & a nice surface to work on...

look closely at the larger mat mini leaves...
they were lightly inked with leaf green, 
then I used fern green & stamped
on them to add detail...
not a perfect fit...
but the detail works...

you'll see the new fern stencil behind the flowers...
it's the perfect filler!

I also use it alone 
for a clean & simple card...

and once again...
they are addicting & just the perfect size...
the ovals are really cool too...
if you look at the samples I've been posting...
I used them A LOT...
addicted!

that's it for today...

next on the TO-DO list is kits for the retailer's Collin's event in Florida...
lots of kits...

have a good one, my friends & take time to...

make art!
wendy
ps...
head's up...
I'll be over on the Ranger blog later this month...
if you don't already own 
you will WANT IT!
trust me!


Thursday, August 18, 2016

NEW...stamps...NEW stencils...NEW mat minis...

don't faint...

I actually have a blog post with

 EXCITING news...

sorry for the lack of posts...
but I think you'll see what I've been doing...

I thought with this release, 
I'd show you the actual pages from the flyer...
that will show examples of how 
I used each of the new products...

in total
there are 4 new stamp sets, 
4 new background stamps...
4 new stamp-it stencil-its...
6 new stencils and
3 new mat mini's...

and they start shipping to stores TODAY, Monday Aug 22nd!

click the photos to enlarge them...

let's get started with 2 new stamp sets...

top left...
SCS143 is ART FROM US...
we had multiple requests for "US"
 (plural) sentiments...
you'll see that reflected in both of these sets...
the daisies are fu to color...

and
bottom right...

SCS144 MESSAGES FOR ART...
I like the fern a lot & there's multiple ways to use it...

here are 2 more new stamp sets...

top left...
SCS145 is ARTFUL THOUGHTS...
great LARGE butterfly...
works well with clearly for art (CFA) 
to make it dimensional...
just cover it with my newsprint paper, then stamp on the newsprint & ink away...
cut it out...
warm the CFA with the heat tool & shape it...

bottom right...
SCS146 CARD ART SENTIMENTS...
this set includes sympathy sentiments...
we had multiple requests for PET sympathy too & I think these fit...

that large tree is fun to stamp with multiple colors & can be used all year round...
green leaves...
or
orange/red leaves...
I've been making samples with the misti...
but you can add multiple colors without it...
the mat mini birdhouses & birds are a perfect fit with this cool large tree!


next up...2 new background stamps...
top left...
bottom right...
for the sample of the butterfly,
I created the piece, spread
over the whole thing...
stamped into the wet translucent paste with the ALL CRACKED UP BACKGROUND...
let it dry...
then I used tim's  distress crayons over the dry embossing paste...

just scribbled (artfully, of course) them on & blended them with my finger, then with a moist paper towel, gently wiped them away from the surface...
the crayons stay in the CRACKS & create a shattered glass effect...
the butterfly appears to be under the cracked glass, like a specimen...
S U P E R FUN STUFF!
and...
I like to use this one with the misti...
ink the bricks & stamp, then ink the cracks with a darker color & stamp again...


now 2 more backgrounds...
top left is a RE-release by popular request...
this is from my very first release LCS003, so if you have that...you already have this background...
we had LOTS of requests to bring it back as a single background...
it's called

and
bottom right...
found this vintage bench text & LOVED it...
I've used it on lots of samples...
it works with anything...


next up are 2 new stamp it-stencil-its...
these have the stamp & the coordinating stencil in the same package...

top left...
a gorgeous flower...

and bottom right...
might be my fav...
that flower that is front & center can be cut out & used with lots of other stems/leaves from past released to change it up...

these are GREAT for one layer cards or you can take it to 102 & add layers...

and 2 more stamp-it stencil-its...
top left...
my fav...
oh...I just said it...but this is great too!

and bottom right...
another favorite...
it's MY blog...
so I can have as many favorites as I want!

the next page has 4 new stencils...
top, far left...
top, far right...
LOVE LOVE LOVE them...
GREAT filler with flowers!

use the whole thing for a background or just a portion of it...

bottom, far left...

inspired by a sweater my mother knit for me, when I was about 8?
...I recall it being green with CABLES & I thought it was the coolest sweater ever!

over on the
far right...
use this one as shown below
or turn it 90 degrees for a different pattern...
cool for an ombre effect too...


and we have 
NEW adorable mat minis...

look at the number count in these packages!
they are the bargain of the century!


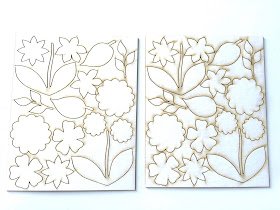
 we have FLOWERS, which includes several flowers, leaves & stems...
there are 2 white sheets in that package...
here's what they look like in the storage sheet...


next...

2 white sheets...
multiple shapes & sizes
and...


these have a sheet of black stars & 
a sheet of white stars...
for a
 TOTAL of 128 pieces in this package...

they look like this...

ink the white stars with any color or metallic embossing paste...
the black stars are cool when misted with buttercup mica spray...
it adds just the right amount of bling...


and I saved my most favorite for last...
this idea worked & I'm SUPER thrilled with them...
there are 2 stencils with this new design...

they are called 
SELECT-A-STENCIL...


and 


they are both a 2 part stencil, 
held together with a brad...

the large circle is about 6 inches in diameter...
so, they are much larger than my usual
 stencils, but we needed more real estate to accommodate the entire alphabet...

the inner circle of UPPER CASE has numbers & some symbols...

the inner circle of the lower case
 has lots of punctation & symbols...

the smaller top portion is a 
ROTATING WINDOW, 
which allows us to stencil, 
and it also masks off the surrounding area & prevents ink in unwanted areas...
M A G I C!!!

it's sized to use with Ranger's mini blending tool...
and it's designed with plenty of working space, to prevent an oops...
when using the outer circle, I use a POST-IT to block off the inner ROTATING WINDOW...
simple!

position the "SELECT-A-STENCIL" letter...
 rotate the ROTATING WINDOW over the chosen letter/symbol...
ink the mini blending tool &, place the blending tool in the window & gently add ink to the stencil...

we debuted these this past weekend at Scrapbook Expo & I was thrilled that they were a HUGE hit!
thanks everyone...
I can't wait to see how you use them...

I'll be sharing more about them once they have shipped & you have them...

these stencils allow any word to be created...
with ANY spelling...
any unique name...
any address...
any date...
any holiday...
any occasion...
truly unlimited potential for these guys!

they can we used for horizontal, diagonal  or vertical words/sentiments and they both can be used along any shape, like a curve...
I'll show you that below...

or you can combine UPPER CASE with lower case to create fun "ransom" type sentiments...
use upper case for the first letter of a name & then lower case...

TADA...

meet

SELECT -A-STENCILS...


here are more examples, 
using the SELECT-A-STENCILS...
all the sentiments below show how I used them...


I hope you're as excited as I am for this release...

I've had a blast...

making art!
wendy
ps..I'll be waiting to hear your favs!
pss...hopefully I'll be a better blogger, 
now that I can share new samples!

EDITED...MONDAY AUG 22...
just got this scoop on bundle deals
 if you're wanting needing them...


the cutest 3 EVER MAT MINI BUNDLE...