Wednesday, September 16, 2015

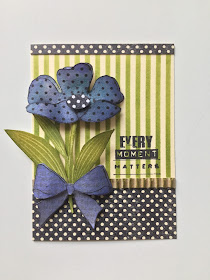
every moment matters tutorial...

grab your archival inks...


some newsprint...

my FAV...glue N seal...

this tim size die...


oh...and

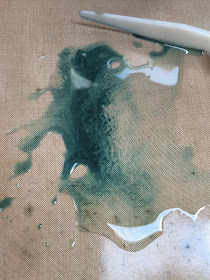
to color the gumdrop...

I'll show you how to create this card


you'll find the complete supply list there 
& also a tutorial with step out photos...


I've also included some helpful tips...

so YOU can follow along and...

make (this)  art!
wendy

Monday, September 14, 2015

and the winner is...

good morning!

I'm back from beautiful Florida & a GREAT class and make and take for Ranger...
it was a fun event!

this is a quickie post to announce the winner of my Ranger accessory bag & the DIY archival pad...

and Rick said that person is...


Blogger Linda Compton said...

Great masking technique. I love the orange blossom EP that 
really looks like terra cotta pot. I have the tiger lily and have 
been trying to get the terra cotta look. It is not bad, but much 
better with orange blossom and the frosted crystals. I see the 
need for a shopping trip. Thanks for the 20% off coupon.

September 10, 2015 at 9:00 PM
 Delete


Linda, shoot me an email or message me with your shipping info...
CONGRATS!
I hope you enjoy the bag & your pad...

I'll see you back here on Wednesday with a really fun tutorial...
if you like the archival/alcohol technique,
I'll be showing you how to use it on 2 different surfaces...
scientifically, one surface shouldn't work, but it does & it's FABULOUS!

here's a peek...


have a good one!
time to unpack and...

make art!
wendy


Thursday, September 10, 2015

celebrating STAMPtember...


THANKS Heidi, from Simon Says Stamp,
 for the invite to participate in your STAMPtember event...
I'm happy to share 
some stamping ideas here today...

I have to say it...
I absolutely...
LOVE stamping! 

One of the things that I especially LOVE about rubber stamps is their versatility. When designing, I always like to have more than one use in mind for stamped images. So for Stamptember, I thought it would be fun to show 2 ways to use one stamp. Here’s the first, using a BRAND NEW...floral collage Stamp-it Stencil-it...

 The Stamp-it Stencil-its all have the stamp and the coordinating stencil in the same package. They make life simple. 
Let’s start with a basic card.


THE SWEETEST MOMENTS CARD

Cut a piece of watercolor cardstock to 3 ¾ x 4 ½ inches.


Working on the smooth side of the cardstock use Jet Black to stamp the floral collage centered, toward the top of the card & dry.

Position the coordinating stencil over the flowers portion of the stamped image, Ink over the flowers with Tiger Lily Archival ink, using the blending tool.


With the stencil still in place, add bit of Buttercup Archival to highlight the tops of the petals.


Reposition the stencil over the leaves & use Leaf Green to add color.


Stamp the largest leaf onto a Post-It & cut it out, right on the line...


Place the Post-it over the large leaf to mask it off, then ink the polka dot stamp with Fern Green Archival and stamp the lower section of the card. Remove the mask and the stamping appears to be under the leaf. I saw this when I first  discovered stamping & thought it was MAGIC! 


Use Jet Black to stamp the sentiment on a watercolor scrap. Lightly ink the edges with Leaf Green & add toward the bottom of the card.

Add watercolor panel to the black card base. Add black glaze pen dots to accent the flower center and the base of the small flower.


This quickly creates a completely flat, easy to mail card. 
The stencil acts as a stencil, so you can add color and it masks off the background at the same time. This allows ink to be added using the blending tool, for quick easy coverage.

Now, let’s use that same stamp again and take it up a notch.


KINDNESS CARD
Cover a sheet of clear, Clearly for Art (CFA) with a thin layer of Glue N Seal. Add Newsprint over the adhesive, burnish & give it a quick 10 second dry.
Cut several small pieces, or use scraps.Ink the floral collage stamp with Jet Black & press the Newsprint side over the inked flower portion of the floral collage stamp and the leaves. Repeat & stamp/cut out 2 flowers and 3 leaves, one of each.


Ink the leaves with Fern Green archival.
Ink the 2 flowers with Sky Blue Archival and add Cornflower Blue to the petal edges.

Ink the vintage text stamp with Watering Can Archival & stamp over the 2 flowers.

Heat the leaves to soften the CFA and shape the leaves, while the CFA is warm.

Heat the CFA to shape the petals. Layer the 2 flowers together, using black foam adhesive. It's a great adhesive for CFA. 

Using the large white Mat Mini Flower Pot, ink over the base & trim piece with Orange Blossom Archival, then sprinkle with Frosted Orange Blossom Embossing powder & heat to melt the powder.


To create frosted powder, mix equal parts of Orange Blossom embossing powder with Frosted Crystal embossing powder. This mix creates an authentic textured clay pot embossing powder. Any colored embossing powder can be mixed with Frosted Crystal to create this "frosted" powder. Frosted Crystal "doubles" your embossing powder options.

Glue the trim piece to the base.


and it looks like this...


your finished pieces will look like this...


cut a piece of manila cardstock to 4 ¼ x 5 inches.

To create the card base, add one drop of Cornflower Blue reinker to the craft sheet and sprinkle with rubbing alcohol. Any percentage of rubbing alcohol is fine. Get the cheapest you can find...
Rubbing alcohol will also remove the archival ink from stencils & your craft sheet.


Use the palette knife to mix the reinker into the alcohol. Place the manila cardstock into the inky solution & it will immediately absorb the fluid. Dry.


As the alcohol is burned off, the ink layers will magically  form!


Use Fern Green to stencil the diagonal stripes border at the bottom of the card.

Mask off half of the "diamond" stencil with painters tape to change the diamonds into a banner stencil.


Position the banner over the stripes and stencil with Jet Black.


Use Jet Black to stamp the sentiment above the border, toward the right. 


Add Hickory Smoke to shade the edge of the card.


LIGHTLY ink the unmounted vintage text background stamp with Tree Branch Archival and randomly stamp over the base.

Test drive the flower pot to determine where to stamp the flourish.

Glue the flower pot to the card as shown. Create a pleasing arrangement with the flower & leaves, then glue in place.


Ink a scrap of manila cardstock with Red Geranium and sprinkle with a custom BRICK embossing powder. Heat to melt, then die cut the tiny hearts with the shapes strips heart die.


this is a great way to use up scraps and create perfectly coordinated embellishments!


to create the custom BRICK embossing powder, mix one part of Orange Blossom Embossing powder, one part of Red Geranium embossing powder, 2 parts of Frosted Crystal embossing powder and ½ part of Watering Can embossing powder.
this creates a textured authentic brick surface...

Glue 3 hearts to the right side of the card.

Add the finishing details...
a little pen stitching to the edges, and some black glaze pen dots to the flower center & to accent the banner points.

Mount to a black card base.

Here's the finished card...


here's a closer look at the dimension...


    So, that’s the same stamp, taken up a notch. One stamp...
    multiple uses...
    use it in full, or just a portion...
    and...
    it can be flat or dimensional...

    and that's why I LOVE stamps!

    And here’s idea #3...since this is an open image, wouldn’t it be fun to watercolor it with your favorite markers?

    or...
    idea #4...

    it would be fun to add doodling or 
    zentangles to the petals!

    I hope this inspires you to look at all the possibilities and ways to change up your stamps.


NEWSFLASH...

here's a CODE to enter at checkout 
to get 20% off my brand of products...


just enter 
WENDY...

it's valid from today to 9/12/15...

A N D...

since we're celebrating...
 I'll end with a GIVEAWAY of one of our 
compliments of RANGER!

just leave a comment on this post & the winner will be announced 
on Monday September 14th...

it would be wrong to send an empty bag, 
so I'll add a NEW COOL

again...
a simple comment is your entry ticket...


I hope you'll grab your stamps,
use them to enjoy STAMPtember
 and

make art!
wendy

Wednesday, September 9, 2015

answering a few quick questions...

I've gotten some questions several times, 
so I thought I'd do a quick Q & A here...

#1...OMG...love the bags, but I can't find them at Stampers Anonymous...
...HELP...and how much???

the accessory bags are from Ranger
NOT Stampers Anonymous...
your local store or
 fav on line can order them for you from RANGER...
the price is a very reasonable
$10.00 each...


#2...is it possible for you to show what the inside of that bag looks like? does it have sections?

here's the inside of the bag...
it's completely open,
 so you have a million options for using it...

from art supply storage to transporting supplies
 to a makeup bag...
how fun!

be thinking about gifts for friends...

just saying'...
the holidays are closer than you think!


#3...what is the size difference with the 2 hosta stamps?

here's the side by side comparison...
the new large is on the left...
the original cute mini is on the right...
I wanted a large size to use with 
the new larger flowers from this release...

LOVE them both!


#4...Thanks for sharing the catalog with us. I enjoyed taking a look. Is it correct that the mat mini pine trees come in both black and white, but the holly minis only come in white?

YES...that's correct...
 I like the black trees for 
 or for using with metallic embossing pastes 
and with 

we needed white trees to show off the ink colors and different stamps/stencils...

the white look really cool too, when used with embossing folders...

I made the holly/berries package white only, 
so that we could use
I tried them in black...
they didn't thrill me, 
so the holly/berries package is white only...

#5...I especially loved the watering can example you shared. Is that done on a canvas, it's hard to tell? Does that alcohol technique work on canvas? Do you have a tutorial for that piece?

YES...it is on a 4 x 6 inch canvas panel...
they are really fun & inexpensive...
YES..the archival ink/rubbing alcohol technique does work really well on canvas...


and...
just you wait to see what else I discovered...
TOTALLY unexpected...
(scientifically) it shouldn't work...
but it does...

I LOVE figuring out new ways to use things...

and...it's coming soon...

like next week on the Ranger blog...
I just finished the tutorial...
I'll keep you posted here...

THANKS SO MUCH 
for all the comments, emails & messages about my new release...

I am totally thrilled with how everything turned out & I'm happy that YOU like them too!

ok...
that's it for today...

please come back tomorrow...
I'll be over on the Simon Says blog to celebrate STAMPtember with them...

and I'll have a SPECIAL code 
to use if you decide NEED to SHOP...

have a fun day...

make art!
wendy


Friday, September 4, 2015

NEW stamps, NEW stencils, NEW Mat Minis, NEW SiSi's...

finally...
it's time to show you 
what I've been working on...
or...
playing with 
is probably a more accurate description...

I must confess that I have had
SO MUCH FUN
mixing and matching these new stamps...

I designed these 3 sets 
to work together,
 to create new images...
they also work with stamps we already have
 to freshen them up...
seriously...
we have L O T S of possibilities...

there's one flower that can even be transformed
 into "leaves" for other flowers!
I'll show you!

YIKES...this is a long post...
you might want to grab a comfy seat...

and READ TO THE END...
for a "special SALE code"!

I'll start with the

3 new stamp sets...

the first is 
SCS134 & it's titled
"artful life"...

the flowers are open images...
perfect for coloring with markers...
and
easy to cut out to make them dimensional, 

the open designs allow them to be over stamped with any background stamp 
to totally change them up...
or...
 you can stencil over them to add a pattern...

the leaves work really well with
to create multi colored leaves 
with just one inking...
and...they are easy to cut out...

I totally LOVE these sentiments...
they're good for cards, 
tags and art journal pages...
see that bow on the bottom?
it fits a #8 tag perfectly...
I've used it lots...


here's a sample using the set...
the black/white polka dots are from
it's inked with jet black...
mixing past with brand new is fun...


the second new set is 
SCS135 and it's called 
"happiness and art"...


I am IN LOVE with the hosta...
it's a much larger version of the hosta from 
the last CHA release 
I loved that one so much, 
that I wanted needed a bigger hosta...
it looks wonderful with 

 I find myself using just the leaves,
 in combination with other flowers...
it's the perfect focal point for a card or tag...
you'll see lots of samples made with the full stamp and also with just the leaves...
if a stamp can be used more than one way...
I really like it!

the circles are good background fillers & they are sized to work with common circle punches to save time...
they are sized at ¾ inch, 7/8th inch and 1 inch...

they are fun to stamp on scraps, punch out & to create a scallop border...
I'll show you...
and...
they are really cool when inked & stamped using the DIY archival pads
for an easy multi color image...

the sentiments are fun for cards/tags/art journal pages...
they have easy to cut out words, 
to make layering simple...


here's the ADORABLE hosta...
it's sitting in the tea time large cup...
on a #8 tag...


and this last cutie is
SCS136 ..."flowers for art"...

more sentiments with cardmakers in mind...

again,
open design flowers for coloring with markers or to stamp over with background stamps and it's fun to add stenciling over them...

the circle fits a 1 ⅛ inch circle punch...

see that flower lower left?
stamp it on a scrap...
color it green, cut it out & 
use some of the "petals" as leaves...
can you see how it changes?

very fun!

meet...
SCS136 "flowers for art"...


here's an example of 
a favorite mix and match
 using these sets...

take the flower (top left) from SCS134...
add the flower from SCS136 over it and
 now it's a dimensional POPPY!
the dots circle stamp created the scallops...


there are 2 fun new background stamps...
"polka dot"...
polka dots are always in style...

this is on an older set (LCS011)
& we've had multiple requests 
to have it available
 as an individual background...

you asked...
we did it!

LOVE it stamped over flowers and used with embossing powders...

and below that you'll see a great 
new "vintage text" background...
I found this amazing
vintage leather bound new testament,
 (dated 1874)
while shopping in Texas with some friends...
we think it's Norwegian or possible Swedish?
it's a great font...
it's AWESOME as a background and it's great stamped over the flowers!


next up we have 
3 new Stamp-it Stencil-it's...
these make life E A S Y and there are 2 distinct ways to create with them...

I *know* I shouldn't have a favorite...
BUT...
I DO...
this just might be it...

this is called
"floral collage"...
just like the name says...
 stamp it first, 
then position the coordinating stencil over the stamped image and stencil it...
this allows coloring with a blending tool for a quick simple flat multicolored image...
the stencil acts as a stencil
 to fill in the open area with ink 
and at the same time, 
 as a mask to protect the background area...

or...
you can stamp the flower on a scrap...
cut it out & layer it over the stamped image to create dimension...
this flower is awesome to use alone...
and to mix with the other flowers/leaves in this release...
here's my fav...
"floral collage"...


and below is a sample card...
this was so fun to make...

the next new stamp-it stencil-it is
"water lily"...

when my violet archival ink was introduced, 
I really wanted a water lily & this is it!

it's great to use the full stamp or you can cut out the little flowers and layer them or
 use them with other leaves to create a whole new image...


here's what it looks like done in pink peony...


I liked it so much that it made the cover of the flyer, inked in violet...
you can see that I added the little red flower from the "floral collage" SiSi & the flower from SCS136 to change it up...


and the 3rd new SiSi is...
"prairie bloom"...

this stencil has 3 stencil sections
 to easily ink the leaves one color,
 the petals another color and 
the 3rd section is the dots
 at the top of the flower...
these can be a different color 
from the petals...
or...
you can add embossing powder
 to just the dots...
or...
 you can add any of the embossing pastes
 to add texture to the dots...

or...
 use just the dots stencil as a background filler...
this is a really FUN one!

or...
spread embossing paste thru the "petals portion...

oh...
and the BUD is easy to cut out & add to other images...


here's a simple flat sample...


moving on...
since we "collect" stamps & stencils,
when designing, my goal is
 to add to the "collection" 
to make it even better and 
to give new life to
products we already have...

so...
that brings me to
 the 2 new mat minis...

mat minis are computer/laser cut 
from a very light weight, 
but very strong material...
 they are perfect for adding to cards and great for mixed media projects too...

the material accepts both archival & distress inks very well...
they can be inked, painted, stamped, stenciled and heat embossed with embossing powders...

and 
they can be embossed with embossing folders...
love the cute textured effect!

first up...
we have mat mini"pine trees"...

these trees are perfect for the holidays, 
but can be used all year...
there are 2 sizes...
a large & a small tree...
6 of each in the set...
for a total of 12 pieces...

these coordinate with last year's holiday release, 
which included tree stencils...
in the sample below, 
you'll see how they layer...


the mat mini pine trees come in black, 
which I really like to use with embossing powders or embossing pastes...
and white, to use with inks and stamps...
honestly...these guys are so F U N...

here's the adorable 
"mat mini pine trees"...


here's a better look at the tag sample...
too bad the rock candy glitter "snow" didn't show up well...
it adds just the right amount of bling...


last year's holiday release included this


see the holly stamp on the left?

the new
"holly and berries" mat minis
are perfectly sized
 to use with the holly/berries stamp...

they're super simple to use, 
since it's a 2 part mat mini...
the berries and leaves are individual pieces...
these come in an all white package, so the stamping & inks will show...

just ink the holly stamp & press the mat mini holly leaves onto the inked stamp...
then ink the stamp again & press the mat mini berries onto the berry section of the inked stamp...

color them with ink & pop them together
 for a fun custom embellishment...

there are 16 pieces in the set, 
so you can create 8 cards or 8 tags 
from just one package...
Ted gave us a good price!

look out Hallmark!


one more thing...
because these products 
are made in Cleveland, Ohio...
if you didn't get the holiday icons
or
from last year,
 Ted can have the guys make them for you...

made in the USA means
nothing needs to be discontinued!

phew...
I HOPE your eyes are OK...

this was LONG, but I wanted to include a sample for each, to help you get the ideas brewing...

if any of these are on your must have list...
just let your store owners know 
that you want need them...
I'm sure they'll be happy
 to order whatever you'd like...

BREAKING NEWS...
I just got this!

here's a special S A L E code to use on the Stampers Anonymous site...

enter this code at checkout...


here's another SPECIAL TREAT...
this link will take you to view the whole flyer...


it's what store owners see...
it has all the info, 
including prices and the package contents...

ok...
it's your turn...

I'm waiting to hear which is your fav...
or what ideas YOU have brewing...

thanks so much for popping by &
THANKS for
 putting up with the little peeks!
I sincerely appreciate 
each & every one of 
YOU!

I've had SO much fun with these new guys...
I've been happy...

mak(ing) art!
wendy

STOP THE PRESS!!!
the day gets even better with the launch of our new

ACCESSORY BAGS from Ranger!

each designer created art specifically for these bags & I think they are flippin' awesome...
they really are 
a great representation 
of each designer's art...

this is where style meets function perfectly...
I can think of so many uses
 for these adorable bags...

here's a closer look at mine...
under the tag on the right it says...
"discover your passion 
then do what you love"...

I AM!


phew...
breathe...
it's a super exciting day!
THANKS to Ranger
 for a really fun & useful surprise!