
I have something new to share today...
I want to start with a review of clearly for art...
so I can point out the major difference below...
clearly for art is my clear moldable material that can be stamped & cut out or die cut to make custom embellishments...
the unique property is that every time clearly for art is heated/reheated, it goes completely flat...
so...when it's embossed with an embossing folder & reheated, the embossing disappears...
like I said...
completely flat every time...
here's where the title comes in...
H. O. W. E. V. E. R...
this next idea changes that property...
when Ranger introduced their new Metal Foil Tape Sheets I couldn't wait to play...
I finally had a chance to try my idea a few days ago...
I expected it to work...
and it did...
but I got a totally unexpected twist...
I wanted to put the metal foil tape sheet over
clearly for art(aka CFA)...
to create metal flowers, which would be thin, lightweight,
strong, moldable & unbreakable...
here's what I did...
I cut a piece of CFA large enough to fit these 2 flowers...
and a piece of metal foil tape sheet, the same size...
then I removed the backing from the foil tape sheet & applied it over the CFA...
what you'll see now is that you have 2 options here for the flowers...
the metal foil tape side is shiny...
but turn it over & the CFA side is still metallic,
but it's duller & toned down...
either side will work exactly the same...
so...depending on your project,
you can choose to make either side the top...
I decided to use the foil side as my top
for the flowers below...
I stamped my flowers, using jet black archival on the CFA side, lightly dried the ink & cut them out...
again...
you can stamp on either side...
next, I put both flowers in tim's dot matrix embossing folder & ran it thru the Vagabond...
you can use any embossing system...
but the Vagabond is really cute...
so now I have 2 really well embossed metal flowers...
I laid the flowers on my craft sheet & heated them with Ranger's Heat-It tool...
so that I could shape them...
expecting the embossing to be gone...
now here's the M. A. G. I. C...
once heated...
I could shape the flowers as usual...
but the metal foil tape held the texture in the CFA...
it didn't go completely flat & loose the embossing...
I was jumping for joy...
this opens a whole new area for play...
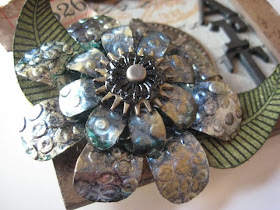
for the flower below I used denim & sailboat blue alcohol ink with a drop of the gold metallic mixative...
here's the metal foil tape/CFA flower...

and below is the little sample I made using the small sq. art parts frame...
tim's new kraft resist paper,
which I inked with weathered wood distress stain...
(LOVE it)...
both the paper & the stain...
some leaves, stamped on grungeboard...
an idea-ology time piece & ornate plate...
a bit of a journaling ticket...
which is glued to a memo pin...
some brand new alpha parts to spell ART...

I used the gold metallic mixative to to change the color of the sprocket gear...
and used it for the flower center...

I HAD to play a bit more...
I used the same exact process for the flower below...
but this time after I embossed the flowers,
I gave them each a coat of Claudine's gesso & dried them...
then I misted the flowers with tim's butterscotch color wash...
and dried them...
then, I put them back on the craft sheet to heat so that they could be shaped...
after I shaped them, I wanted the edges a bit more distressed looking, so I used some caramel alcohol ink just on the tips of the petals...
then added a favorite accoutrement button...
and got this...

by adding Ranger's metal foil tape to the CFA and running it thru embossing folders you can quickly & easily make as many custom embellishments as you need...
no fancy metal tools are needed...
(ok...that Vagabond is fancy...)
the embossing folders makes it very simple...
now here are some IMPORTANT TIPS
to keep in mind...
HEATED METAL GETS HOT...
so be careful...
it also holds the heat longer, so you have a bit more working time...
I heated my metal/CFA pieces on the craft sheet...
let them cool about 5-7 seconds, then picked them up to shape them...
if it cools before your shaping is complete...
just heat the section that you need to mold...
if you happen to get a wrinkle in the foil tape when you apply it to the CFA...
no big deal...
the magic embossing folder takes care of that...
it's completely gone...
don't like the embossing folder you chose?
pick another & re-emboss the foil tape/CFA...
the original pattern is completely gone & you are left with the second pattern...
it's magic!
other options...
I could have used the sanding grip to lightly remove the alcohol ink, if I wanted the metal to stand out a bit more...
I could have done that with the gesso flower too...
I almost did...
but I didn't think it would look good with the butterscotch...
next time I'll choose a different color & sand off the embossed areas to reveal the metal to create a worn/distress look...
which I think will be cool with the gesso/color wash...
now I'm seeing metal butterflies...
leaves & more...
this is a fun combo...
you can also make stamped metal pieces...
so, instead of using the embossing folder,
just ink the metal/CFA & stamp...
then shape as desired...
you'll have a piece with no texture,
for another different effect...
and lots of background stamps to choose from...
and once again...
HEATED METAL GETS HOT...
so please be careful...
changing subjects...
in my last post I talked about Ranger's new Glue N Seal...
I forgot one little tidbit...
if you apply Glue N Seal over distress ink, you'll pick up some distress color on the brush,
since it's a water based product & distress inks react with water...
not that I've ever done that...
(ok...I did it twice...but I'm a slow learner)
it's NO BIG DEAL if you get color on the brush...
just run it under the faucet...
BEFORE putting it back in the jar...
the water takes the color right off the brush...
and your jar is nice & clean with no added color...
oh...the lightbulb just went off...
ding...
another metal foil tape/CFA idea...
I GOTTA try it NOW!
and...
make art!
wendy
OMG - I have a package of Clearly Art & Metal Tape at home...can't wait to get out of work {so interferes with my real life} and try this!!!
ReplyDeletewow wendy! great ideas. more stuff to buy and try.
ReplyDeleteThat is just way to cool!! You are such an inspiration Wendy!!
ReplyDeleteI think I need to go shopping and give these a try!!
WOWEEEEE ! Drop dead gorgeous! Great techniques.... beautiful flowers....gotta make me some of those! Definitely see them as butterflies....oh yeah!
ReplyDeleteoh my goodness, what fun you are having
ReplyDeletei love to find new ways to use products
now i just have to HAVE those products
great day folks, have a great day
Gorgeous! Canst wait to try! Thanks for all the tips.
ReplyDeleteWendy, this is fabulous! I love your flowers. I am going to try this for sure. Brilliant!
ReplyDeletegorgeous will have to look out for it.
ReplyDeleteOK, I believe I've said it before, but this deserves it again:
ReplyDeleteYOU'RE A GENIUS!!!!!
Thanks for sharing an absolutely fabulous technique that I am DYING to try, but I can't right now. Boooo Hooooo!
Now those are some really lovely flowers!!!!!!!!! Can't wait to get some new toys to try this myself!
ReplyDeleteWOW, Super Cool! Love the flowers and ooh the possibilities.
ReplyDeleteSUPER COOL! what fun! TFS!
ReplyDeleteI now need both of these new items to give this a try. Great results and idea!
ReplyDeleteAmazing!
ReplyDeletewow Wendy - very fun .... more things to add to my wish list!
ReplyDeleteSandra ltb
You're killin me Wendy - amazing, amazing ideas. I LOVE the metal flowers. I just need to move up my birthday by a a few months and beg for a Vagabond. Seriously though, they are just beautiful!!
ReplyDeleteAmazing!!! Can't wait to try this. You rock!
ReplyDeleteGail in Oklahoma
Omgosh! What a fantastic discovery you made!!!! I love those CFA/metal foil tape flowers!!!!
ReplyDeleteOk, I guess I have to order some CFA. And some metal foil sheets...
ReplyDeleteOh my gracious, that flower is so freakin cool !! You are just plain brillant, does your mind ever shut off ?? :) Now I have get me some metal foil .. off to shop !! Have a great day Wendy
ReplyDeleteYou've outdone yourself! Can't wait to try out these great ideas! THANKS!
ReplyDeleteThis outstanding! What a great look, can't wait to try this.
ReplyDeleteWOW!!!!!! I sooooo love this!!!
ReplyDeleteAnd believe it or not i actually have everything i need to make them!! can't wait to put the tinkers to bed and go MAKE ART!!!
Tanks Wendy!
OMG Wendy - that is a brilliant idea - and means I have to order some CFA because - horror- I forgot with my last "oops I shopped again" order.... lol.
ReplyDeleteYou are one AWESOME lady!!
Love it....
ReplyDeleteGreat tip. Thanks for all your ideas.
ReplyDeleteLovely flowers! They would make a cool necklace or maybe a brooch for a scarf! Thanks Wendy for all the creative ideas!
ReplyDeleteThank you for experimenting for us. I love the look of the metal, but I haven't really working with it yet because I didn't want to get into a whole new set of tools. This is just perfect! Can't wait to try it!
ReplyDeleteYour project is gorgeous and those flowers are to die for. Now I have to have some of that foil. I hope it is coming out soon. I can't wait and try this technique. TFS!!! Wendy, I so appreciate it. :-D
ReplyDeleteWell, aren't you just Miss Clever! I'm off to try it!
ReplyDeletewhat a cool idea! I've GOT to get my hands on some CFA!!!
ReplyDeleteWOW!!! WOW!!!! I love these flowers!!!!! Too cool!!! Totally fabulous!!!!!
ReplyDeleteWhat a cool idea. Have to try this. Have some other brand foil tape but I bet it will work. Thanks for the inspiration!
ReplyDeleteStunning - Amazingly Stunning! Need I say more. As I'm reading this post on your blog, I can't help but think how much fun it would be to spend a day playing and making art with you !!
ReplyDeletebeautiful flowers and what A GREAT idea thanks for the review
ReplyDeleteAmazing..so want to play gotta source me some suppliers in UK....x
ReplyDeleteTerrific tips & gorgeous projects - thanks Wendy!
ReplyDeleteoooooh shiney, pretty, lovely, gorgeous, divine, textured, yummy... BRILLIANT TECHNIQUES!!!! There, I shouted that last bit so you could hear me above those lightbulb pings hunny ROFL LOVE LOVE LOVE those ideas... THANK YOU for sharing your amazing talent and sooo much inspiration! xxx
ReplyDeletemm mmmmm good! will be trying this for sure!
ReplyDeletewow!!! that looks amazing! im ready to go clicking ur links that take me to where i can BUY all of this and make my own....why do u have to enable me like this???!
ReplyDeleteGenius! Very clever! I like the metal and porcelain looking flowers! Great technique idea!
ReplyDeleteFantabulous flowers!!!!
ReplyDeleteGenius idea, love it and will deffo have to try it...love that look, both with the AI and the gesso/colorwash, very cool!
ReplyDeleteOh wow, these are wonderful ideas, love your flowers, I need that stuff!
ReplyDeleteI am so glad we have you working in the R&D department (Research & Development)!!! That metal flower is just AMAZING and I have to get my hands on some of that metal tape - don't think I've seen it yet??? Good news.... I got my first shipment from SSS with some of your new stamps and now with this great technique I'm really anxious to get started "ARTING!"
ReplyDeleteOH MY! Fabulous.
ReplyDeleteLove it when the lightbulb goes off and you make art!!
ReplyDeleteThis is so cool. Or should I say so HOT! Awesome!
ReplyDeleteThe flowers are beautiful, thanks so much for sharing this great technique. PS - I LOVE alcohol inks! So awesome! =)
ReplyDeleteI love the butters cotter and gesso!!! Alcohol inks are my favorite!!!
ReplyDeleteFlowers are my favorite....metal and cfa flowers will now be my favorite..est!!!! You are so clever!
ReplyDeleteSounds AWESOME WENDY!! I can't wait to see your other idea!! THANKS for sharing and have a FABULOUS DAY!! =)
ReplyDeletetruly amazing, what more can I say,
ReplyDeletelove it!,I am stunned at how cool these flowers are,
Kat
Great tutorial and tips. I now need some metal foil and CFA! Thanks for some great ideas.
ReplyDeleteyou are amazing!!
ReplyDeletei hope someday to take my own time to make art with your art parts!!!
Very cool technique Wendy! Thanks for sharing. Definitely need to get a hold of some CFA and metal tape!
ReplyDeleteOMG! I so was not into the clearly for art, but with the metal foil and embossing... Bad ass!
ReplyDeleteNow we just need you to sell your art parts chipboard in sheets......
What awesome ideas, I have to clean up and organzie tonight, but tomorrow is all play time and I have CFA and Metallic tape. yeah!
ReplyDeleteSimply AMAZING! Thanks Wendy!
ReplyDeleteOh, I love this idea! Can't wait to try it.
ReplyDeleteOkay now I have to get some Cfa too, just got done foul but not played with it yet. Wonderful ideas and clear instructions
ReplyDelete