yesterday while working on another book 6 project, I used embossing 2 different ways & I thought I'd share it here...
since I can't show the real deal yet...
I did some small sample pieces to show you the technique...
grab Ranger's Watermark Resist pad, some clear embossing powder & some of tim's distress stains...
you can also use the Perfect Medium Pad, in place of the watermark resist and achieve the same results...
and you can substitute the distress ink pads for the stains...
I chose to use UTEE for my embossing, since I was using a bold image...
but regular clear embossing powder will work too...
this is more dramatic with a bold image...
stamps will fine details won't show up as well...
but... that might be just what you need for certain projects...
so keep that in mind...
let's start...
BUT...first...
a ***WARNING***
let me just say
that once you use the distress stains on my art parts...
YOU. WILL. BE. ADDICTED...
it's a FACT! I am NOT responsible...
how did I ever live without them?
ok...NOW...let's go...
ink the stamp with the watermark resist & stamp onto a naked (UNINKED) art part...
sprinkle on the embossing powder...
use the heat tool to melt the embossing powder, until the image is completely shiny...
the photo below shows the result...

after the image cooled, I inked over the whole art part with broken china stain to get this end result...
you'll see that the embossing powder allows the natural (kraft) color of the art part to show thru...
for a 2 color effect...
for the next sample, I inked the art part with broken china stain FIRST & dried it...
make sure to dry it...
or the embossing powder will stick everywhere...
then I used the watermark resist on the stamp again, added embossing powder & blasted it with the heat tool, to melt the powder...
I added a second layer of stain over the whole art part...
and wiped the excess stain off the embossed area with a paper towel...
here's the result...
it's more of a tone on tone result...
and the background has more intense color...
because it has 2 layers of stain...
let's make this easier...
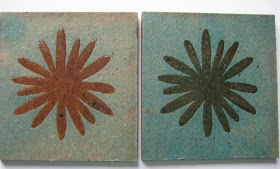
here's a side by side comparison of the 2...
same exact products, but quite different results...
this is why I LOVE INKS...
we have a million options...
and since embossing powder is basically ground up plastic...
I'm sure it's a little more technical than that!
the plastic will resist most things...
even archival ink...
I used olive archival to stamp the text stamp over the art part, then used a paper towel to remove the text from the embossed flower...
so now it looks like the text is behind the flower...
even though it was the last step...
here's a better look...
so think of the possibilities...
stamp with watermark resist over patterned paper...
that will allow the pattern to show thru under the embossed area...
stamp multiple times, using the resist pad, to create a custom background on any card stock color...
the images can be embossed or just left as a watermark, for a more subtle effect...
my favorite color combo???
for the book project I'm working on...
I clear embossed over the naked art part, then added black soot stain over the art part...
the result is an AWESOME kraft embossed (pattern) & black stained art part...
so stinkin' fun & it couldn't be easier...
ok... back to the studio...
gotta
make (MORE) art!
wendy


WOW what a great look - I will have to try this real soon. So many possibilities... going to make art!
ReplyDeleteI love this technique - so easy and so stunning.
ReplyDeleteWow, I love it!
ReplyDeleteOh, this looks like great fun!
ReplyDeleteCool technique .. I like it ! Thanks for sharing Wendy. Have a great day !
ReplyDeleteThank you Wendy. Really neat technique, love the look. Now go and work on more projects for the new book - LOL!
ReplyDeleteElaine Allen
Coolio beans!!! And black and kraft together? Dynamite combo! Off to play....
ReplyDeleteOk...we know you are hiding new art parts behind your back as you show us this technique...you can't fool us. Sneaky but cool. Thank you Wendy! Karen :)
ReplyDeleteI just love the way your mind works. I never think to try these ideas on my own. Thanks for sharing your ideas.
ReplyDeleteGreat technique, Wendy! I liked both variations... can't wait to try this with all kinds of different color inks. Thanks!
ReplyDeleteWay cool!!!! I love the contrast!!!!
ReplyDeleteThat is an amazing technique. Will have to find some time to play. Maybe tomorrow????? Thanks for sharing that with us.
ReplyDeleteBeautiful.... Gonna play with this technique! Can you spill some beans about your NEW stamps coming out next month??
ReplyDeleteMiss ya!
:) Heidi
Very cool!
ReplyDeleteOh wow! I love the results. You were having way too much fun ;)
ReplyDeletetoo cute!
ReplyDeleteThanks for sharing.
Sandra ltb
wow Wendy...this is a GREAT idea...and Im loving the look...dying to play with my art parts...have a whole series lol...but my xmas cards...well..umm...not done!!looking forward to some reveals soon *wink*
ReplyDeleteOMG, I love art parts. They are so awesome to work with. I've said it before and I'll say it again... Ted and Michelle need to sell those babies in BULK, you know, like, so much per pound. lol. And, I can imagine that the black and kraft color would be your fave...lol...
ReplyDeletelove the effect of this...can't wait to see the "real" project!
ReplyDeleteHow many more days must I suffer before I get to see the new stamps, art parts & projects???...imagine this being said in a whiney voice:)