
using NO PLASTER!
the studio looked like a scientific experiment was taking place...
I had an idea...
which was based on the properties of the ingredients below...
they are dye inks, which are OIL based...
and
another dye ink,
but all the distress inks
are WATER based...
because it's white,
keep in mind that the picket fence spray stain
has pigment in the solution which makes it opaque...
so, just like salad dressing,
oil & water don't mix...
this was the basis for the idea...
I *hoped* to take advantage of that
incompatible (when wet ) effect...
I added one last ingredient...
the bottle on the far right is rubbing alcohol...
aka...surgical spirits in the UK...

it went like this...
I swiped the sky blue & hydrangea archival ink pads onto the craft sheet...

then added plenty of rubbing alcohol...
 |
| & mixed the alcohol into the inks with a palette knife... |
then after shaking the picket fence distress spray stain,
I misted the archival ink/alcohol solution with
ONE blast
of the picket fence distress spray stain...
one pump is plenty...
I tried 2...it was too much for a small tag...
but I would use more picket fence
for a larger art journal page or canvas...
***DO NOT MIX this SOLUTION***...

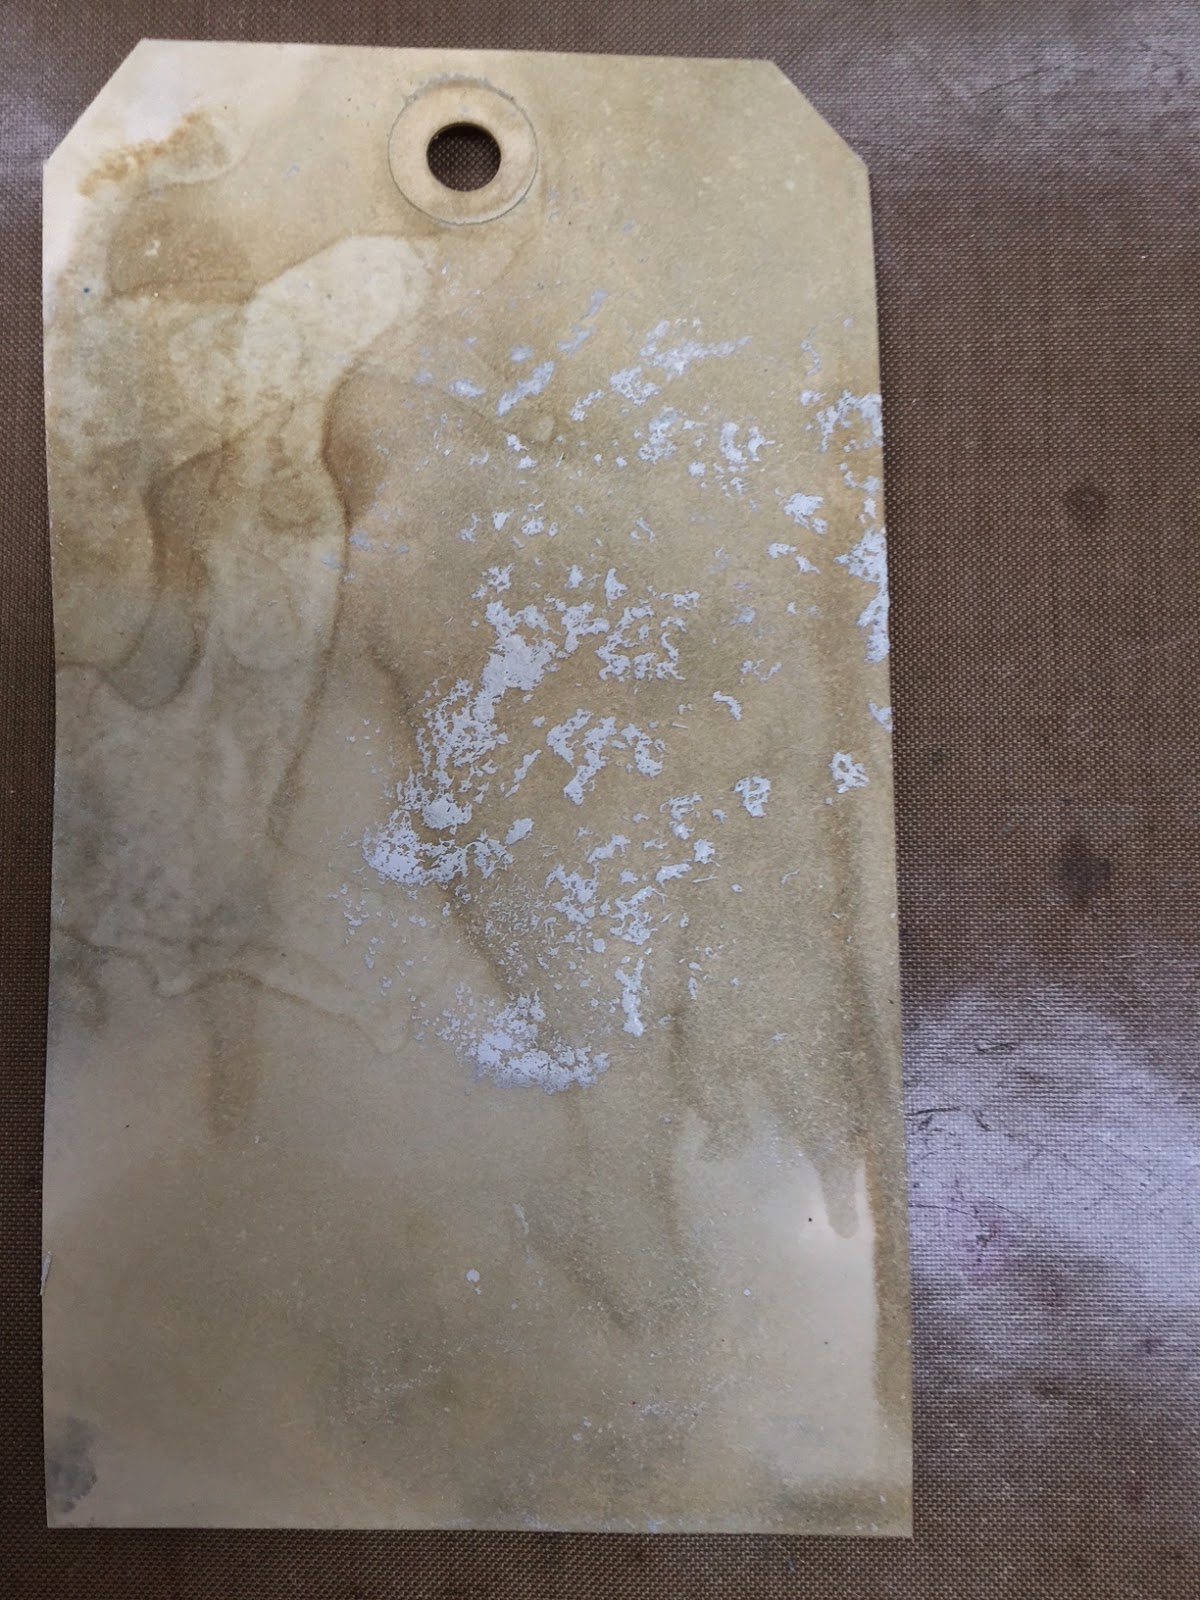
I swiped a manila tag into the inky solution...
the picket fence on top of the archival solution actually looked like curdled sour milk...
here's a wet not yet dry tag...
see those plaster chunks?
this is using tea rose archival ...

now back to the dry sky blue/hydrangea tag we started with...
the picket fence "curdled chunks" dried & have created awesome texture &
they now they look like...
splattered plaster!
you can not get this random cool effect with embossing powders, embossing pastes or texture paste...
it's very random and
much different in appearance...
now this is cool...
before you dry it, you can actually move the chunks or curdles around...
that's pretty fun...
they aren't stuck to the tag until it's dry...
when dry, the chunks are baked into the tag & permanent...
like this...

it was fun to work over that cool background...
I used watering can archival with
the new ruffles border to stamp along the bottom of the tag...

next, I wanted a thin border at the top of the tag...
after inking the ruffles stamp
again with watering can,
I pressed the tag onto the inked ruffles stamp...
I only wanted that small straight trim piece...
you can see that below...

I inked the old wood floor background stamp with tree branch & pressed it over the tag...

then used jet black to stamp the lace border at the top & bottom of the tag...

so far it looked like this...
sort of shabby chic!

I added sky blue, then hydrangea archival to the tag edges...

then gathered twigs to the edges & gathered twigs very lightly over the whole tag...
LOVE LOVE LOVE how this is looking...

now for the cute mat mini pitcher...
I inked the new stripes stamp with
pressed the pitcher onto the inked stamp, then sprinkled on watering can embossing powder...
and heated the powder to melt it...
you can see the embossed mat mini pitcher
sitting on the stamp...

to create the flowers
I glued a sheet of newsprint to a sheet of CFA (clearly for art) with glue n seal...
then stamped the hydrangea SiSi
with jet black 2 times and
cut out one full hydrangea image &
a partial of just the flowers...
the flowers were inked with sky blue & a bit of hydrangea & the leaves were inked with leaf green over all the leaves, then fern green right under the flower, to create the shadow effect...
the SiSi stencil makes this so easy...
it masks off the flower...
I heated the CFA to soften it so I could shape the flowers...

here's the back of the mat mini pitcher...
after the second layer is added to the back, the hydrangea stem slips right in the slot...

is the perfect way to add the flower layers...
and I also like to use the foam to add the flower to the tag...
it adds just the perfect dimension &
the black isn't distracting,
when viewed from the side...

here's the assembled flower...
I like to offset the layers...
it seems to make the flowers more realistic...

next I stamped the sentiment in jet black archival...
and glued my pitcher in place...

then slipped the flower stem into the pitcher...
the adhesive foam holds the hydrangea securely to the tag...

I wanted to add just a tiny bit of bling...
so after shaking the pewter distress stain, I tapped it onto the craft sheet & used
to add dots...
the ball end of the tool makes PERFECT dots...
you can tap the ball end onto the craft sheet into the stain or onto the wet dabber top & dot away...
and this tool is really great for adding rub ons to surfaces...
a MUST HAVE!

I also used the stain to accent the top & bottom of the tag...
I LOVE the mat mini pitcher, the texture & that hydrangea for sure...
I like to use the black Sakura glaze pen
to add dots to the flower centers...

and here's the completed tag...

this was so much fun that I couldn't quit...
I tried several other color combos & now I have some tag bases just waiting for me...
first I tried
tea rose & tree branch with picket fence...

here's the result...
here is the wet tag...
and here's the dry tag...

I just HAD to make another...
this time I tried
watering can & tree branch archival
with picket fence...

that combo made this great background...
so this experiment paid off...
I absolutely love this technique & I LOVE that we have another way to use the supplies we already have, in a completely different way...
it's fun to play & try ideas...
sometimes we just need to remember
that it's only ink & paper...
remember...
it's it's ugly...
it goes in the trash...
and you never tell a soul or blog about it...
haha!
so...
have I inspired you?
are YOU going to try it?
tell me...
what color combo are you thinking about?
***if you've read this far***
how about a giveaway?
does anyone want Megan & the ruffles border?
I have this stamp set, compliments of Ted...
for a lucky commenter...

just
leave a comment...
& Rick will choose a random winner...
I hope you can take time this weekend to have fun and...
make (splattered plaster) art!
wendy
How fun was that!! And beautiful as always. Want to try this one for sure. thanks for always thinking outside the box, Wendy!
ReplyDeleteYou ALWAYS inspire me with your great tips and trix. Will for sure try this one BUT have to get some rubbing alcohol first AND distress spray. I only have the stain.
ReplyDeleteHave a lovely weekend and thanks for the chance to win such an awesome candy/Gunilla
I am off to Whim So Doodle today. Hopefully to get the new Tea Rose ink and Embossing Powder, which I love! I can't wait to try this technique!
ReplyDeleteGreat effect ! It's always good to say "hmmm ... what if ...". Thanks for doing that & sharing the results !
ReplyDeleteCool technique! Will try this as soon as I get some picket fence spray stain. I'm thinking cornflower blue and orange blossom would be a fun combo. Megan and the ruffle border need to come live with me. Thanks for the inspiration.
ReplyDeleteIncredible technique! Love your tags. I'm adding this to my Pinterest board to remind me to give it a try. Thanks for doing the experimenting for us!
ReplyDeleteI just love those backgrounds - they look so cool & the ruffles border made me think of a once grand but now tatty and abandoned Georgian manor house - just need to get hold of some surgical spirits now as I am definitely going to try this!! Thanks so much for experimenting and then sharing :o)
ReplyDeleteLove this idea! I'll definitely give it a try!
ReplyDeleteFabulous technique. Can't wait to give it a try.
ReplyDeleteI love this technique. And cant wait to run it! Tge slot in the back of the watering can is genious!
ReplyDeleteThat's a fab technique I gotta try it! And I'd love a chance to win the stamp set!!
ReplyDeleteThat is so cool! What a great technique. I guess I need to get the spray stains after all...
ReplyDeleteWhat a great idea....just right to kick start the inspiration ;)
ReplyDeleteLove the quotes on the stamp set...just right for making something for the hero in my life :)
xoxo Sioux
This looks like fun! As soon as I clean off my desk (crafting with my grandkids :D) I'll have to give this a try.
ReplyDeleteYou're awesome Wendy! I'm definitely going to give it a go! :D
ReplyDeleteThat is so cool. Great tutorial. I need to try. Thanks a ton Wendy.
ReplyDeleteI LOVE this technique!! Such a cool effect. Can't wait to try it! And I would love to win something ;-)
ReplyDeleteGreat technique - must give it a go. I fancy burnt orange and a green.
ReplyDeleteWhat a great look, and I love the tip of using the sakura glaze pens for the flower centers. I know Iwould be over the moon to have Molly as my new creativity friend!
ReplyDeleteOh wow this looks fun. Seeing that I just had shoulder surgery and attempting to just survive using my left hand is an experience. I better put this technique on the back burner. I can just see my face covered in spray and trying to explain to my hubby what I did.
ReplyDeleteReally like this technique. I want to play but will need to purchase some ink pads and rubbing alcohol. Beautiful outcome. Thank you for sharing.
ReplyDeleteI love this technique! It is so beautiful. Thank you for continuing to teach us new ways to work with products we already have!
ReplyDeleteI love new techniques! This is amazing and I can't wait to play with this.
ReplyDeleteOh Wendy, you never fail to come up with such new and clever ideas! Can't wait to give this a try in lots of colour options. I'm thinking a mix of Orange Blossom, Dandelion and Watering Can will have a look of warm Italian marble... that's my treat sorted after prepping at the weekend! Have a great one. Jenny x
ReplyDeleteWhat a fun technique! Thanks for sharing your experiment with us, I love seeing how products play together in our art!
ReplyDeleteFantastic use of material!!! Thanks!!
ReplyDeleteThis is so cool! Love your tag and can't wait to try the technique.
ReplyDeleteWendy,you have such a unique artful eye which I find very refreshing! I really appreciate your style and talent!
ReplyDeletewhat a great way to use products you already have on hand. it is fun to experiment sometimes you know the old saying: there are no mistakes in stamping just happy accidents!
ReplyDeletestamping sue
http://stampingsueinconnecticut.blogspot.com/
You are amazing. that is so cool!!
ReplyDeleteI like the splattered plaster effect. I also really like your experiments. Thanks. Lisajake128
ReplyDeleteLoved this technique - absolutely must try it if I figure out what rubbing alcohol is in Norway :)
ReplyDeleteOMG, I love this technique. I will for sure try it and thanks again Wendy for sharing such great techniques.
ReplyDeleteWow, what an experiment...you sure inspired me. I need that kind of alcohol. Have to find out how we call it in Dutch ;-)
ReplyDeleteI want to try the colors cornflower and potting soil.
Beautiful gve away...like that lady very much.
That's an awesomely cool technique! I'm sure I'll be trying it out this weekend. Thanks for all the fabulous ideas!
ReplyDeleteFantastic! Love it!
ReplyDeleteGot to try it!
Got to get MESSY!!! lol
Wow! Cool tech! I love the looks of that! Will definitely have to give that a try! The finished tag is awesome!
ReplyDeleteSuch a great technique. Adding to my Pinterest for future inspiration though I'm going to give it a try today
ReplyDeleteAnother WVT!!! I'm going to have to open up anothe notebook, by first one is bursting. Inspired? Yes. The things I have to do FIRST THING this morning will jus have to wait! <3
ReplyDeleteI love this new technique! Thank you so much for sharing. I'm off to give it a try.
ReplyDeleteWhat a funny texture! I'll have to play now... ;) thanks for sharing something new! And I love the stamp set ur giving away!
ReplyDeleteSuch a fun technique!! Thanks Wendy! And Thanks Ted for the giveaway. ;)
ReplyDeleteWhat an amazing effect. Thank you for doing the groundwork, so that we can benefit from your experiment. Will have to go to my table and make something cool. Thanks again.
ReplyDeleteHow cool is that, plaster look with no plaster. And yes, I love that new ruffled stamp. Thank you.
ReplyDeleteOh my stars! This is just the best technique ever!!! And that stamp set is p-e-r-f-e-c-t for the love of your life!! You know, that special day is just around the corner.
ReplyDeleteI need people like you to make me think outside the box. I'll have to buy some distress spray and try this technique.
ReplyDeleteLove this background...have to do a couple cards today and am going to try it! Called a friend to come play and try it too! The house can wait!
ReplyDeleteI can't wait to own the tea rose ink and embossing powder.
ReplyDeleteWhat an awesome technique! My head is swimming with all the possible color combinations for this and I cannot wait to try it. Oh, and the hydrangea SiSi and flower pot are on my "just gotta have it" list. Gorgeous tag, inspired technique and clear instructions. It doesn't get better--thank you!
ReplyDeleteI love the effect, I'm thinking Tea dye/Antique Linen or Tattered Rose Spray Stains with Archival Leaf Green. Megan & her ruffles are more than welcome at mine!
ReplyDeleteI always love to see new uses for my inks and sprays! Great technique for many future projects. Love your products!
ReplyDeleteYou are such an inspiration to give one the incentive to try out different and unusual ideas and methods. Thanks for taking the time to explain it all in such detail so that we can experiment. That stamp set would be awesome to have. Thanks for the chance to win it.
ReplyDeleteAwesome technique! Can't wait to try it with Orange Blossom and Leaf Green...my two favorite colors!
ReplyDeleteLove your technique! Always fun to get inky!
ReplyDeleteThat technique is beyond amazing. This is why I love visiting your site. You are so inventive and have the most amazing tutorials!
ReplyDeleteThat was a great idea and look forward to trying it some day! Yes please, I would love to have Megan she is a perfect and amazing stamp!
ReplyDeleteWOOOOOOOOOOO ... Woman you ROCK !!!
ReplyDeleteThis experiment is AMAZING ... I LOVE the texture... OMG ( gotta try this) ... I don't have new colors BUT I'm gonna try orange blossom and cornflower ... I think they'd be cool... I'm just experimenting right ... you may never know LOL !!! Your tag is over the top fabulous with those stamp techniques... Ummm I NEED Meagan and that border .... Pssst RICK ... over here ... LOL !! Thanks , Wendy I like playing with you!
Oh, Miss Wendy-Girl! I am not leaving my house this weekend! I can feel a full blown obsession setting in! Every little bit of this tag is gorgeous! The smokiness of the background, the texture of the "plaster," the layered stamps, the flower, the vase, and those little black flower centers! Holy Cow! Fabulous!
ReplyDeleteWhat a great background! Can't wait to try it. And I love the rest of the tag. The stamp set is lovely.
ReplyDeleteRick, Please, please pick me. I would love, love, love to have this stamp set. Thank you. You're the best!
ReplyDeleteGreat techniques
ReplyDeleteused to create
your lovely tag!
Carla from Utah
Wendy, Thanks for showing us this new technique. I can't wait to try it. Whatever combination I decide to try it is just a cool effect and I can't wait to see the results. I love Wendy's Art and would love to have this stamp set to try out on some of my newly created tags. Thanks for sharing.
ReplyDeleteOh my gosh, I LOVE this technique!! The effect looks amazing!! I have the Archival Inks but I don't have the Picket Fence spray to try this...I'm ordering some now!! Amazing inspiration as always!! Have a great weekend :)
ReplyDeleteLisa
A Mermaid's Crafts
The splattered plaster technique looks awesome, will try to give that a go this w/e and the ruffles stamp could easily become a favourite :-). Thanks for the chance to win some goodies.
ReplyDeleteSally
This splattered plaster technique looks fun- I hope to try it out this weekekend - those stamps look fab too :) Good luck all x
ReplyDeleteI love that stamp set!!!!
ReplyDeleteVery cool technique. Can't wait to try it out.
Brilliant technique xx love this idea and looks so wonderful ! Xx great stamps too
ReplyDeleteGorgeous would love to try this technique !
ReplyDeleteWhat a great technique for backgrounds! I am completely blown away with the results...it is creative chemistry!
ReplyDeleteMust try this technique. Love anything which gives random results! It always comes as a surprise!!!
ReplyDeleteThis technique is beyond awesome! And I already have everything you used to make it except the new ruffle and wood floor stamps and new Archival ink colors! Make my dreams come true and pick me!
ReplyDeleteLove love this!
ReplyDeleteI'm off to try the "curdling" technique for some Valentine tags! Oh, I'd love a new stamp set!!
ReplyDeleteThis is so gorgeous! I love the texture and fun patterns it makes. I am going to play at it this weekend. The only colors I have on hand, Archival Ink Potting Soil, Fern Green, Jet Black. Spray stain in Antiqued Bronze. Will see how it all comes out! Thanks so much for inspiring!~kim
ReplyDeleteI was taking down my Christmas tree (finally!) but now I just have to go and play with some crafty goodies. I don't have the same goodies, but I do love playing around and discovering fun ways to use mine! I would do some blues, since I am working on a baby boy scrap book for a shower.
ReplyDeleteThat is an amazing effect and I will definitely play around with it too! I think you have a little bit of a mad scientist in you...lol... in a good inky way! I'd LOVE to have the A Passion For Art set... such fun stamps!
ReplyDeleteWhat a cool effect! And Love, love, love the stamp set!
ReplyDeleteWhat a fun technique! Since my name is Megan I feel its in my destiny to win this stamp set :)
ReplyDeleteSuch a great technique. Thank you for sharing. I would make a lot of tags at once and put them away to stamp and embellish later.
ReplyDeleteThe colors - I think I would first try potting soil and orange blossom.
Thank you for the chance to win such a great prize.
This is a must have stamp set for me. Chances of actually winning ???? So is it for sale yet???? Really need it for Valentines.
ReplyDeleteEntire tutorial is wonderful, Wendy. I will need to get that spray stain. In the meantime, I'm going to try the flowers. Helene
creativity often makes messes and art know which ones to keep!
ReplyDeletegreat experiment!
You managed to find yet another game changer in the crafting world!!! You never seize to amaze me and I am sure millions of others....
ReplyDeleteOH WOW!!! I just tried this and LOVE it!!!! Made a couple tags and then went with a whole sheet of cardstock because I had a lot left over and didn't want to waste. Thank you so much for the inspiring new technique!!!
ReplyDeleteLove the technique, it looks so cool. Thanks for sharing.
ReplyDeleteYour technique makes great looking backgrounds, and I think even I, can pull this one off! Thanks Wendy for this idea and for a chance to win this beautiful stamp set!
ReplyDeleteThat is way cool!!!! I'm thinking forget-me-not and leaf green will be my first color combo try. I'd love to win the stamps.... hmmm... how about no bake cookies.. yum!!! LOL
ReplyDeleteLove this technique...what an awesome look! I am totally in love with the ruffled border...coolest stamp ever (and that's not to say I don't love the rest of the set)!
ReplyDeleteWOW........wonderful as always! Great technique, I will try!
ReplyDeleteDebbie
Mmmm....tea rose, leaf green, sky blue, grunge rose stencil, stamp sentiments...and yes... A little bit of blingy foil at some of the edges near the ruffle border. Maybe some lace effects...
ReplyDeleteYou are such a clever girl! Love this technique.
ReplyDeleteOooh, this stamp set with Megan is my favorite one. Thanks for the chance to win it.
Pssst Rick! Pick me ;)
Oh what an elegant tag, I love the colours on the first one particularly and I love how you can move the 'plaster' around - very clever, I really have to try this out now! Thanks so much for the chance to win too. Anne x
ReplyDeleteWow!! Love this technique, and that stamp set is great!! Thanks for the chance to win!!
ReplyDeleteit was a fantastic technique which totally made me want to get the things to do it. so great. thanks.
ReplyDeletesounds like a plan....lets get inky!
ReplyDeleteWOW! I can't wait to try this technique, will it work with other colors of distress stain spray? I guess I'll have to try and see what look it gives, can always go in the trash if I don't like it, right?;)
ReplyDeleteI also love to find new ways to use what I have on hand, thanks for the chance to win something new to experiment with, too.
This comment has been removed by the author.
ReplyDeleteI have some of those products and would love to add the stamp. I'm go8ng to try this technique this weekend.
ReplyDeleteThis comment has been removed by the author.
ReplyDeleteWOW OH WOW!!! You never cease to amaze me! You are the technique queen and the way you experiment with things blows me away. I would never have thought to do this! You ROCK, and I can't wait to try this myself!!! WOW!!!! LOVE Megan too...whoever gets her is LUCKY!!! Thanks Ted and Wendy for being so generous!!!
ReplyDeleteI never would have imagined it would turn out so beautifully at first. Loved seeing the progression, fabulous tag.
ReplyDeleteI would LOVE to win these stamps! What a great giveaway! I really enjoy your techniques. This one looks amazing and is one I will definitely be trying! I'm thinking I may try some blues and greens. And will have to try some pinks and reds too!
ReplyDeleteI can not wait to try this, it looks amazing. I have all your inks and the new ones are on order. Looking forward to playing with them. Gotta run to the store for some rubbing alcohol so I can play. Thank you so much!!!
ReplyDeleteWhat a fabulous technique! I cannot wait to try this. You are incredible! Love that stamp set & would love to win.
ReplyDeleteWhat a great tutorial. I will have to try this, maybe with yellow and blue. Thanks so much.
ReplyDeleteI am so inspired by your new techniques, I can't wait to try it. Thank you for sharing x
ReplyDeleteIt's about to snow on the east coast. I'm headed to my craft room to try your technique out. Maybe red geranium and magenta hue for a valentine themed tag. Love your products!
ReplyDeleteLove this tutorial. I'm leaning toward green/blue and some white or pewter, I think. Wish me luck trying this! Usually my first efforts are dreadful! But I do persevere. Thanks so very much for your ideas which keep us all going!
ReplyDeleteLooks like fun! Your tag is beautiful!
ReplyDeleteI just love it when someone creates a new technique using products I already have. Great tutorial!!!
ReplyDeleteFab, must have a go :)
ReplyDeleteThis is just fabulous - just finished watching you on youtube at CHA and am now in craft room trying out the many different and wondrous things that you showed! Who new metal could be made to look like enamel at home! And now you have topped it off with making plaster at home!!
ReplyDeleteWendy, this is such a great technique. I can't wait to try it. I need to check my supplies to see what I have and jump right in. I need that Meagan set, that ruffle is so beautiful. Thanks for the great tutorial.
ReplyDeleteThis is an awesome technique! Your finished tag is amazing. Thanks for the tutorial, and also for the chance to win the great giveaway.
ReplyDeleteJulia
I love the cottage cheese plaster technique! Down right awesome!
ReplyDeleteThanks Wendy for all the beautiful inspiration! Can't wait to try this cool technique! Thanks for the opportunity to win this beautiful stamp set--love Megan. Bette
ReplyDeleteLove your inspiration. I am looking forward to trying out this technique.
ReplyDeletesuper cool!!!!! I will certainly be trying this with different color combos. Love the shabby chic effect you got on some of the tags!!!
ReplyDeleteThis is a very cool technique. Wendy you are the best! Can't wait to get my scraproom finished so I can try this technique. Thank you for the chance at the stamp set..They are so cute. Thank you too Ted
ReplyDeleteVery cool technique!!! And I must say I would never have purchased the old wood floor background stamp if I didn't see you use it. I love the look of it stamped!!! Keep up the great work!!
ReplyDeleteLove this technique! Can't wait to try it. Love this stamp set. Thank you for sharing!
ReplyDeletePicket Fence Spray Stain has now jumped to the TOP of my shopping list. This technique is outrageous and gorgeous - sheer genius to come up with this idea, Wendy. Brava!
ReplyDeleteWendy,
ReplyDeleteThis technique is amazing. Will it work with other spray stains as well? Have you tried any others? I love it! Thank God for wonderful, artistic people like you!
~Corissa
OMG, this is so amazing. I love it. Can't wait to give it a whirl. AND, yes, I would love to win the giveaway. Thanks for the inspiration.
ReplyDeleteYou think like a chemist! Not that I'm a chemist, but I'm married to one!
ReplyDeleteGreat look and I will most definitely give it a try!
Fabulous technique. Thanks for sharing the instructions and photos (for us visual learners).
Wendy - your experiments turn into dynamic ideas. This is a great technique which I plan on playing with this weekend. Think I might try the orange blossom - amazing textures here I come! Thanks Wendy!
ReplyDeleteYou are the mad scientist! You must have been a fun student to have in class (art or science, of course). I love your out-of-the-box techniques and can't wait to try this one. I love your other alcohol technique and use it often.
ReplyDeleteIf this is even possible, I love an intentional "Happy Accident". Learning to not be so clean when I craft, this looks like a lot of fun and I will be making some tags with this technique. Thank you for putting a circle inside of a square so to speak. I LOVE IT!
ReplyDeleteEverything you released this time is wonderful but my favorite is Meagan!!! Your creativity is so incredibly inspiring!!! Everything you have made, including the painting using Dina's paints are beyond beautiful!!! Rick, besides picking me, will you please talk your lovely wife into coming back to Boiling Springs, NC? :-) We learned so much when she was here and had the BEST time. And please come, too. Heard so much about you; we would love to meet you!
ReplyDeleteI love the new technique and will definitely be giving it a try.I love the stamp set as well.
ReplyDeleteGorgeous tag, love your plaster technique. Can't wait to give that a try. Thanks for the chance to win. Always love seeing all of your pretty creations.
ReplyDeleteI cannot wait to try this technique. Your tag is beautiful.
ReplyDeleteThis is what art is all about...the ability to think what if....
ReplyDeleteWhat a beautiful finish you created. I can't wait to try it myself. Thanks for a chance to win the stamp set in addition to sharing your terrific ART!
thanks for all the tips - love this technique will be trying it out soon ... maybe this weekend!
ReplyDeleteSandra ltb
Love, love, love this technique. Can't wait to give it a try!
ReplyDeleteThanks for sharing all your amazing tips and the great inspiration with all your projects!!!
ReplyDeleteLove all your work and ideas, but this one is out of this world. So impressed I am posting for the first time. Thanks so much -- you are an inspiration!
ReplyDeleteLove this technique Wendy! I'm going to try it out tomorrow!!!
ReplyDeleteLove it! Going to try right away!
ReplyDeletei love all your archival ink colors so I'm going to try a bunch of combos. What a cool effect. Thanks for sharing your genius.
ReplyDelete"Perfect. Just the way you are".
ReplyDeleteMy husband has told me this so many times.....this just jumped off the page at me. Thanks, Wendy. Love the new stamps and techniques. Love your detailed, yet easy to understand instructions with clear, close-up pictures to match. Bravo!!
Love the simplicity of this technique and the amazing result. The ruffle stamp is a must-have! So hmmm. What colours am I thinking? Watering can and cornflower for the background.
ReplyDeleteGoing to try this first thing tomorrow am!!
ReplyDeleteLove the technique. It put a huge amount of ideas in my head to try.
ReplyDeleteOh my God Wendy! That is so cool! I just tried it and I am totally flabbergasted. Discombobulated, supercalifragilisticexpialidocious, I'm speechless I just can't come up with enough adjectives. This is incredible.I used French ultramarine and hydrangea and it created the most incredible shade of blue with the picket friends sprayed on it and I want this on every wall in my house. I can't wait to try other colors and color combinations. I don't think I'll ever get tired of figuring out color combinations to try! You are the bomb!matter-of-fact, I don't think I'm going to sleep tonight. It's midnight in Connecticut, and I don't think I'm going to go to sleep I'm so excited. Oh my gosh.
ReplyDeleteI adore this stamp set and would feel very privileged to win your generous give away. I'm loving the the new technique and will try it tomorrow.
ReplyDeleteThank you so much for the opportunity xxx
What a fun idea! I'll try it! your tutorials are Always inspirational! The stamps are so beautiful !!!!!!!! Thanks for the chance! finger crossed! BArbarayaya
ReplyDeleteWow !! what an awesome technique ..Loved it ..Thanks for sharing this with us ..The tag looks so beautiful !!
ReplyDeleteYou have an amazing mind! I never would have thought like this. Lovely Tags!
ReplyDeleteOooh how beautiful; you are really so inspirational Wendy! I just love seeing the results of your 'experiments'....so beautiful especially the attention to detail....the hydrangea little centre dots & the effect of offsetting the flowers....& & the lovely little glossy pitcher just exquisite! Thank you.
ReplyDeleteYou are absolutely brilliant! I truly love this idea!
ReplyDeleteI am a total newbie to stamping but I'm so inspired by your work!!!! I can't wait to try these techniques. Thank you!!!
ReplyDeleteLove it...I love the chunky look and the stamps are awesome!!!
ReplyDeleteThat is such a cool effect, the ironing is going to have to wait another day - again!
ReplyDeleteHi
ReplyDeleteYep I always read to the end of your very inspirational and clever blog posts. I always learn so much and just love giving your techniques a go. Thank you for all your great ideas and inspiration x
That is awesome!! I love your tags and I will definitely be giving this a try. I don't have the spray but time for some good old experimenting. I live in the boonies up here so making do is what I do. LOL! I would also be beyond thrilled to make a nice new home for that gorgeous stamp set too!
ReplyDeleteThis technique is absolutely genius Wendy, just love the plaster effect. Must try this, am thinking of pink and purple as I'm a bright colour person. Would love to give Megan a home and I adore the border stamp, it's so delicate looking.
ReplyDeleteYour techniques are fab and you have taught me to have a go and experiment, I now have some tags cut and will just play and see what happens, thank you x
ReplyDeleteI love the tea rose and tree branch tag colors. This is going to be fun to try. Think I am going to have to buy more ink. Your tag is beautiful. Love the colors and idea!!!
ReplyDeleteI love this technique and the results are great. I'm thinking of having a look at my stash and seeing if I have violet and yellow dye inks to try with the picket fence.
ReplyDeleteAt least I'll have fun experimenting.
WOW Wendy... this technique is awesome and I really appreciate you sharing this because I have tons of inky supplies but never know what to do with any of them. I'm one of those who struggle with what to do. Your finished tag is absolutely DIVINE! I LOVE it! And I really like how the other tags came out after trying other inks. Just beautiful! Thanks so much for your creativity and the inspiration!
ReplyDeleteHugs,
Jo
Joann6274@gmail.com
I can't wait to try this in my art journal and make a few tags.
ReplyDeleteWhat a fun background and love the ruffle and lace border.
Kandi
Thank you for sharing the best technique I have seen in years. I know how I'm spending my weekend. YOU ARE AMAZING...
ReplyDeleteWhat a great technique! I can't wait to try the plaster effect. Thank you for the chance to win the stamp set. Love your art!
ReplyDeleteThank you 😀😀😀😀 love this techniqe, its so FUN 😍😍👍👍
ReplyDeleteI LOVE this technique!! It is so awesome!!!! I am going to try it today....and as for the ruffle stamp? I would LOVE to win that!!!! Thanks for the chance.
ReplyDeleteAmazing technique. Must be that chemistry you took years ago. As I was watching the tag come together I just knew it was going to be amazing. Thanks for a new play thing!
ReplyDeleteYou have the best ideas, Wendy! Don't know how you think them up but I love them. Keep up the good work. Now I have to go and try this!
ReplyDeleteWho would ever think that spraying inks on a mat, then alcohol, then swipe the paper through, what looks like a complete mess, would turn out so fantastic. Great ideas flow through your brain and down to your fingertips! I really like this technique Wendy and thanks for sharing.
ReplyDeleteVictoria, BC
Canada
Awesome! You make it look sooo easy!
ReplyDeleteI love the tag, but especially before stamping, etc. what a great background. Would like to try it using pen over it instead of stamping. It would make a great journaling tag.
ReplyDeleteLooks like fun, and the finished results are beautiful. I think I need to try it!
ReplyDeleteI just love it when new ideas are born and yours is a winner!
ReplyDelete*thud* this is AWESOME! Can I come and sit next to you and maybe just touch your arm for a few hours, I mean seconds, then maybe some of your brilliance will soak through into me? Stalkerish? Um... yesh! LOVE this Wendy.. you ROCK!!!
ReplyDeleteWendy this is, as usual , very pretty. Love that you went against the grain to create a new texture tech. The stamps are simply gorgeous & especially the way you used them. Love love the color combos. Going to have to try yours first, then I'll be brave & try ny own. Also... Would love to win these awesome stamps
ReplyDeleteFun technique with great results. The color combos you tried look great on the tags. Love those big Hydrangeas and the cute little pitcher. Thanks for sharing these new tips with us.
ReplyDeleteWonderful results, those combinations make beautiful backgrounds and I love the new stamps with watering can.Thank you for the opportunity to win the stamps I am keeping my fingers crossed x
ReplyDeleteLove this new technique and finished tag, I will be trying this real soon. I think not only will I try our color combos but I would like to try Watering Can and Cornflower Blue together. Thanks so much for sharing and a chance to win your gorgeous new stamp with Megan!! She is gorgeous !!!
ReplyDeleteThat is one cool technique & the finished tag is gorgeous.
ReplyDeleteOh my... LOVE this tutorial and am going to give it a try! The colour combinations are so lovely and those new stamps look fabulous!
ReplyDeleteThe end result is beautiful Wendy!
I'm gonna try this technique right now! So glad you're giving away this set ... I wanted it, but I could only pre-order so much you know! haha C'mon Rick!
ReplyDeleteSo so gorgeous, thank you for sharing.
ReplyDeletewow!! this looks like such a cool technique! I do want to try it. =) thank you for the chance to win too.
ReplyDeleteWendy, you are such an inspiration! I love your ART! Thank you for this opportunity to make my ART!!
ReplyDeleteWhat a great experiment!!! I love the texture you achieved! I'm still slowly adding your archival inks but might give this a try once I have some good color conmbos.
ReplyDeletewhat great result! i can't leave a long comment because in my excitement I have to go and try this out too! thank you for sharing!
ReplyDeleteI wish I could get inside your head during one of your creative play sessions, Wendy. You are such inspiration to so many people!
ReplyDeleteI would like to see what Tea Rose and Leaf Green or Tea Rose and Fern Green look like with the picket fence. I ran out of the picket fence spray, so it'll be a little while before I can try it. And, I am now in love with your ruffled border stamp. Gotta have it!!!
Love this!! Always love techniques with supplies I already have! Thanks, Wendy!!!!
ReplyDeleteMandy Earnhardt
Yes, you have inspired me to try this technique! Thanks for sharing your creativity!
ReplyDeleteJust found your page and Love,love,love your tags! I will definetly be checking back. Would love to win your giveaway.
ReplyDeleteLynn from Kansas
WOW, Wendy!! That does look like a rustic plaster! That's amazing!! I love learning new background techniques!! Can't wait to try this one out!! XOXO-Shari
ReplyDeleteWow great tutorial I'm really gonna I give this a go. Love the finished product too. You really do think outside of the box which is very inspiring
ReplyDeleteGreat ideas - love the way you did the flowers - reminds me a bit of doing paper tole - definitely adds more dimension and they don't look just layered.
ReplyDeleteSabine
Oh Wendy I love your plaster technique!! Fantastic look!
ReplyDeleteGeeeeeorgeous. I love that ruffles stamp. That would be awesome to use on some square shrines to make curtains for a stage piece. I'd love to win it but if I don't I'm gonna have to start saving my pennies for that set, and Megan is just super Hot.
ReplyDeleteyes i will try that! Great background idea. Let's play...:-)
ReplyDeleteI'm looking forward to giving this a try. Thanks for sharing these ingredients and wonderful technique and how to do this.
ReplyDeleteGorgeous!!
I love this technique Wendy! Looks like soft clouds floating in the background and your yags are so pretty :-) Thanks for the chance to win
ReplyDeleteThe technique is marvelous. i don't have any of the sprays yet but I definitely want to get it and try! I need more archival colors too! Love this idea!
ReplyDeleteLove the splattered plaster technique....and of course your stamps as well!!!
ReplyDeleteWendy you always do come up with such amazing techniques to try. SPLATTERED PLASTER.....lol... Love that words and the technique. Gosh it looks awesome ! Only "problem" is that I dont have the white Picket Fence distress stain spray ( yet ). But seems as if I NEED it ASAP....lol.. This look you achieved is looking so different yet exciting. NEED to try that.
ReplyDeleteThanks for the give-away. Would love to win allthough I cant mention a fave color combo...
Hugs from Monica... Spain