and more...
one of the most popular stencils from the latest release is this borders stencil...
it's a great basic "go to" stencil with lots of options...
so, if you already have it...
I thought I'd share several ways to use just one portion of it...
today, I'll focus on the square-ish...
"diamond-ish" pattern on the right...
line up the stencil at the bottom of a tag...
ink & you get this...
I used cornflower blue...
now, reposition the stencil to act as a mask & cover up the stenciled pattern...
ink with another color...
to create this multi colored border...
this is leaf green archival...
now reposition the stencil again to add another row of color...
you can keep repeating this to create a full custom multicolored background...
and it's quick & E A S Y!
use 2 colors...
or a different color for each row...
here's an example...
this is the back of my stencil binder...
have a multicolored border at the bottom & a single coordinating stenciled row at the top...
same story here...
PLUS...
with the stencil in place, you can easily stamp or stencil thru the stencil to add a pattern...
that's the little polka dots you see...
stamped with the stencil in place,
on only one of the rows...
the polka dots were added thru
the coneflower stencil the same way,
to change up the flower petals...
same thing here...
that's the new rose SiSi...
combined with the mini hosta leaves...
it's also fun to stencil one row at the bottom of a tag, then follow the lines & cut the tag to have a zig zag bottom...
like this...
and here's another way to use it...
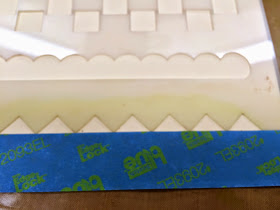
mask off half of the diamonds...
I used painters tape across the top portion of the stencil...
here's the stencil on a tag...
ink thru it...
and TADA...
because only half the stencil got inked...
now it's a banner!
so...
one basic stencil can be used lots of ways...
here's another...
you can add embossing powder and emboss just one select row, then ink the other rows...
that's a fun effect too!
think about the possibilities when you...
make art!
wendy
ps...
I'm off to work on a fun blog post for Friday...
see you then!


O WOW this is awesome. How would have thought to use one stencil in so many ways. Your mind is awesome and thanks for sharing. Now I need to buy that stencil. LOL
ReplyDeleteI've got so many ideas rolling through my brain now. Gorgeous makes!
ReplyDeleteGreat stencil tips Wendy!
ReplyDeleteFabulous ideas, Wendy. Thanks for inspiration
ReplyDeleteWonderful tips! Thank you.
ReplyDeletevery cool Wendy...TFS!
ReplyDeleteLove the ideas you are featuring today, love how your mind works too! Anne x
ReplyDeleteI am inspired! Thanks!
ReplyDeleteThanks for the great ideas!
ReplyDeleteOoow, yeah, sure need that stencil!!!
ReplyDeleteSuch wonderful information!!!
ReplyDeleteSure hope Amy has plenty for Saturday!
ReplyDeletegreat tips, love the diamonds, they look fab!!
ReplyDeleteOh wow, all are gorgeous!! What a creative way to use the stencils!! Thanks for the inspiration!! Have a great day :)
ReplyDeleteLisa
A Mermaid's Crafts
It all looks fantastic!!
ReplyDeleteI love these ideas, thanks so much
ReplyDeleteFabulous ideas! I now need this stencil! xxx
ReplyDeleteLOVE this stencil and love the multi colored line up! Gorgeous projects too!
ReplyDeleteGreat ideas Wendy! I love when you show us different ways to get the most out of our stuff!
ReplyDeleteI love every one of these ideas, thank you.
ReplyDeleteI don't normally buy border anything but this stencil has some possiblities. thanks for sharing.
ReplyDeletestamping sue
http://stampingsueinconnecticut.blogspot.com/
what stamp is it that the saying came from that is on the middle completed tag...the coneflower stencil one? It says "accept what is..." I love it and need to embrace it! Wasn't sure "who" put it out...thanx
ReplyDeleteSo, SO pleased to see these BEAUTIFUL new colours Wendy! They are real MUST HAVES and will be perfect for all those floral stamps/stencils. Jenny x
ReplyDelete