here's how I got started...

here's how I got started...
a 20 minute podcast by Crazy BeYOUtiful
Showing posts with label Pink Persimmon. Show all posts

Saturday, November 26, 2011

happy Saturday & happy holidays!

here's Lisa's dapper dude project, in full...

just in time to say...

happy holidays...


this was another very fun piece to make...

the base that you can barely see is a large creative cover...
it's peeking out from under the scallops...

I added the square art parts base & frame to the center & a large art parts scallop to each side...

it sort of reminds me of a window with shutters...

it's very dimensional & stands alone quite nicely...

other art parts used are the small truck, the lamp post & the picket fence...

I used grungeboard to die cut tim's large pine tree
as always...in love with minis...

they were inked with peeled paint distress stain, then shaded with forest moss & a bit of walnut stain...

I like mixing art parts, grunge & CFA...
I think the different thicknesses of materials add interest...

the large square frame was randomly painted with the black paint dabber & then inked with brushed corduroy & walnut stain...

I used jet black archival to stamp over the entire frame with this medicine label stamp...
then added a bit of gold, with the paint dabber to the edges of the frame...

I used Glue N Seal to add some crowded attic paper to my Clearly for Art...

then stamped the dude with jet black and inked him with the new festive berries distress ink...
it's an awesome color & I see it's ON SALE!!!

by stamping the dude on CFA, I could heat him & shape him to make him rounded & very dimensional...
and even though he is paper, now he's very sturdy...

I stamped an extra collar & pocket to add more layers...
small details, but they do add to the finished piece...

the white cuffs and shirt were accented

Lisa's bird is also stamped on CFA covered with paper & inked with broken china...

again, this allowed me to shape the wings & tail feathers
and not worry about the pieces being damaged or broken...

the paper background in the square frame is also from the crowded attic paper stash...

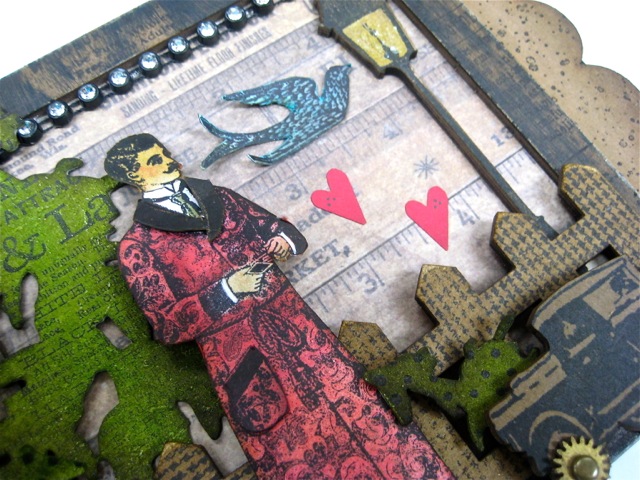
here's a better look @ the dude...


hmmm...

what else did I forget?

the scallop art parts are inked with brushed corduroy distress stain & stamped with the spatter stamp...

the fence is stamped with the houndstooth, using jet black...

the tiny bit of shimmer on the lamp post is rock candy distress stickles...

the rhinestone trim @ the top is a purchase from my recent teaching weekend @ Queen's Ink...
not sure who makes it, but I thought it was pretty cool...

HUGE CONGRATS to Lisa & Pink Persimmon...
wishing you tons of success...

ok...

gotta run...
if I seem rushed...I am...

my NEW STAMPS arrived yesterday & I'm happy to report that each & every one has met the jet black archival ink pad...

and the stamps with the coordinating art parts have all been test driven & are totally flipping cool...

I am seriously IN LOVE with this new release!

now I'm headed to the studio...

I GOTTA...

make art!
wendy
ps...go BEARS!

Thursday, November 24, 2011

Happy Thanksgiving & the dapper dude

HAPPY THANKSGIVING!!!

today & EVERY DAY...

I'm especially thankful for my blog friends,
my BFF's (we texted yesterday, so you all know who you are),
my family and my business associates who have also become great friends...

I LOVE you all...

I always feel bad for turkeys on this day...
so this makes me laugh...


since my brother is soooo kind to us
& invited us to his home
& said I don't have to bring anything hard...
lol...
I seriously LOVE HIM!

I had time to play a bit last night...

I wanted to surprise Lisa with another project, using her new stamps...


I'm LOVING how well our things blend...

Lisa's stamps (on CFA), my art parts & stamps...

plus
tim's distress stickles, crowded attic papers,
grungeboard & Sizzix dies...

and of course it's all tied together with Ranger's ink...

here's a peek...


that yummy red is the

LOVE LOVE LOVE it LOTS!

ok...gotta run...

Rick & I both wish you a day filled with family, friends & great chow...
especially pie...

I'm happy to know that pie has no calories on holidays!
I read it on the net...
therefore, it MUST be true!

CHEERS...

tomorrow I'll

make art!
wendy
ps with my new stamps & art parts...
the art parts are here & the stamps arrive tomorrow!
yippee!

Tuesday, November 22, 2011

a surprise for Lisa...

late yesterday afternoon, I got Lisa's new stamps in the mail...


I immediately wanted to text her to tell her that I got them & LOVED them, but then thought I'd just make a little something & surprise her...

so this morning, on my coffee break,
I made her this ATC...


sorry...no step out photos...

but here's a quick review of how it's made...

I covered an ART PARTS ATC with a scrap of tim's crowded attic paper...

the paper was originally off white-ish...
I inked the paper with weathered wood distress stain, dried it, then added shading to the edges with brushed corduroy & walnut stain, using the blending tool...

I also used the gold paint dabber lightly around the ATC edge...
a tiny simple detail...that I LOVE...

using jet black archival, I stamped the entire stamp on the ATC...

then I stamped it the second time on another crowded attic scrap, but this time I cut out just the corset & the cherub to use...

I used a Cut N Dry nib with fired brick to add color to the back trim portion of the corset...

and a bit of brushed corduroy to the back corset section & the cherubs face...

and I also used the nib with fired brick to add a bit of blush to the face...

and a nib to add peeled paint to the wings...

& glued it over the corresponding section on the ATC...

then I adhered another scrap of paper to Clearly For Art (CFA), with Glue N Seal...
& stamped the image for the 3rd time, again with jet black...

I cut out just the front part of the corset this time...

I inked the corset with brushed corduroy, used the nib again to add fired brick to the trim...

I heated the CFA to shape it & make it dimensional, then glued it over the corresponding portion of the stamp...
with a grunge scrap under it for a good gluing surface...

the left over paper/CFA scrap was used to make the really tiny bow under the cherubs chin & it's attached with a mini fastener...

I gently RIPPED a tiny bit of greens from a family room decor piece...
no one will ever notice it's gone!

& glued that between the corset layers...

I used the black Sakura Glaze pen to add dots to the trim & on either side of the corset...

I LOVE these pens!
it's so MUCH easier to make tiny raised dots, than to glue a million mini rhinestones!

trust me!

the final detail is 2 snaps glued to the corners...
tim discontinued these without consulting me...can you imagine?
I'm seriously considering a write-in campaign for a re-release...

here's a look @ the dimension from the molded CFA...

it's a nice sturdy ATC now!


Lisa...I LOVE your stamps & had a blast surprising you!
so glad you liked it!

in other breaking news...
28 pounds of brand new ART PARTS arrived today!

OMG...way cuter than I expected...it's like Christmas here!

I'm out of my mind excited & DYING to get the stamps that coordinate with them so that I can...

make art!
wendy