here's how I got started...

here's how I got started...
a 20 minute podcast by Crazy BeYOUtiful

Thursday, December 29, 2011

goodbye 2011...

I was sort of sad when Christmas was over...
all that prep & anticipation...
over ...
in what seemed to be a flash...

it was a great holiday with family & friends...

and we did add some memories to our hearts...
I hope you did too...

I got happier when I realized that with Christmas over, we are getting SO CLOSE to 2012...

I am soooo looking forward to 2012!

and the first EXCITING event...
CHA...

prep here is in "full speed ahead" mode...
lots of projects...
lots of deadlines...
lots of private peeks & meetings...
lots of "making art" & lots of fun...

here's a very small peek @ my new line of embellishments with blossom bucket...

the line is called...
embellish your art...

the packaging will look like this...

unfortunately, I had to chop off the product that is attached to this card...
sorry...

card top...

insert product photo here! lol...


card bottom...


these are resin products, all sized to work perfectly with art parts & my stamps...

and with a BILLION other things too...

I have had so much fun making samples with them...

I'm expecting peeks to start in less than 2 weeks...
so not a long wait @ all...
YIPPEE!

in addition to the resin embellishments, there will be a few other *things* that I've been wanting/needing...

believe me...

just as soon as I get the GO AHEAD...
I will be sharing them here...

I am over the moon excited to share & to hear your thoughts...

when I talked about working on new stamps, back in October, I got quite a few suggestions for stamps & some questions too....

I pulled them out of the file...
because I NEEDED something to blog about...

here we go...

question #1. I collect cat & dog stamps. please tell me that you'll consider designing some...

ME...NOPE SORRY...you won't be happy!

question #2. you didn't make flower stamps this time & I want you to know that I/we need more...

ME...you WILL be happy! I LOVE flowers too!

question #3. will you consider more stuff for men please

ME...you WILL be happy!

question #4. more large backgrounds too

ME...you WILL be happy

question #4. how about a porpoise stamp & some aspen trees?

ME...you will NOT be happy!

question #5. make us lots more art parts with coordinating stamps

ME...you WILL be VERY happy...

question #6. are you doing another book for those of us who don't have classes in our area?

ME...you WILL be happy...
and here's a little scoop...

book #6 is a whole new LARGE size & format...

LARGER PHOTOS & LARGER TEXT TOO...
change is good!

question #7. I'm hoping for more large art part frame type pieces for gift giving

ME...you WILL be happy!

question #8. loved the kit idea. any hope of getting them monthly...

ME...YIKES...I gotta sleep sometime...
BUT...
I *think* you'll be happy with another 1 or 2...
coming soon...
stay tuned...

question #9. give us a little nugget. we won't tell HONEST...

ME...HMMM...ok...

this time I did lots of fun/humorous sayings & images too...

remember...
what happens on the blog...stays on the blog!

that's it for today!

with all this talk about new art stuff...
I'm excited to get into the studio to...

make art!
wendy

Sunday, December 25, 2011

MERRY CHRISTMAS!

from both of us...

to ALL of you...

we send you our wishes for the best Christmas ever.

may the spirit of this day stay in your heart each & every day of the coming year.

I hope you can enjoy the day with those you love.
we are...

and...
HAPPY BIRTHDAY to THE BEST HUBBY EVER!

today we'll eat cake...

tomorrow we'll...

make art!
wendy & Rick too...

Friday, December 16, 2011

faux crazed porcelaine...

a few weeks ago,
I showed how Ranger's Glue N Seal
could be used with tim's
to create this cool vintage look on glass...

the post is here...


here's another fun & EASY effect, using the same products...
this time it creates a faux vintage porcelain surface...

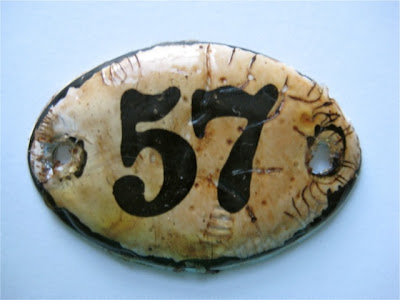
I started with this metal plaquette, which was too stark for the art I'm working on...

so...I applied a medium coat of matte Glue N Seal ...
then let that dry...


then I painted on a medium/heavy coat of rock candy crackle paint & let that dry...


when the paint had completely dried & cracked,
I rubbed the coffee archival ink pad right over the paint to accent the cracks...
they are barely visible until you add the coffee ink...

I just wiped off the excess with a paper towel & dried it with the heat tool to set the ink...


and the finished plaquette now looks like this...

it's very vintage...
with those little crazes resembling vintage porcelain...


it will be added to a CHA project...

you'll see it in January...

and speaking of CHA...

I'm expecting my new line of Blossom Bucket embellishments to arrive today or tomorrow...

YIPPEE!

so if you hear about an earthquake in Illinois...
don't be alarmed...
it's just me jumping up & down...

I contemplated sitting out on the driveway to wait...
but it's mighty cold out there...

all the projects are finished for book #6 & the instructions are completed too...
YIPPEE...
check that off the to-do list...

the projects will all be sent today so that the photographs can be taken for the book & the insert that's included in each stamp set...

and last but not least...

from the bottom of my heart...

A MILLION THANKS
for all the birthday tweets, Facebook posts, cards, gifts & emails...
you made my day!

I hope you know that
I SINCERELY APPRECIATE
YOUR KINDNESS & FRIENDSHIP!

happy holidays everyone...
I hope you have a great weekend...

the LAST before Christmas...
YIKES!!!

ok...back to the studio...

gotta

make (more CHA ) ART!
wendy

Monday, December 12, 2011

do you see what I see?

I popped into JoAnn's yesterday to pick up some different colors of thread for my sewing machine...

I ALWAYS use black...
why I *thought* I NEEDED other colors is beyond me...
but now I have them...
just in case...

some days I wonder about me...
no doubt Rick does too...

anyway...

while quickly zipping thru the store...
a few things caught my eye...


$1.00 paper mache cone
$1.00 mini (like 3 inch) kraft colored book
$1.00 mini child wood hanger
wrought iron holder with glass $2.99
shiny metal mini colander (Christmas ornament)
$3.99 @ 60%off = $1.60
shiny metal mini pitcher (Christmas ornament)
$4.99 @ 60% off = $2.00

TOTAL...less than $10.00

but...

INSPIRATION
FOR ART =
PRICELESS!

if you have a JoAnn's in your area...
I thought I'd pass this *scoop* along...
so you can be ready...
& get the goods before they're gone...

the Christmas stuff was really picked over...

stay tuned...

I'll be using these things to...

make art!
wendy
ps...what do YOU see in these items???

Thursday, December 8, 2011

stained watermark resist play...

yesterday while working on another book 6 project, I used embossing 2 different ways & I thought I'd share it here...

since I can't show the real deal yet...
I did some small sample pieces to show you the technique...

grab Ranger's Watermark Resist pad, some clear embossing powder & some of tim's distress stains...

you can also use the Perfect Medium Pad, in place of the watermark resist and achieve the same results...

and you can substitute the distress ink pads for the stains...

I chose to use UTEE for my embossing, since I was using a bold image...
but regular clear embossing powder will work too...

this is more dramatic with a bold image...
stamps will fine details won't show up as well...

but... that might be just what you need for certain projects...
so keep that in mind...

let's start...

BUT...first...

a ***WARNING***

let me just say
that once you use the distress stains on my art parts...

YOU. WILL. BE. ADDICTED...
it's a FACT! I am NOT responsible...
how did I ever live without them?

ok...NOW...let's go...

ink the stamp with the watermark resist & stamp onto a naked (UNINKED) art part...

sprinkle on the embossing powder...

use the heat tool to melt the embossing powder, until the image is completely shiny...

the photo below shows the result...


after the image cooled, I inked over the whole art part with broken china stain to get this end result...

you'll see that the embossing powder allows the natural (kraft) color of the art part to show thru...
for a 2 color effect...


for the next sample, I inked the art part with broken china stain FIRST & dried it...

make sure to dry it...
or the embossing powder will stick everywhere...

then I used the watermark resist on the stamp again, added embossing powder & blasted it with the heat tool, to melt the powder...

I added a second layer of stain over the whole art part...
and wiped the excess stain off the embossed area with a paper towel...

here's the result...
it's more of a tone on tone result...
and the background has more intense color...
because it has 2 layers of stain...


let's make this easier...
here's a side by side comparison of the 2...

same exact products, but quite different results...

this is why I LOVE INKS...
we have a million options...


and since embossing powder is basically ground up plastic...
I'm sure it's a little more technical than that!

the plastic will resist most things...
even archival ink...

I used olive archival to stamp the text stamp over the art part, then used a paper towel to remove the text from the embossed flower...


so now it looks like the text is behind the flower...
even though it was the last step...

here's a better look...

so think of the possibilities...

stamp with watermark resist over patterned paper...
that will allow the pattern to show thru under the embossed area...

stamp multiple times, using the resist pad, to create a custom background on any card stock color...

the images can be embossed or just left as a watermark, for a more subtle effect...

my favorite color combo???

for the book project I'm working on...
I clear embossed over the naked art part, then added black soot stain over the art part...

the result is an AWESOME kraft embossed (pattern) & black stained art part...

so stinkin' fun & it couldn't be easier...

ok... back to the studio...

gotta
make (MORE) art!
wendy

Monday, December 5, 2011

please join me...*edited*

in sending HUGE CONGRATS & GOOD WISHES...


If you're wondering what this is all about...

TOMORROW, DECEMBER 6, Hels will make her debut on
Create & Craft TV in the UK...

it's channel 671 on Sky & 36 on Freeview...
there are rumors that it's on line too...

if anyone finds it on line, please send me the info!
I'd love to see it...

***EDITED*** here's the internet link...


tomorrow the episodes are @ 2pm & 7pm...

for those of us in the midwest, that's 8AM...
for the first episode

for NY friends 9AM &

California friends...6AM

new episodes will be shown on December 17th @ 12pm & 4pm...

and Hels will be demoing...
studio 490 products!

I'm totally thrilled & can not wait to see her creations!

you can read her blog announcement here...
so...
please take a second to shoot her an email & wish her good luck on her new adventure...

next...

this was perfect timing...
I got an email this morning, wondering if rock candy distress crackle paint will work on art parts...

why...yes it does...
we use it on my art parts bottle in classes...

and...

I just finished this NEW ART PART this morning...
it looks so cool...

sorry I had to chop off the rest of the art part...

trust me...it's a good one!

if you are ***NEEDING*** art parts or stamps...

they are already ON SALE @ eclecticPaperie...

and with this code

madabout12

you get an ADDITIONAL 15% off the sale prices!
it's a good time to stock up on the *essentials*...

ok...it's back to the studio for me...

I'll get this baby all glued & assembled, then start project #9...

wait 'til you see #7...
it's the MOST FUNN-EST *thing*...
E.V.E.R!

it's frigid, cloudy & UGLY here...

a perfect day to

make art!
wendy
ps...the BEARS suck big time

Friday, December 2, 2011

just what I like...

a nice (intentionally) blurry photo...
to show you what's happening @ studio 490...

this is what the dining room table looks like...
LOADED with new art parts!

I keep "hinting" that we need to "add on" to the studio...
he thinks I'm kidding...
I'm NOT!


this week I finished 6 projects for book #6...

and the instructions are written too!~
yippee...

I LOVE to ...
make art...

writing the instructions...not so much!

I just realized that good sneak peeks start mid January-ish...
which is only 6 weeks away!

I. CAN. NOT. WAIT. TO. SHOW. YOU.

when creating the projects & working with the new art parts,
I found myself wishing for a smaller Cut N Dry nib...

I have a discovery...

this is my new favorite tool...


the replacement nibs for the alcohol ink fillable pen are exactly what I was looking for...

they accept & apply distress inks perfectly...

I found that the tips don't fray & that the small ones allow you to color in really teeny tiny details very easily...

I'm using one for each color & storing them in a tiny container for reuse...

when I look back on the 6 projects I finished...
I used these nibs on 4 of them...

that's my tip for today!
try it...

I ***think*** you'll be impressed...

ok...gotta run...
project #7 is calling...

I hope you have a wonderful weekend & can take time to

make art!
wendy
ps...GO BEARS!

Saturday, November 26, 2011

happy Saturday & happy holidays!

here's Lisa's dapper dude project, in full...

just in time to say...

happy holidays...


this was another very fun piece to make...

the base that you can barely see is a large creative cover...
it's peeking out from under the scallops...

I added the square art parts base & frame to the center & a large art parts scallop to each side...

it sort of reminds me of a window with shutters...

it's very dimensional & stands alone quite nicely...

other art parts used are the small truck, the lamp post & the picket fence...

I used grungeboard to die cut tim's large pine tree
as always...in love with minis...

they were inked with peeled paint distress stain, then shaded with forest moss & a bit of walnut stain...

I like mixing art parts, grunge & CFA...
I think the different thicknesses of materials add interest...

the large square frame was randomly painted with the black paint dabber & then inked with brushed corduroy & walnut stain...

I used jet black archival to stamp over the entire frame with this medicine label stamp...
then added a bit of gold, with the paint dabber to the edges of the frame...

I used Glue N Seal to add some crowded attic paper to my Clearly for Art...

then stamped the dude with jet black and inked him with the new festive berries distress ink...
it's an awesome color & I see it's ON SALE!!!

by stamping the dude on CFA, I could heat him & shape him to make him rounded & very dimensional...
and even though he is paper, now he's very sturdy...

I stamped an extra collar & pocket to add more layers...
small details, but they do add to the finished piece...

the white cuffs and shirt were accented

Lisa's bird is also stamped on CFA covered with paper & inked with broken china...

again, this allowed me to shape the wings & tail feathers
and not worry about the pieces being damaged or broken...

the paper background in the square frame is also from the crowded attic paper stash...

here's a better look @ the dude...


hmmm...

what else did I forget?

the scallop art parts are inked with brushed corduroy distress stain & stamped with the spatter stamp...

the fence is stamped with the houndstooth, using jet black...

the tiny bit of shimmer on the lamp post is rock candy distress stickles...

the rhinestone trim @ the top is a purchase from my recent teaching weekend @ Queen's Ink...
not sure who makes it, but I thought it was pretty cool...

HUGE CONGRATS to Lisa & Pink Persimmon...
wishing you tons of success...

ok...

gotta run...
if I seem rushed...I am...

my NEW STAMPS arrived yesterday & I'm happy to report that each & every one has met the jet black archival ink pad...

and the stamps with the coordinating art parts have all been test driven & are totally flipping cool...

I am seriously IN LOVE with this new release!

now I'm headed to the studio...

I GOTTA...

make art!
wendy
ps...go BEARS!

Thursday, November 24, 2011

Happy Thanksgiving & the dapper dude

HAPPY THANKSGIVING!!!

today & EVERY DAY...

I'm especially thankful for my blog friends,
my BFF's (we texted yesterday, so you all know who you are),
my family and my business associates who have also become great friends...

I LOVE you all...

I always feel bad for turkeys on this day...
so this makes me laugh...


since my brother is soooo kind to us
& invited us to his home
& said I don't have to bring anything hard...
lol...
I seriously LOVE HIM!

I had time to play a bit last night...

I wanted to surprise Lisa with another project, using her new stamps...


I'm LOVING how well our things blend...

Lisa's stamps (on CFA), my art parts & stamps...

plus
tim's distress stickles, crowded attic papers,
grungeboard & Sizzix dies...

and of course it's all tied together with Ranger's ink...

here's a peek...


that yummy red is the

LOVE LOVE LOVE it LOTS!

ok...gotta run...

Rick & I both wish you a day filled with family, friends & great chow...
especially pie...

I'm happy to know that pie has no calories on holidays!
I read it on the net...
therefore, it MUST be true!

CHEERS...

tomorrow I'll

make art!
wendy
ps with my new stamps & art parts...
the art parts are here & the stamps arrive tomorrow!
yippee!

Tuesday, November 22, 2011

a surprise for Lisa...

late yesterday afternoon, I got Lisa's new stamps in the mail...


I immediately wanted to text her to tell her that I got them & LOVED them, but then thought I'd just make a little something & surprise her...

so this morning, on my coffee break,
I made her this ATC...


sorry...no step out photos...

but here's a quick review of how it's made...

I covered an ART PARTS ATC with a scrap of tim's crowded attic paper...

the paper was originally off white-ish...
I inked the paper with weathered wood distress stain, dried it, then added shading to the edges with brushed corduroy & walnut stain, using the blending tool...

I also used the gold paint dabber lightly around the ATC edge...
a tiny simple detail...that I LOVE...

using jet black archival, I stamped the entire stamp on the ATC...

then I stamped it the second time on another crowded attic scrap, but this time I cut out just the corset & the cherub to use...

I used a Cut N Dry nib with fired brick to add color to the back trim portion of the corset...

and a bit of brushed corduroy to the back corset section & the cherubs face...

and I also used the nib with fired brick to add a bit of blush to the face...

and a nib to add peeled paint to the wings...

& glued it over the corresponding section on the ATC...

then I adhered another scrap of paper to Clearly For Art (CFA), with Glue N Seal...
& stamped the image for the 3rd time, again with jet black...

I cut out just the front part of the corset this time...

I inked the corset with brushed corduroy, used the nib again to add fired brick to the trim...

I heated the CFA to shape it & make it dimensional, then glued it over the corresponding portion of the stamp...
with a grunge scrap under it for a good gluing surface...

the left over paper/CFA scrap was used to make the really tiny bow under the cherubs chin & it's attached with a mini fastener...

I gently RIPPED a tiny bit of greens from a family room decor piece...
no one will ever notice it's gone!

& glued that between the corset layers...

I used the black Sakura Glaze pen to add dots to the trim & on either side of the corset...

I LOVE these pens!
it's so MUCH easier to make tiny raised dots, than to glue a million mini rhinestones!

trust me!

the final detail is 2 snaps glued to the corners...
tim discontinued these without consulting me...can you imagine?
I'm seriously considering a write-in campaign for a re-release...

here's a look @ the dimension from the molded CFA...

it's a nice sturdy ATC now!


Lisa...I LOVE your stamps & had a blast surprising you!
so glad you liked it!

in other breaking news...
28 pounds of brand new ART PARTS arrived today!

OMG...way cuter than I expected...it's like Christmas here!

I'm out of my mind excited & DYING to get the stamps that coordinate with them so that I can...

make art!
wendy

Saturday, November 19, 2011

the ANTIQUATED COLLECTION reveal...

FINALLY...

Lisa Pace is revealing her brand new stamp sets today!

HUGE congrats, MY FRIEND!
they were certainly well worth the wait...

let's start with my favorite first...


how about these beauties?


and these?


NO WAIT...the guy is MY FAVORITE!
what a cool dude!


and I LOVE this classy guy too!


the detail is amazing in these...


Lisa's stamps can be ordered from PINK PERSIMMON...

and I'm *thinking* she'll be posting LOTS of fun stuff

normally I cheer for Lisa from Illinois,
but right now I'm cheering from
with very inky fingers...

if you happen to be in the Madison area...
come see us @ the Alliant Energy Center...

I'm inking, stamping, misting & demoing there to...

make art!
wendy
ps GO BEARS!

Friday, November 18, 2011

the Great pumpkin challenge...

ends with...

the master!

and a SURPRISE designer!

pop on over to the Ranger blog & see how tim has transformed the same pumpkin we all got...
and also the super special designer too...

this week has been so fun & inspirational...

it's fun to see what happens when we all start with the same basic ingredient...

I think each designer's style was really evident for this challenge...

and...hmmm...what else?

OH...

come back tomorrow @ 3:01pm...
for the full reveal of Lisa Pace's brand new stamps...

they're called the ANTIQUATED COLLECTION...
you'll be impressed...

I almost forgot this...

THANKS for the friendly advice...

NOT to mention being a BEARS fan in Madison...
(the land of cheese...)

I got it!

my like are sealed...

have a great weekend...
grab some inks & some stamps...

and take time to...

make art!
wendy
ps...GO BEARS!

Thursday, November 17, 2011

Day 3 of the GREAT pumpkin challenge

today features my friends
Tammy Tutterow & Richele Christensen...

pop over to the Ranger blog & see how they altered their pumpkins...

and speaking of pumpkins...


this is headed to...

can you hear the drumroll???

it's going to...
artbyvic said...
Your pumpkin turned out amazing! It would look lovely on in the center of my tabls! :)
THANKS to everyone who ordered hoodies & totes...
I'm glad you like them!
thanks for letting me know!

I had people ask if I would have them available here on the blog for holiday gift giving...

sorry...nope...

all orders now go right to the graphic guy...
and get shipped right from him to you...

I would *guestimate* that if you are ordering gifts,
the order should be in by the end of the month,
to make sure it arrives in time...

they are custom made when they are ordered &
he doesn't have them made & in stock...

HOWEVER...I miscalculated (or had a senior moment) &
I do have 2 extra hoodies here...

I have 1 large watermelon pullover &

1 large zip hoodie in the khaki color...
shoot me an email if they fit your needs...

THANKS to everyone who commented on my pumpkin, both here & on the Ranger blog...

you made my heart happy!
I wish I could give you each a pumpkin...

now it's time to start packing for my last weekend away for the year...

no more trips until CHA @ the end of January...

yippee!

I'll be in Madison, Wisconsin all weekend...

stop by, tell me you are a BLOG FRIEND &
I'll have a little gift for you!

I'll also post a SECRET word on Twitter...
so if you're a Twitter friend...you'll have a second chance for a little gift!

Friday is set up & then we have a make & take Friday evening...

we'll be using my art parts & stamps, tim's distress stains, Ranger's silver paint dabber & jet black archival ink...

to make some fun custom embellishments...

ok...time to get packing...

as always...

make art!
wendy

Wednesday, November 16, 2011

Ranger's GREAT pumpkin challenge...day 2

the challenge continues &
today I share the Ranger blog with the talented Jennifer McGuire...

this challenge was over the moon fun for me...

in total, I used over 30 Ranger products!
seriously!

here's my pumpkin...


my first step was to age a plant stake with alcohol inks...
the photo above shows that it's toned down & looks much more vintage...
that shine was bugging me...


once the stake was ready, I attacked the pumpkin...

I started by swiping coffee archival over the raised areas, to tone down the orange & add some shading...


then with sepia archival, I stamped some random polka dots...


my spider was stamped with jet black archival...
I found it easiest to use him without the acrylic block, & shape him to the curve of the pumpkin...


next, I applied tim's stickers to black presentation board & cut them out...

sanded the edges with the sanding grip...

and distressed the edges with walnut stain...


I cut a banner from Claudine's sticky back canvas, removed the backing paper & placed it on my non stick craft sheet...

I like to remove the backing paper...
it keeps the canvas nice & flat & it makes it simple to color & then stamp on...

I misted the natural canvas with plain old water...
then applied the frayed burlap distress stain & moved it around with a blending tool, to give even coverage...


I wanted to use 2 different stamps & the background I chose would have covered most of the banner...
so I masked off a section on each side with a post-it note...

that allowed me to use the giant background stamp, with jet black archival...
and stamp just the center section...


then I removed the post-its and stamped the polka dots on the blank canvas ends, again with jet black...

I folded the canvas, as you'll see in the photo @ the bottom of the post...
to create a little extra detail...
then added the canvas banner over clearly for art BLACKOUT...

this makes the banner nice & sturdy & finishes off the back...


moving on...

I used 2 art parts leaves & inked them with peeled paint distress stain & stamped with with the text background, using jet black...


and then...I was having so much fun, that I forgot to take more photos!

I seriously...lost my mind in this project...

so, without photos...

I used grungeboard, Claudine's sticky back canvas & clearly for art to create a whole bunch of flowers...

I used Glue N Seal to add vintage text to my clearly for art, then die cut it with tim's tattered leaves die...

the leaves were misted with water...
then I just touched the tip of several of the distress stains to the leaf & watched the colors blend like magic...

heating the clearly for art (CFA), allows you to shape the flowers & leaves to make them very dimensional...

I liked the combination of grungeboard, canvas & CFA...
because it added lots of different textures...

the red heart is die cut from grungeboard, inked with fired brick distress stain & the LOVE is part of this stamp...

so...lots of flower stamps, lots of background stamps some leaves & art parts...
made this...


here's a closer shot of the banner...

the butterfly was stamped on CFA BLACKOUT with the gold paint dabber...

and the heart is suspended with a charm clip...


and here's the finished pumpkin...


I told you I used lots of Ranger goodies...

Archivals:

Jet Black, Sepia, Coffee, Vermillion & Olive


Distress Stains:

Peeled Paint, Mustard Seed, Rusty Hinge, Frayed Burlap, Lipstick, Scattered Straw, Fired Brick, Wild Honey & Forest Moss


Distress Ink Pads:

Walnut Stain, Forest Moss


Gold Paint Dabber


Alcohol Inks:

Pitch Black & Rust


Adhesives:

Glossy Accents, MultiMedium (matte), Glue N Seal


Claudine's Natural Sticky Back Canvas


Tools:

Craft sheet, Heat it, Ink Applicator with felt, Blending tool with foam, Mister


and believe me...

when I was done,

I was happy to have the craft scrubbie...


sorry for the lack of links...

BLOGGER/hughesnet is being a pain today...


in closing...

the pumpkin says...

give thanks...

so to thank you MY BLOG FRIENDS...


I'll ship this pumpkin to a random commenter...

if you'd like this guy to live with you...


just leave a comment &

I'll choose a winner first thing tomorrow morning...


thanks RANGER!!!

it was seriously FUN to


make (pumpkin) art!

wendy


Tuesday, November 15, 2011

Ranger's GREAT pumpkin challenge...

begins today on the Ranger blog with...


pop over see 2 different versions of the pumpkin...
both are definitely THEIR unique style!

moving on...
a few weeks ago I got an email asking me to answer a few questions...

to make the story short...
the email said that some friends were planning their second annual WWW...

which I was told was short for
WONDERFUL WENDY WEEKEND...

hmm...that grabbed my attention...

she went on to say that the weekend is devoted to eating, shopping & using my stamps & art parts...
and that each person presents a little project
for the group to create...

WOW...that's pretty cool...

the gal told me that she was in charge of the games this time...
& she asked me to answer some questions...

the "winner" gets a home cooked dinner...
it's cooked by the losers...
and the $$$ in the pot, for a shopping spree...

she also said the gals have already answered the questions @ their planning luncheon & they were in sealed envelopes and were being held by their minister...

now that is flippin' hilarious!!!

ok...here we go...

she reminded me that each question should have only one answer to avoid DEBATES!

wow...this is serious business!
here's the answers as of today...
but honestly, some of these ink answers change daily...

1. favorite green ink

2. favorite blue ink

3. favorite brown ink

4. favorite stain

5. favorite crackle paint

6. favorite paint dabber

7. favorite color of "clearly for art"

8. favorite art parts package
residences (but the NEW ones are fab! OMG!)

9. favorite background stamp

10. favorite stamp/matching art part

11. mom van or sexy sporty car?
hmmm...SUV...there could be a DEBATE there...

12. color
why BLACK, of course!

13. favorite movie
Wizard of Oz

14. favorite TV show
Anderson Cooper, the daytime program
we DVR it & watch it every evening...

15. favorite flower
red geraniums

16. favorite food
noodles

17. PC or Mac
MAC all the way!

18. number of new stamp sets coming (closest wins)
14

19. state where do you live
Illinois

20. shoe size
6 1/2

21. favorite Tim-Ranger product

22. favorite Tim NON Ranger product

23. favorite Ranger NON Tim product

24. nuts in your cookies?
YES!

25. number of times you have been published (closest wins)
I honestly have no clue on that one...sorry


well gals...I hope you have a fun weekend!
what's for dinner?

I asked SIRI last night if she would help get my make & take stuff ready for the convention this coming weekend in Madison, Wisconsin...

she said...


I take that as a NO...

that's all from me today...

have fun checking out the pumpkins...

then be inspired to...

make art!
wendy