here's how I got started...

here's how I got started...
a 20 minute podcast by Crazy BeYOUtiful
Showing posts with label grungepaper. Show all posts

Monday, January 17, 2011

a set a day...#8...

Happy Monday...

let's start the week off with...
VISIONS OF ART...


"she" is very fun...
I stamped her on grungepaper...
cut her out...
it was easy because of the simple lines...
and used her on a journal page...

she's about 4 inches tall...

the mini flower can be stamped on a scrap,
cut out & layered...
or the flower can be covered up
with a small
ART PARTS...
flower!

there's a HINT!

I also stamped just the mini flower on a grunge scrap & added it to the tree, on another journal page...

I LIKE her...
she can wear a crown...
or...
she can be transformed into steam punk...
or ...
she can be stamped over patterned paper...

I LOVE the saying to the right & because of the arrangement on the storage sheet, I was inspired to use those 2 together on a journal page...
I like her looking @ the saying...

the next saying is FUN...
I used that on a project for BOOK #4...

it fit well with the large butterfly...
and it's in the ART PARTS rectangle frame...

this saying works with funky/altered art...

the next stamp is large...
4 inches wide, so it's good for larger projects...

I left the words far apart, so they will be easy to cut & use individually...
there's that RANSOM note thing again...

I like to stamp the saying on grungeboard scraps & cut out just the rectangle letters & layer them over the saying to add interest...
it's a small detail, but it makes a difference...

this is another saying for your studio...
a gentle reminder of sorts...

the bottom saying is large...
5 inches wide...

again...the words are far apart so they can easily be used on smaller projects...

or you can just choose a word or two...
to mix and match with other sayings...

ok...gotta run to the studio...

the TO*DO list is still REALLY LONGGGGGG...

I'm putting the final details on a
MAJOR GIGANTIC LARGE
super cool "project" for tim...
that was THE PROJECT of the weekend...
yep...WEEKEND...
lots of detail on this guy...
phew...

you'll love his releases...
It's a promise...

I still have more art to make for Ranger...

and I have to finish some details on 2 projects for my portion of the Stampers Anonymous booth...

and make 2 new "acrylic covers" to house my new small babies...
and the new larger sets need a new home too...

and do step by step photos for the power point presentation for my portion of the CHA class...
me & technology...
that should be interesting...YIKES!

I'm teaching with TIM...
CLAUDINE & the REAL LADY DY...
straight away from the UK...

Should be a VERY FUN class!

and that's just the top few TO*DO'S...

I'm leaving a few days early to help tim with another special class for a group of store owners...
so...
THE LIST MUST BE DONE
BY NEXT MONDAY...

YIKES...

see you tomorrow for set #9...

I better head to the studio to...
make art.
wendy

ps...GO BEARS!!

Thursday, November 18, 2010

tissue taped & color washed...

not since grungeboard has a product completely addicted me so quickly...
it has won my heart...

seriously...

enter tim's redone...
AMAZINGLY FUN...
color washes...

I literally have a million ideas for using these sprays running around in my little brain...

it's all I can think about...
SERIOUSLY!

and I'll prove the point by saying I got up
@ 4:03 am, to make this tag...
the idea wouldn't let me sleep...

lets start @ the beginning...

use tim's tissue tape and add a few strips to a manila tag...

what's cool is that the tape leaves no ugly residue when it's removed...

it's the perfect mask...


mist over the tag with butterscotch color wash...
and you'll have this...


then add some vertical tissue tape strips & mist with sailboat blue to get this...


mist with water to change the look to this...


since my style is still more vintage...


it's looking better now...


WARNING...
here's another reminder about looking @ all the possibilities...
OK...some might call it a lecture...
whatever...

this yummy tim accoutrement button is GREAT on both sides...
actually, the back side is the perfect flower center...

just chop off the shank...
add some jet black archival...
and now you have 2 options for one button...


then add a little studio 490 stamping...


some tim's trimmings misted with butterscotch color wash...
and attached with the tiny attacher...

a grungepaper flower created with sunset orange color wash & a bit of espresso color wash...
misted with the new sunflower sparkle Perfect Pearls Mist...

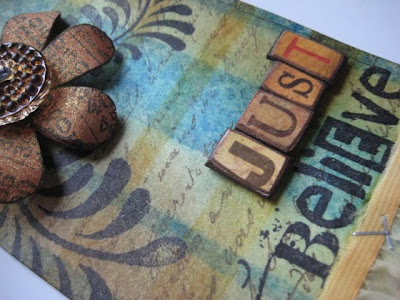
a little word made from tim's new salvage stickers...

here's the finished tag...


and here's a closer look...


now think of the possibilities...

don't want straight lines??

tear the edges of the tape...

or get out those OLD decorative scissors...
blow off the dust...
& cut the tissue tape...

stamp before removing the tape...

use it on other surfaces...

I could go on & on about these sprays...

I made a few other VERY VERY FUN things with the color washes...
but that's for another post...
stay tuned...

and if you don't have my "clearly for art" yet...
just sayin...

you will want it when you see the new twist I have discovered...

it had me completely freaking out jumping for joy...
it's over the top cool, if I say so myself...
just you wait & see...

it looks NOTHING like the other clearly for art things I've done...
NOTHING!!! I even impressed...ME~

it's not shiny...people are asking...what is that stuff?
just saying...be prepared if you want to play along...

I'll be demoing & showing LOTS of cool techniques this weekend @ the Alliant Energy Center stamp convention in Madison Wi.

hope to see you there...
in the Stampers Anonymous booth...

I'll be the one with the inky fingers...
that is until I use my craft scrubbie...

oh...wait!!!
one more thing...
craft scrubbies make great stocking stuffers for guys...
Rick has one to use in the garage...
it removes grease like a dream...

Christmas is coming...

gotta run now...
time to pack demo stuff so I can...
make art (in Wisconsin)

wendy
ps...I'll be working with Michelle...
Mrs Stampers Anonymous...
I'll do my best to sweet talk her out of some hot off the press rubber...

for a little giveaway here...

I bet Michelle likes comments!
What do YOU think?

Monday, November 15, 2010

I'm skipping Thanksgiving...

and moving right on to CHRISTMAS...

I had an idea...
a unique way to use studio 490 art parts...
something a little different than the obvious...

I wanted a gift card holder, that was something more than just a plain old gift card holder...

something the recipient would keep...

how about an ornament gift card holder??


I started by randomly spraying my small art parts frame base (3 1/2 x 3 1/2) with with tim's (very addicting) color wash...
this is the red pepper color wash...

I dripped a few drops of water on & then dried it with the heat-it tool...
thus the worn looking spots...


to create this you'll need the following art parts pieces...

2 small frame bases, a small frame & a small scallop trim...
the secret is to trim one side off the frame ...
like this...


the tree is stamped on grungepaper, cut out, inked with forest moss distress ink, then embossed with tim's dot-matrix alterations embossing folder from Sizzix...

I actually used the back of the grunge...
the canvas side added more texture...
I liked it...

ahhhh...
this is the perfect embossing folder for a Christmas tree...
kind of looks like ornaments!


by layering the cut frame between the solid bases,
you create the perfect hiding spot for the gift card...
make sure the cut end is @ the top...


here's what the slot looks like
without the gift card...


I think this will be for my niece for her December birthday...

hopefully, she'll keep the ornament...
but in reality, I'm expecting her to give it back & tell me to fill it for Christmas...
yep...
that's what I think will happen...

other key ingredients not mentioned above...
my background stamp is unevenly stamped with Ranger's coffee archival, to create a worn effect...

everything else is stamped with jet black archival...

that would be...

tim's cute bird stamp...I LOVE this mini set!


text on the scallop...

the scallop was sprayed with espresso color wash & misted with heirloom gold Perfect Pearls Mist...
(THE perfect color combo)...trust me... I LOVE it!

then embellished with tim's long fasteners...

I used the gold paint dabber to edge the scallop & to paint the mini grungeboard stars...

rock candy distress stickles add a bit of bling to the barn door inked holly berries...

before assembling the art parts, I glued a charm clip (small side) between the layers to hold the bauble with a jump ring...

oops...forgot to say I distressed the edges with tim's sanding grip...

this is a quick & simple idea that can be adapted to any occasion...
for a guy or a girl...

and speaking of art parts...
I'm happy to relay that they are...

today I'm off to work on new stamp designs...
and new art parts too...

we gotta have fun new supplies to...

make art!
wendy

Friday, October 22, 2010

a week & a day?


since the last post???
YIKES!!!

So...what happened during those days?

I went to Maryland to see the QUEEN & co...
& had a TOTAL blast...

The classes were really fun & inky (thank God for the new Ranger craft scrubbie)...
it cleaned 310 inky fingers, in just one class...
and did a great job all weekend long...

I got to meet some blog friends, which is so cool for me...
to have a face that goes with a name...

I also got to visit with friends from last year's cruise...so FUN!

THANK YOU everyone who came to the Queen's INK!

I spent Tuesday @ home catching up, and then on Wednesday Rick & I took off to Chicago for a little retail therapy...
just doing my civic duty...
shoes x 2...couldn't resist...

Wednesday evening we had an awesome dinner @ Gibson's in Chicago (actually Rosemont)...
giant steak for Rick...
the best lobster ever for me...

we checked into the hotel...
then went to the Rosemont theatre to see the top 10 finalists from America's Got Talent...
minus Jackie Evancho...boohoo...

The show totally exceeded our expectations...
and the performances were so much better than seeing them on TV...

the little getaway was to celebrate 38 years...
I can hear those calculators going...
I was 10 when we married...
I hope you believe that!


And speaking of celebrating...

we came home early on Thursday morning for Paul's LAST CHEMO treatment (we hope)...

he's done...YIPPEE!!
he's got another rough 10 days, but then hopefully he'll be on his way back to normal...

He brought flowers for the nurse who had been with him for every treatment...
we LOVE LORI!!!
he surprised me with some too...awwwwww...

I had treats for everyone to thank them for their kindness & expert care...
and told them if we ever see them again...
we hope it's out of that building...

he has a PET scan before Thanksgiving...which will tell if he's done...
then repeats every 3 months after that...

hmmm...what else?

next stop on this art adventure is For Keeps Sake in St. Louis...

I LOVE that place & ALL the folks there...

they will be the first to use art parts to create Christmas decor with some of tim's new ideology goodies...

I'm looking forward to returning & doing some brand new projects with them...

hmmm...what else has happened???
oh...I know...

I made a little art...
trust me...
it REALLY IS...
little...
just 2 1/2 inches tall with the memo pins...
but it was soooo much fun...

once you use up tim's film strip ribbon, you are left with the cutest mini tin...

the idea has been brewing for quite some time,
but when I got all of Claudine's new stamps & saw she had flower stamps...
I HAD to take a short art break...

here's what you'll need...

an empty film strip ribbon tin...
tim's idea-ology curio knob...
tim's ideology lost & found paper stash...yum!
coffee & jet black archival ink...
tim's stormy sky, scattered straw & peeled paint distress inks...
gold paint dabber...(I'm officially addicted)
Ranger's Enamel Accents (black)...
Claudine's multi medium...
studio 490 screen stamp...
studio 490 text stamp...
my look inside stamp...I ADORE this set!
1 1/4 circle punch...
scallop punch...

just a few tips...
start with these...

apply one strip of tissue tape to cover the base
of the tin...then color with willow alcohol ink, using the ink applicator...

use the gold dabber to accent the edge of the lid & the bottom edge...

use jet black to stamp Claudine's flowers & leaves on grungepaper, cut out & ink...

stamp backgrounds with coffee...

make a few custom epoxy memo pins...

and you'll end up with this...


another angle...


I liked it...
remember I LOVE mini...
but I flipped when I saw that I could add the curio knob as a base...

too stinkin cute if I say so myself!

just remove the screw & you have a nice flat surface to glue to the bottom of the tin...

tada!!!


upside down to show the base...


inside the lid...
a mini Claudine flower, stamped on grunge & overstamped with my text stamp...


inside the base...

I made this to fit the lid, but I liked the funky effect of using it in the base instead...

hello...
I AM looking inside...
makes me laugh!


trying for a better shot...


so there you have it...
Claudine's stamps, studio 490 style...

I think these will make adorable little gift containers for earrings or folded up $$$...

just a little holiday idea for you!
or really...
it's perfect for any gift giving occasion...

that's the update from here ...

time to get going on kits for St. Louis...

once those are done...

I have tim's brand new configurations calling me...

this one might be first...
or I think this one...
but then I REALLY like this one...

decisions...decisions...

have a great weekend &...
as always...

make art!
wendy