here's how I got started...

here's how I got started...
a 20 minute podcast by Crazy BeYOUtiful

Friday, February 6, 2015

foiled & fun!

I've done a total 180 degree turn on foils...
I went from...
don't need them to

100% ADDICTED...

let me start at the beginning...

maybe a year ago,
 Ranger sent me these foil sheets...
there are 3 different packages...

when I first started stamping, 
I bought some leafy metallic stuff...

what I found with the leafy thin stuff was that it was very annoying...
it seemed to have so much static that it was sticking everywhere...
I was not in love at all...

so when I got these 3, 
I thought about my past experience &
I admired them & put them away... 


this past Saturday I had a play day...
I posted the project here & that's what prompted getting out the foil sheets...

if you read the suggestions on the package,
you can add an adhesive strip, remove the protective paper on one side & add it to a tag...
then remove the top release paper &
 press the foil onto the adhesive...
the dull silver side goes onto the adhesive & the color is on top...


and you get this really nice foiled border...


the foil sheets also work well with

just ink the stamp with an ink that will hold the sticky powder in place, then stamp & sprinkle on the powder...
then heat just until the powder turns clear, 
then quickly press the foil onto the sticky powder...

let it sit for a bit & then start rubbing over the stamped image to release the sheet from the sticky embossing powder...


the result is a stamped foiled image...


you can also add the adhesive strips to a
cardstock scrap & cover it with foil...


then die cut or punch out foiled embellishments...


now back to my Saturday play...
and how I came to LOVE these foil sheets...

I had added translucent embossing paste thru the old ledger stencil on several areas of my canvas...

I liked it a lot...
but I kept thinking that if I could add TINY bits of metallic, that would really be cool...
I didn't want paint or gold embossing paste...

I didn't want lots of metallic...
I just wanted some random shiny bits...

remember those foil sheets Ranger sent?

if you look at the next photo, I placed the foil sheet over the dry translucent paste & used my fingernail to add the foil to small areas of the embossing paste...
since the paste is raised, it's easy to feel where to rub...
and the foil sticks really well!
F A B U L O U S!


once I figure something out...
I can't stop...

(kind of like the faux graniteware & the splattered plaster)...
I know...you're thinking poor Rick!

so...
the next photo shows the foil added to the label pull...
I had added a thin layer of 
to alter the label pull...
so now that I figured out that the foil will stick to embossing paste,  I knew I could add foil to the edge of the label pull...
it's the perfect highlight & fits right in with the vintage grunge effect...
the additional color made a big difference...
it appears to have texture, 
but it's completely flat...


the next photo shows the wood frame from the project...
that too had been covered with 
a thin layer of gold embossing paste...
so it was simple to foil just the edge...

I found it so easy to lay the foil in place,

the slanted end is awesome for foiling...


the next photo shows another tiny area that I foiled at the bottom corner of the canvas...


and I couldn't stop, 
so I randomly foiled the edge of the canvas...


you'll see that I used several different colors of the foil...
the canvas holds the foil securely in place...


this is EXACTLY the effect I wanted...
it's not "in your eye bling"...
it's very subtle & vintage-ish...
but you do notice it...

I also added a little foil to the thin part 
right above the word...
that really helped to make it more 
rusty looking...


by now I'm really on a roll & I was looking for other things to foil...
this is why I didn't make dinner...

I decided to add little bits to 
 I used the new mini glue stick & added a few small areas, then pressed the foil over the wet glue & let it dry...

when it was dry, I ripped off the foil & dripped on some mushroom alcohol ink...

the mirrored star looks like this......
just a little rusty & crusty...
I am in LOVE!


hang on...

there's more...

I grabbed a black tag, then
with the vintage quilt stencil & let it dry...

when I designed this stencil I thought about being able to add 2 colors...

but that would take a ton of masking...

since I have no patience...

on to

plan B...

I placed the foil over the dry paste & used my finger to rub over just the embossing paste dots...

tada...multicolored!

and a new technique is born...

foiled embossing paste!


oh yes...
there's more...

I used a black tag again...


and added the 

it dries & looks like this...


I used several colors of foils again...


and got this really fun background, 
with just a hint of metallic...
it's the perfect starting point for tag art...

black tags are really cool to use 
with the pastes & foil sheets...


and just one more for today...
sometimes I want to accent a stencil or in this case, a lace border stamp...

the random worn foil is again,
exactly what I wanted...

I laid the ruler in place, then put a foil sheet over it, then traced along the ruler edge 
with the slanted end of 
(I LOVE THIS TOOL!)

you can make the line solid & perfect...
or more worn like this...
it's a tiny detail, but it makes a big impact!


I am now 100% addicted to these

there is no static...
there is no mess...
and there are multiple ways to use them...
I like that they can be made perfect 
or vintage & worn...

I'm...in LOVE!

I started to wonder...
do they stick to 
no!

BUT...

if you mix 
 with the colored embossing powders (50/50 ratio) it does!
the texture is the key!

I linked to 
this gives us enough to custom mix it with all the embossing powder colors...
that little jar of magic powder will DOUBLE our embossing powder colors!

I'll be sharing lots more about embossing powders soon, but in the meantime
you can learn about this
by watching the video that was filmed by ScrapTime at CHA...
just click the link above...

I hope that you got 
some ideas from this post 
and that you're inspired 
to grab some foil sheets and...

make art!
wendy
ps...we have a NEW distress color being announced TODAY...
can not wait!

EDIT!
say HELLO to the beautiful new


Thursday, February 5, 2015

it's all about LOVE...

 begins today & the theme is 

HEARTS/LOVE...

it's a nice broad theme...
so however you choose to interpret it will be cool...

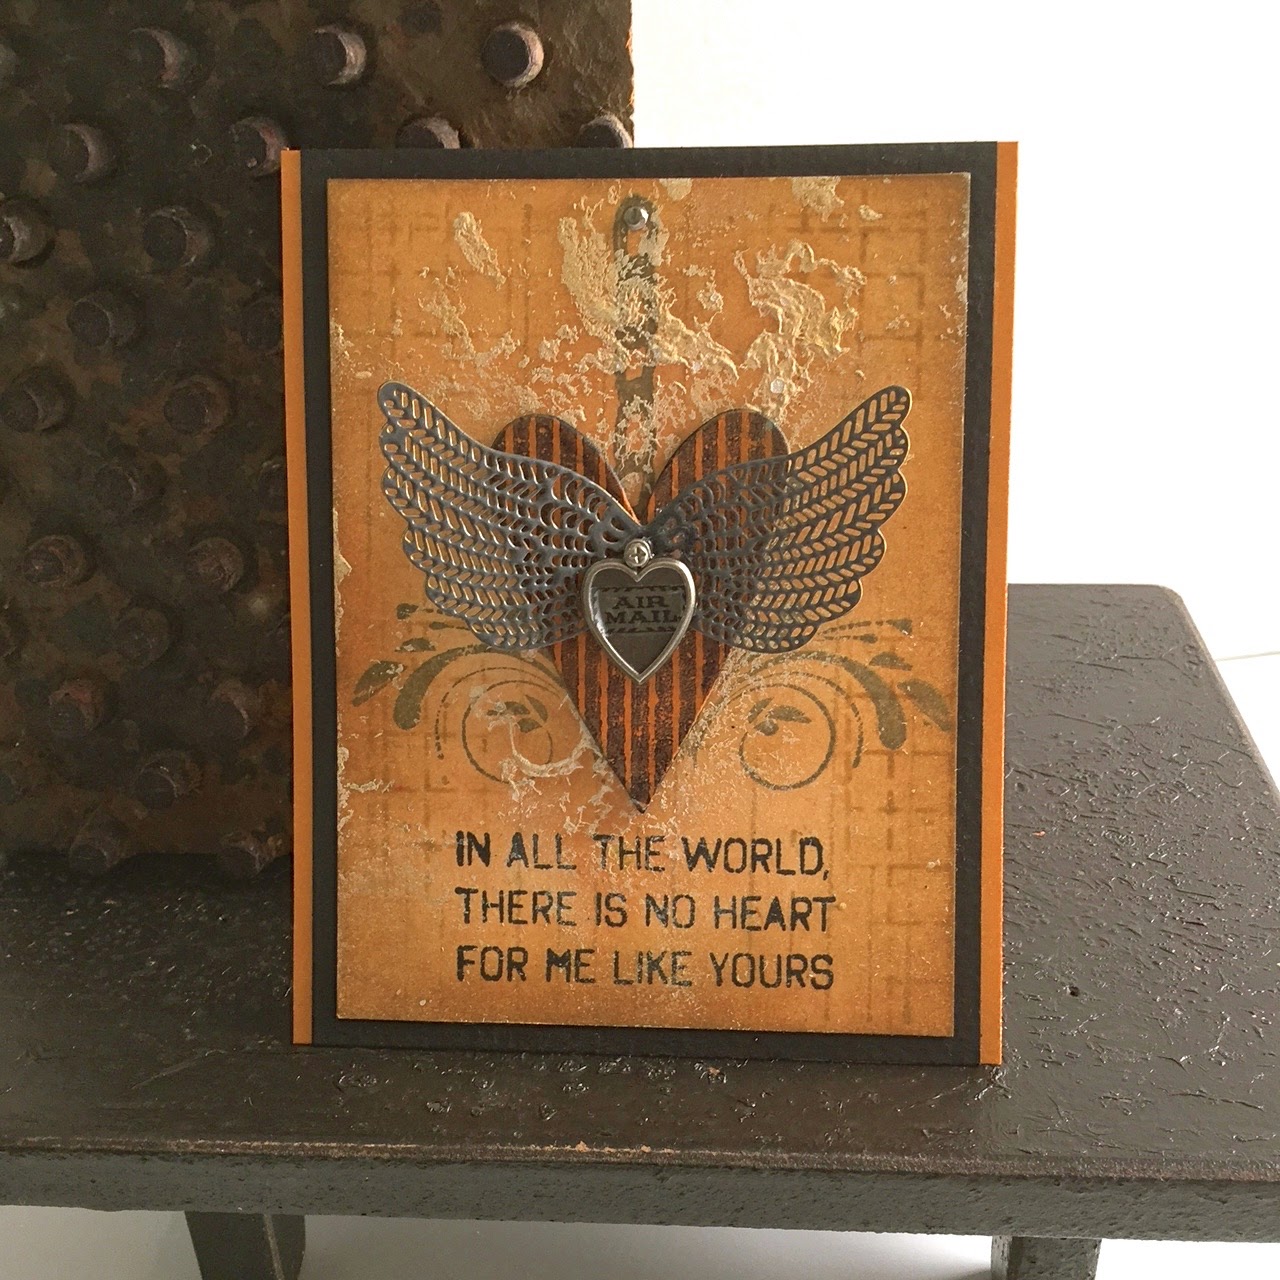
here's my contribution to the challenge...

first of all...
remember...
there are no rules in art!
not every Valentine needs to be red...

I started with a 3 x 4 ¼ inch manila cardstock scrap & used the splattered plaster technique with tea rose archival & a tiny bit of tree branch...

you can read about

after it was dried, I used jet black to 
stamp my sentiment...


I inked some gold wings with 
then embossed them with 

the wings start out like this...


it's a simple 
total transformation...

and with more embossing powders to choose from, we have more color options...


the next step was to ink 
with tree branch & stamp over my card...


it looked like this...


I used brushed corduroy to ink over the whole card...


then used watering can to stamp 
watering can is awesome when used with jet black...

you can see that in the next photo...

the jet black sentiment really pops...
and the flourishes are in the background, 
right where they belong...


I inked the chain stamp with watering can & stamped it between the flourishes...


the heart below was cut with 
it's a Sizzix die...
it's cut from the 

the heart was inked lightly 
then stamped with 
using watering can...


to add more layers to the background, I used the new vintage ledger stencil 
with tree branch archival to stencil random areas...
sorry for the glare...
my studio has skylights, which I LOVE, but they sometimes are annoying for photos...


you'll see that some areas are light & some are a little darker...

 that tiny addition of the stenciling makes the background much better...
every detail matters!


I added my card to a slightly larger black cardstock panel, then to a coordinating cardstock base...

using the new remnant rub tool...
(I'll show you a new use for the tool tomorrow)

I used a mini fastener to add it to the wings & heart...
I also like to use a mini fastener at the top of the chain to make it more realistic...
now it doesn't appear to be hanging in mid air...

glue it together...

this is the result...


here's a closer look...

I love the different textures...
the "plaster", the heart, the embossed wings
peeking out from under the heart...
it's a very simple quick creation, 
but the multiple textures make it special...


so that's my non traditional Valentine!

I had several questions to answer...

#1. I have the adirondack snow cap reinker for my ink pad. can that be used with glacier white, if it's the same ink...

YES, you can. NO PROBLEM, since it is the same ink, just rebranded with a new name...


#2. what is the size of the stamp in the new faux graniteware starter set? I'm not sure I need another one.

   it's about 1/4th the size...
I wanted to include a stamp with the mat board & instructions, to make a complete kit to get you started with the technique...

this mini sized stamp is so nice for working on small surfaces & especially curved surfaces like the glass vase I showed in the previous post...

here's a photo to compare them...

is on the left & the new mini is on the right...


#3. Have you tested other inks to see if they work with the splattered plaster you showed us?

   I had the big idea to try the technique using the metallic distress spray stains...in my mind, since like the picket fence, they too have pigments, I thought I might get "metallic" plaster...
BUT...
sorry to report...
it did NOT work...
at all...NO clumps...
NONE!

so don't waste your time...

some experiments work...this one didn't...

stick with the picket fence...
it's magic & it works every time!

as far as other brands, I'm familiar with Ranger products & that's what I use & LOVE...
so...I really don't have any other info to offer...

#4. I got the foil packet for Christmas, but have no idea what to do with it. how does it work? do you have any examples of how you've used it?

ah yes I do...
that's tomorrow's blog post...

stay tuned!

#5. THANK YOU for the faux graniteware glass tut. I'm on it. One question. How did you prep the glass?

I did not prep the glass at all...
 I've done it on multiple glass surfaces...
tim's corked vials was the original test piece, 
since they're small...
it has worked perfectly every time...

HOWEVER...
I'm thinking that if you're recycling something...
possibly a salad dressing bottle or something that is oily, maybe a make-up bottle,
then I'd make sure to wash it to remove the oil...

if you read the instructions on the Ranger blog, you'll see that you need to use archival ink...
if you use embossing ink under the embossing powder, it will peel right off...

my new motto is...

EMBOSS it...
DON'T TOSS IT!

or maybe...

DON'T TOSS IT...
EMBOSS it!

that's it for today...

I hope you'll join the challenge...
there is a PRIZE!
our sponsor this month is Linda, 
owner of the funkie junkie & she's giving a $25.00 gift certificate to a random participant!

don't forget to visit the Ranger blog  & enter to win a set of my new archival inks & embossing powders...
they are choosing 3 lucky winners!

make sure to read the intro...
there are several ways to enter...
more chances to WIN!


now it's time for me to...

make art!
wendy


Wednesday, February 4, 2015

faux graniteware technique...


hi friends!

today I'm sharing this fun new technique

I'll show you how to transform an ordinary glass vase into a faux graniteware vase, that can actually be used for fresh flowers...


to play along...

find an inexpensive glass bottle or vase...
this is a great way to recycle...

grab your archival inks...
any color will work...


(they are the same inks)

and


then you'll be all ready to...


and...

make art!
wendy
ps...
check out the tutorial...
there is a GIVEAWAY for 3 sets of my new archival inks & the 3 new 
coordinating embossing powders!
GOOD LUCK!

I hope YOU...
WIN IT 
on WEDNESDAY!


Monday, February 2, 2015

mixed media canvas...

I decided I NEEDED to have
 a play day on Saturday...

just for me...

just for fun...

no agenda...

no assignment...

no supply list...

no instructions...

that was THE PLAN...
it's still my hobby & I LOVE it...

and that's how it started...

I had so much fun

and I made this...


I couldn't wait to use the 
 that I brought home from CHA...
thanks tim!

she's plain white right from the package, but I altered her with archival inks to look like this...

I added her shoes with a black sharpie & then used a q-tip that I moistened with rubbing alcohol to make it bleed...
that made them look more vintage...
she is so cute!


I was looking for some small wings & discovered that the leaves from the idea-ology poinsettia set fit her perfectly...
I used hot glue to attach them to her back, after I tapped on some gold metallic embossing paste to the front of the leaves...


I had pulled out a flat 6 inch square canvas to use as my base...

my original plan was to wire her onto a smaller canvas, that I would then add to the 6 x 6...
but...
 sometimes things change and a better idea comes along...

in the photo below, 
on top is the original 2 ½ x 3 ½ inch canvas...
below that is the cute frame that is left after I pulled off the canvas & added some 

by removing the canvas, the background shows thru & it seemed to be more cohesive & less bulky for the 6 x 6 canvas...


I had an extra leftover "hosta" 
sitting there...
have you tried the newsprint 

the hosta was just the right size 
to pair with the salvaged doll...


here's the background...
since I hadn't planned this to be a tutorial, I don't have all the layers, stamping, stenciling color details...
but I think you get the idea...

I'm sharing this because I got this email last week...

"can you suggest a gameplan to create a collage background like I see on your art journal pages? mine seems like things were dumped and have no rhyme or reason".

this simple way seems to work for me...

 briefly, it started like this...
I used the splattered plaster technique as the first layer...
YES...the technique works great on canvas...

then added the tree branch 
stenciled alphabets in 3 spots...

I used larger alphas on the left & the smaller on the right...
repeating is good...
if you look, they form a triangle...

it might be hard to see, but I added 
to just parts of the stenciling...

you'll also see 3 areas that were stenciled with translucent embossing paste...

I think using 3's & the triangle placement helps make the background cohesive...
and keeps the eyes moving...

once I knew where the mini frame would fit, I traced around it with the stabilo pencil & smeared it with my finger...

LOVE LOVE LOVE the new chain stamp...

the frame will cover up the unconnected area...


I thought I'd share this too...
after I had my little word collage in the bottom right corner...
I think the mix of fonts is fun...
but some of the words can be used year round...

the top needed something...
I had considered "journey", 
but it seemed too large...
so I chopped the remnant rub apart to make a new word...

YOUR...

it was a perfect fit space-wise & 
it complimented the word collage in the bottom corner...

I also cut the word LIFE away from "explore" to use alone...


here's a better look at the salvaged doll...
I might be prejudice...
but I think the hosta is adorable & so is she...

the heart was cut from 


did you notice the subtle metallic accents on the background, the canvas edges & on the frame?

I had some fun unexpected discoveries using Ranger's foil sheets...

trust me...
they are SUPER fun...
I have a new addiction...

here's what's happening this week...

I'll be back here on Wednesday &
I'll also be on the Ranger blog with a full tutorial...

on Thursday the new "make art challenge" will be announced...
I hope you can join us...
we had awesome entries for the first challenge...
(and there is a PRIZE)...

and then...
back to the foil sheets...

 I plan to be here on Friday & I'll share my foiling discoveries then...

while Rick is out there plowing us out for the 3rd time...
we got 15 inches of the white stuff...
with yucky 6 foot drifts in some spots...

I'll

make art!
wendy
ps...background stamps, sets of stampsstencilsmagic mat board & SiSi's have SHIPPED & are in stock now...

check your local stores or the highlighted links will take you to some online shopping spots...