

this is the 3rd post in the series,
that shows several ways
to use the same stamp...
you'll find #1 here...
that showed
watercoloring with distress stain...
and #2 here...
that was about
watercoloring with archival inks...
both with the same stamp for different results...
I got hooked on the weathered white,
because it's a very textured, gritty, matte finish embossing powder...
it actually feels like sandpaper after it's melted...
it's great for backgrounds...
and
I really like it for doilies & lacy borders...
this page in my new fat little book, shows the vintage doily background stamp, inked with glacier white pigment ink, then embossed with weathered white embossing powder...
you can click the photo to see the texture better...
I inked over the cooled embossing powder very lightly with a bit of potting soil archival ink to age it...

in the photo below,
I used weathered white again with
I think it really looks great
the hearts are the new mat mini "have a heart"...
the large & small leaves are the hosta stamps layered together...
I use them for so many projects...
the flower is from this stamp-it stencil-it...
(bottom middle) & it's inked with
the cute gal is cut from a

here's the same lace border again, this time it's lightly inked with tree branch archival, to create the vintage effect...
see that beautiful flower color?
delicious!
the flower is popped into the
it's cut from
to jazz up the cup/saucer...
you'll find the mat mini heart here...
I LOVE the mini envelope...
that's stamped on a white mat board scrap & cut out...
the sentiment is from
and the spoon is a perfect fit for
the adorable tea cup...
oh...
the flower center is a new mat mini button, accented with some black glaze pen dots & some tan-ish embroidery floss...

I demoed this weathered white embossing powder/archival ink technique @ CHA & here's a video compliments of Melody Lane...
if you click the link
in the video you'll see the technique used with
I think bolder images work best...
fine lined images don't show up as well...
this technique only works on black, because archival are translucent inks & they won't show up on a black surface...
this technique will not work on a light surface, UNLESS you are using a stamp-it stencil it...
that's another way to use the stamp-it stencil-its...
I'll be showing that soon...
it's flipping' COOL...
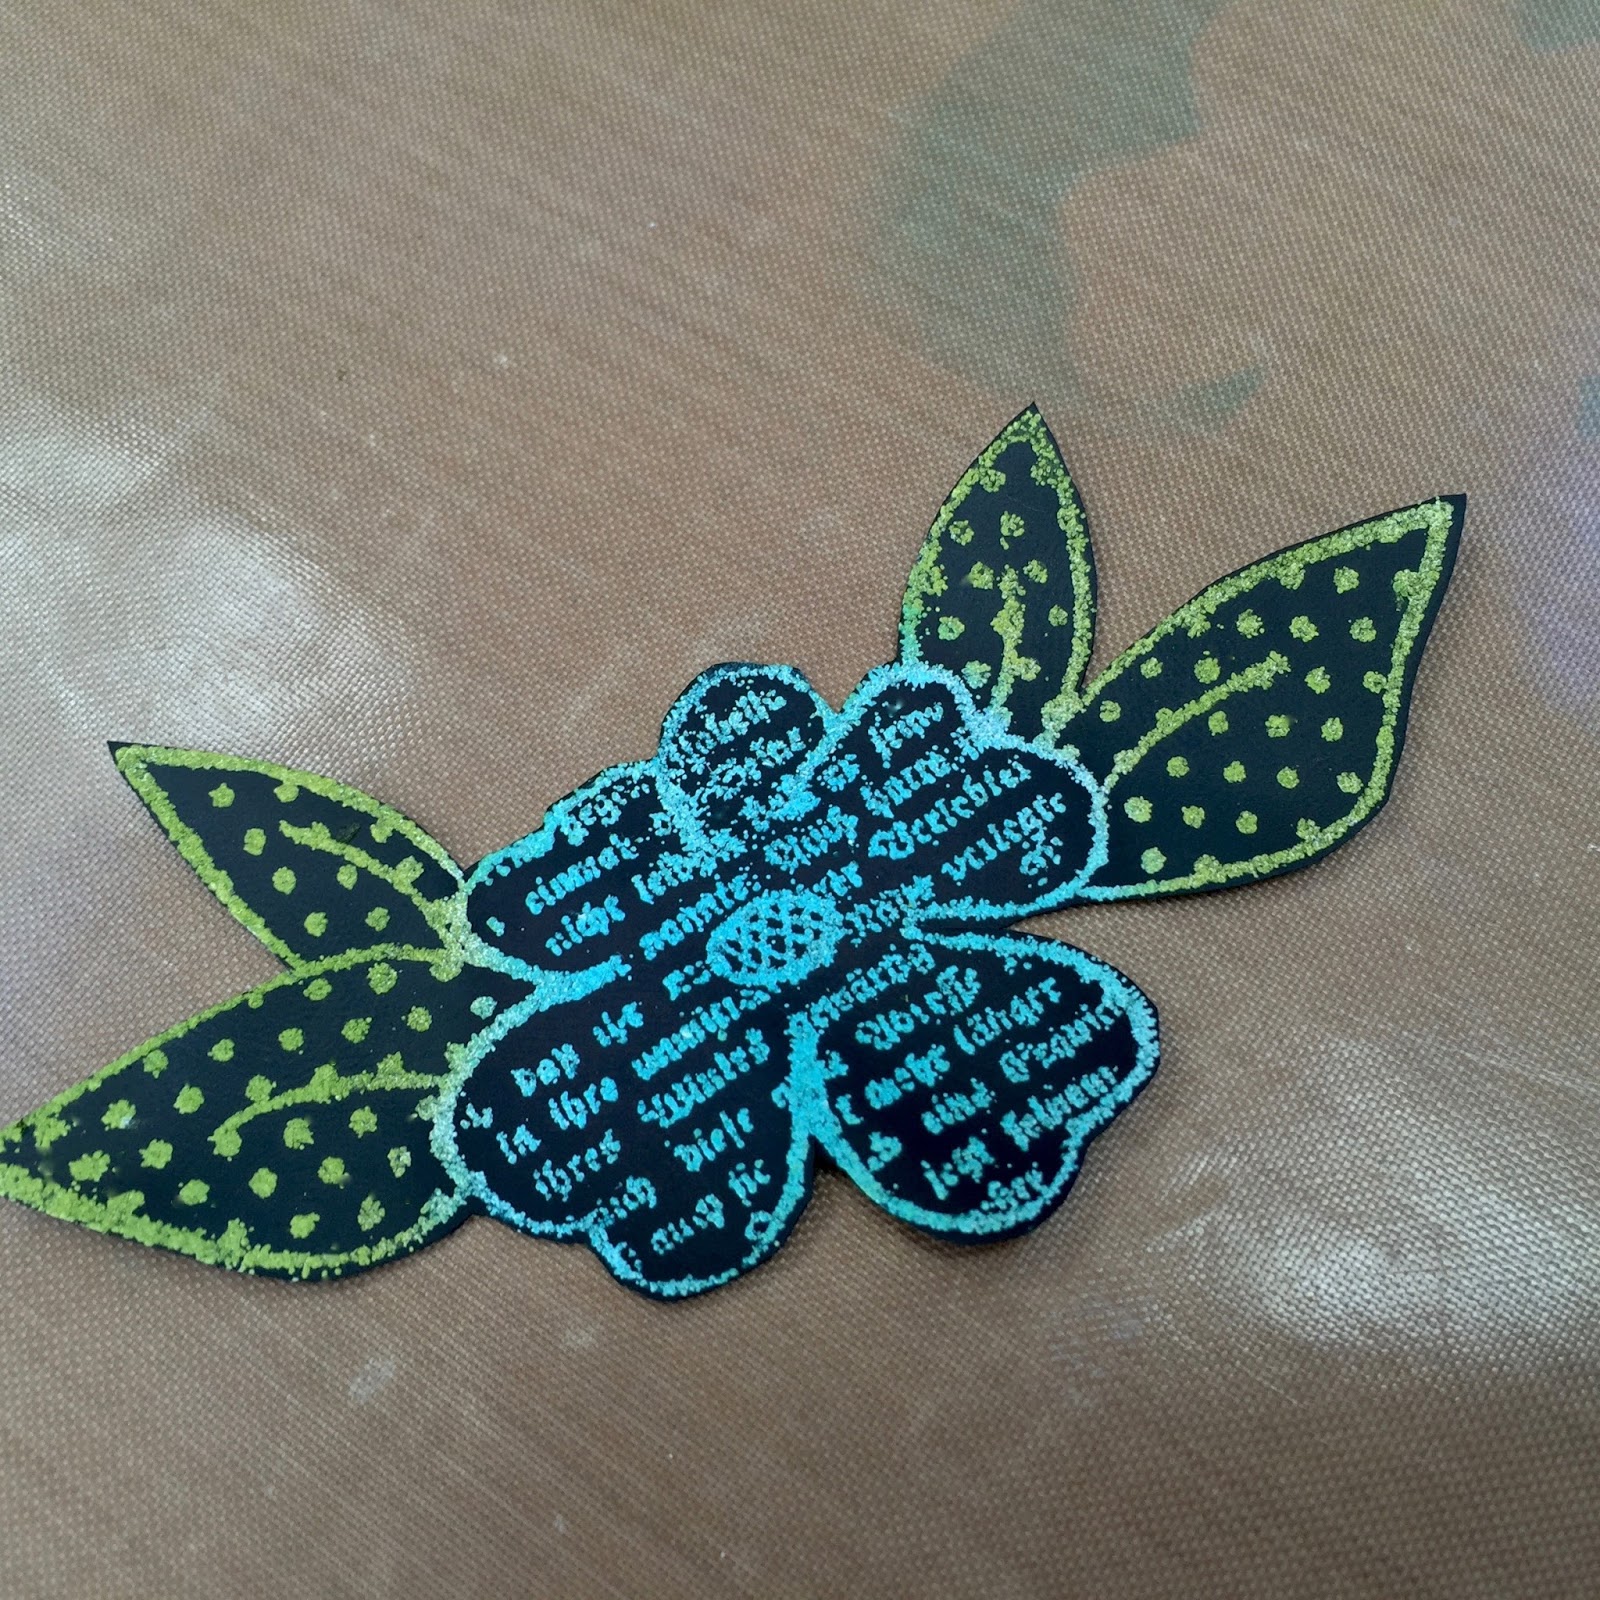
this card starts off the same as
in the previous 2 posts...
I inked the same stamp with glacier white pigment ink & added weathered white embossing powder...
my base is Ranger's black cardstock...
I'll trim this base down later,
when I figure out what I'm doing...

I decided on these 2 archival inks...
leaf green for the leaves &
for the flower...
choose any archival colors you like & they will work & look great...

here's the leaf green added with the blending tool...
I find it best to tap the inked blending tool over the embossing powder, as opposed to rubbing over a large area...
you do see a tiny bit of wetness, where the ink is on the black background,
but that will dry & disappear...

next, I inked the flower...
you can see that the area around the leaves is already drying...
give it a quick dry & you'll see that the archival tints the embossing powder...
and...
the black background shows no color...

I wanted to add dimension to this card, so I used my clearly for art BLACKOUT...
it works the same as the clear CFA...
just use the Ranger heat-it tool to soften the material, then shape & it stays put...
since the "blackout" is a plastic-ish surface, I did prep it with the antistatic powder tool, to prevent stray embossing powder from sticking everywhere...
here are the 2 CFA blackout pieces cut out & ready to be the top layer...
I ended up not using the top one...
but I'll have it ready for another day...

back to the original black cardstock piece...
I trimmed around the leaves for something a little different...
they're hanging off the base...

I added a piece of black foam adhesive under the CFA blackout piece...
I LOVE this stuff...LOTS &
it's perfect for
clearly for art...
you get perfect dimension & great adhesion...
here's my card layers...
the largest was stamped with
inked with the new sunflower archival...
the top layer is sunflower again, stenciled thru the new "lots of dots" stencil...
I didn't worry about the center, since it would be covered...
and the middle is black cardstock...

and here's the finished layered card...
the sentiment is stamped with jet black archival...
the flower center is tim's new hex fastener inserted into a fluted fastener...
I offset the top layer just a tiny bit so that the bottom flower/leaves layer would peek thru...

so that's post #3...
showing several ways to use the same stamp...
I hope you've enjoyed it...
I'm not sure what's next...
stay tuned!
would you like another series like this?
today I have a CHRISTMAS assignment that needs to get done...
yikes!
I hope you can see how cool
the weathered white embossing powder is, especially when it's tinted with archival colors...
it's super easy, it's another way to use your archival inks & it adds really nice texture when you...
make art!
wendy
9 comments:
Now I need the White Weathered embossing powder! I really love the leaves cut off the edge of the cardstock.i need to try that!
Cool technique! Have to see if I have any of that embossing powder. If not then have to do some shopping!
I love the vintage doily stamp on the craft cardstock And I think the Garden Patina ink will be added to my shopping list. Thanks for sharing this with us!
Awesome Wendy!!
I never have any luck with white ink for stamping. This looks like it works pretty good. May have to get me some!
It's brilliant to emboss with the weathered white and then ink over it!!! I LOVE that! Just brilliant!
I love the doily looks Wendy!
WOOOOOOOOOW !!
So cool! Wanna try the coloring with Archival on black cardstock technique now, but I gotta go make dinner ... wah wah wah! I watched the Melody Lane videos, and I had trouble concentrating on what you were demoing, cause that freakin' ring on your left hand was gorgeous! I couldn't stop staring at it! And, that scarf! From now on, when doing demos, no jewelry, and crappy clothes! lol
Love the texture of that embossing powder and boy do those colours pop on the black! Thanks for sharing all your beautiful creations and tips Wendy! Deb xo
Post a Comment