here's how I got started...

here's how I got started...
a 20 minute podcast by Crazy BeYOUtiful
Showing posts with label Ranger Glossy Accents. Show all posts

Thursday, August 26, 2010

cats & questions...and other randomness

the things we do for LOVE...
Hmmm...
sounds like a song...

This furry guy, Ranger the cover cat
(see right sidebar), LOVES fresh pineapple.
Somehow...when Rick cuts it up for our breakfast, he knows & he insists on sharing mine...

Like I said...
the things we do for love...

I put some on a fork for him & he licks it until it's bone dry...

he gets every last drop of juice...
and smiles the whole time he's licking...
SERIOUSLY!


and continuing with cats...
I got this question the other day...

#1...I know you have 2 cats. I want another. Do you have 2 litter boxes?

NOPE...we have NONE.
These guys have us trained to serve them.

They both go outside to do their duty...
never ever had one single problem.
Yes, they both have claws, but have never done one speck of damage inside.
They totally trained us.

Ranger will come & make a certain noise to get your attention, then lead you to the door he wants to go out.

Sometimes it's the front door...
sometimes a patio door...
sometimes he will only go out the kitchen door & he will wait for us to open the garage door...

and...as NUTS as it is...
we're trained to do it!

Now the other critter, Ringo, will rub your leg only when he wants out.
He too leads you to his choice of doors.

and when they want to come in...
they have a different voice for that...

We still wonder how this happened...
I guess we paid attention & like I said...
they trained us. It's PERFECT!

#2 question...when did you know for sure that you were an artist?

This is kind of funny...
many days I still wonder...
like right after I've just tossed something ugly in the trash...

SERIOUSLY...
some days are just NOT good days for making art!
I don't make things I'm 100% satisfied with every single day...
so don't think I do...
it's either THERE or it's NOT...

there's no forcing art...

Ok... before I had my first stamp release we decided to change accountants...

So we made an appointment to explain what was going on & she said...
so you're a nurse, right?

I blurted out...nope, an artist...
then I quickly looked @ Rick...
and thought...

WHO SAID THAT?

I was thinking it came out of HIS mouth!

So I guess once it was listed as my occupation on the tax forms...that made it official.

#3...Is it bad that I'm in MI, and contemplating visiting relatives in IL to see you in Nov?

Not in my opinion!! HA!
Better hurry & decide...
we'd love you to join the fun...

the classroom @ Scrapbook Friend'z holds 28 & a few days ago I heard we were already @ 25...

#4...LOTS of book #3 inquiries...
I could write a book on here! Speaking of "book" where is my Part III book that I'm not so patiently awaiting? LOL I'm getting all Wendyized and am dreaming of art parts and stamps and they thought sewing paper was weird....ha!

SOON...
They are just swamped @ Stampers Anonymous with CHA orders for stamps, art parts & books...

keep in mind they make Tim's stamps, mine, Art Gone Wild, Inky Antics, Darcie's & Claudine's clears too..

So...that's a whole LOT of work...

Just as soon as they are here...
I'll post it...

#5...Pleeeese can you get some of those amazing Art Parts airlifted to the UK urgently. We need them!!!. Seriously, its really hard waiting, they look fantastic.

5A...do you have pull to send art parts across the pond like today?

Here's the scoop...
orders placed @ CHA ship first...
they are shipped in the order they are received.

So...depending on when they were ordered, that determines when they ship.

First day CHA orders ship first, second day second...etc...

and NO...I have NO PULL!
Ted is the boss...

actually...
I really think Michelle is...
but we won't let Ted know that!
It's our little secret...shhhhh...

Here's a reminder that inspiration is everywhere...
even WALGREENS...

I was there the other day & spotted these fake lashes...
I kind of chuckled to myself...

if I were to wear them...
I could see mine falling off in my ice tea...
or worse yet...
my mojito!

But...something clicked &
I went back down the aisle to get some...


and made this...to add to my Ranger apron for classes.
there's those memo pins again...
they are so fun & simple.

Glossy Accents is the MAGIC ingredient.

and see tim's new charm clip?
I'll be getting 1000 of those cuties!

they are perfect for hanging things...
obviously...duh...

and can also be used just like the memo pins to make custom epoxy embellishments...


the fake lashes are sooo cool looking on her eyes!

it's a small detail...
but it does add to the overall effect!


agree?
Plus it makes me laugh!

Maybe the gals @ JoAnn's were right...
(see yesterday's post)

Maybe I HAVE gone off the edge!


WARNING...
here's a little enabling...

I LOVE these Jenni Bowlin buttons...
LOVE the colors...

the brown & black are sweet...
but the package listed as yellow is an awesome vintage-ish yummy color.
that just might be my new fav...


these adorable butterflies are vellum...

LOVE the mini papers too...
I'll be making art with them early next month...

stay tuned...


Ok...we're off early tomorrow morning, headed to O'Hare for a flight to Columbia South Carolina to spend the weekend @ The Stamping Place.

I was there last year for the grand opening of their AWESOME brand new classroom...

I'm looking forword to visiting, teaching, stamping, inking, grunging, sweet tea & southern hospitality!

I hope you're looking forward to the weekend so you can...

make art!
wendy

PS...I told you comments are GOOD...

just ask...
Blogger Mall Rat said...

I can't wait for Art Parts to show up. I signed up yesterday for your Friday night class at For Keeps Sake in St. Louis .. I can't wait !!! I finally get to take a class with you, I'll have to get a pic and put you up on the wall of fame with Tim & Teresa :) LOL

August 25, 2010 3:35 PM

Mall Rat...Please email your shipping info...and there will be some fresh rubber headed your way...

compliments of TED & MICHELLE!

WAIT...

OH...one more thing...

if you really need a laugh...

check this out...

I'm CERTAIN SHE is over the edge...

no doubt...

and...

comments are good...just sayin...

Thursday, August 12, 2010

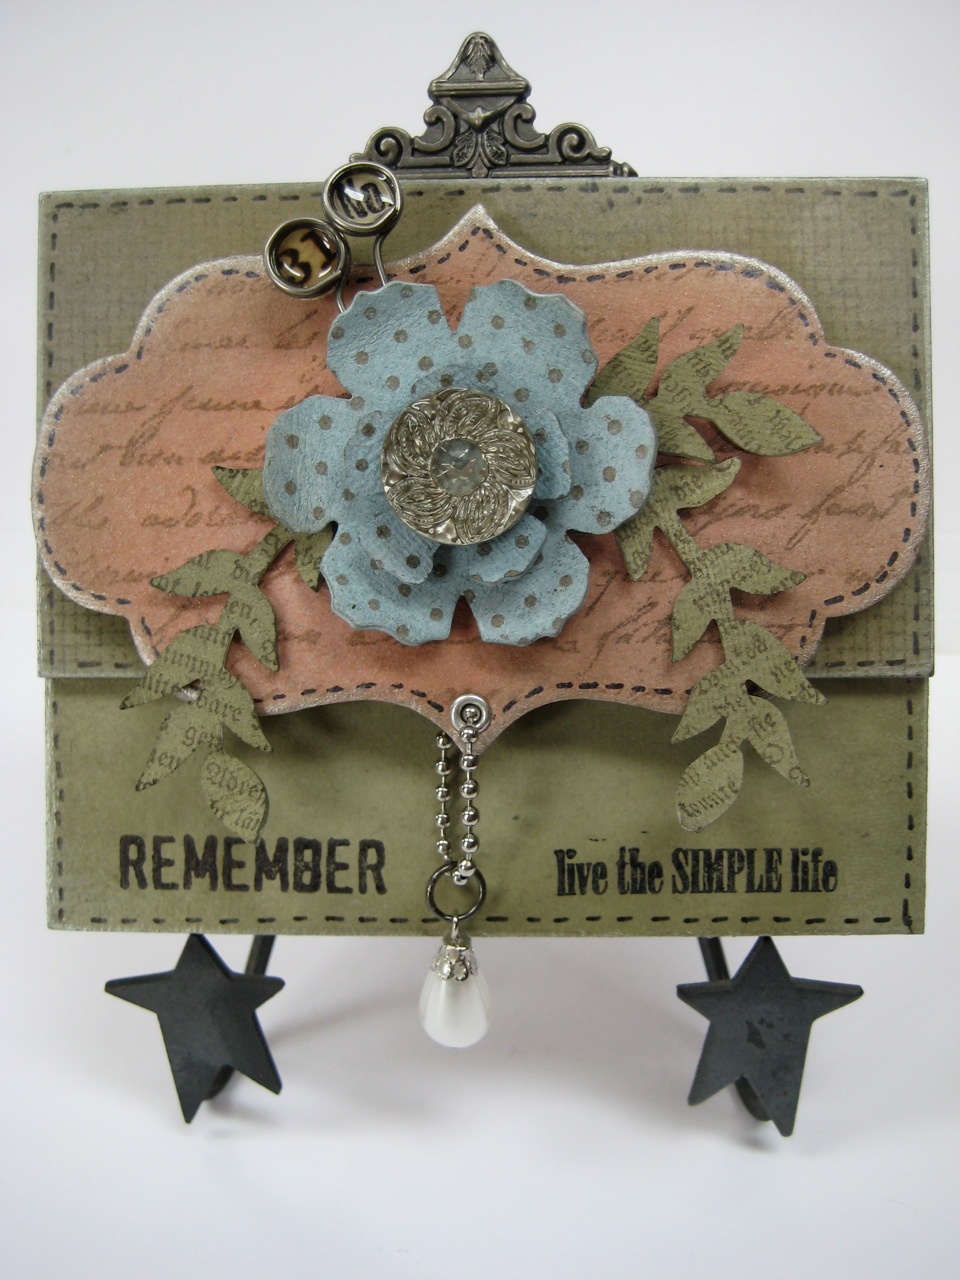
Thursday's tutorial...

good morning!

as promised...
here's a very fun project...
complete with supply list & instructions...
just for you...

my blog friends...


supplies you'll need...

tim's newest distress inks in these colors...


You'll want to work on Ranger's non stick craft sheet...
and have the heat-it tool ready...

then grab these Ranger supplies...
and archival inks in black & coffee...

oops...forgot to include the Glossy Accents...
in the photo...

that holds everything together...


you'll need tim's alterations (Sizzix) dies...
the leaves from regal crest

and speaking of dies...OMG...
wait 'til you see the vagabond...
it's WAY WAY WAY COOL...

check out the video...
it can't come soon enough...phew...hot flash...too excited...can't think about that now...


ok back to business...

from tim's idea-ology line...
a small piece of ball chain
a new button
and a pearl from the new bauble package

and...
2 cut outs from the 3 1/2 x 5 1/2 art parts frame

plus these...

studio 490 stamps:
screen from art rules
script from live & make art
text from botanical art
polka dots from seriously art
remember from collectible art
live the simple life from residential art

general stuff...
this cool tool...opens jump rings like magic
one silver eyelet & eyelet setter
chipboard scraps
precision pen for pen stitching

the info for making the custom epoxy memo pins is here...

ready to start?

*make 2 epoxy memo pins (they take several hours to dry)

*using grungeboard, die cut the leaves and the 2 flowers, using tim's alterations dies

*using chipboard, die cut the styled label

*using snow cap, tap the pad directly onto the flowers, leaves, label & 2 art parts rectangles

*use the heat-it tool to dry, then apply a second coat to each piece, then heat to dry

make sure to cover the fronts & backs of the flowers and leaves

*using the blending tool & forest moss, ink both art parts pieces & also the leaves then dry

*using the blending tool with stormy sky, ink the flowers front & back then dry

*using the blending tool with rusty hinge, ink the label then dry

*using coffee archival, lightly stamp one arts part rectangle with the screen stamp and the die cut label with the script stamp then dry

*using coffee archival, stamp the flowers with the polka dot stamp then dry...
don't forget the backs!

*using coffee, stamp the text over the leaves then dry

*using jet black archival, stamp the plain green rectangle with the word & saying then dry

*using the silver dabber, lightly edge the 2 rectangles & the label

*add the eyelet to the bottom of the label as shown, then insert the pearl bauble on the chain as shown. use a jump ring to attach the pearl to the chain

*using Glossy Accents, glue the 2 rectangles as shown...overlapping them by an inch

*add a scrap of chipboard under the label & glue in place

*shape the grungeboard pieces then glue to the label. add the leaves then the flowers over them

*add the button & embellish with the epoxy memo pins

*add the ornate plate to the back of the hanging...

*a little pen stitching is the finishing touch

*now...sit back & admire the art YOU created!

Here's a closer look...


what I LOVE about this technique is that it totally changes the look of the pigment ink and the distress inks too.

by combining them, you end up with a whole new color palette & TONS of possibilities...

this is the technique that made me fall in LOVE with the pigments...
the chalky look is cool...

and also the fact that you CAN use the blending tool with them too! that's a story for another day...

I hope you enjoyed this...

Get out your supplies and...

make art!
wendy

well...DUH...nice post...

BUT...art parts & a few of tim's things aren't here just yet...
but you'll be all ready when you do get them!

ps...art parts will be shipping soon...
book #3 too!
tim's stuff in Sept...
and that VAGABOND...like I said...
not soon enough for me!

Tuesday, August 3, 2010

CHA was ...

PERFECT!

It's lots of work...but LOADS of fun too...

Art Parts were a HUGE hit...
YIPPEE!
I'm thrilled...

I'm already getting ideas filed for CHA 2011 in January...
art parts we'll need...

the new release of studio 490 stamps makes me happy too...
another YIPPEE!

I LOVE demoing for Ranger...
visiting with friends & inky fingers make me oh so happy...

and speaking of inky fingers...
Ranger's brand new Craft Scrubbie works like MAGIC...

I tested it @ Ranger U & it worked great...
but after I demoed @ CHA for about 7 hours straight...
you can bet that my fingers were REALLY inky...

so, that was a REAL test...

I'm happy to report that it worked like MAGIC...

after using the Craft Scrubbie, I went to dinners with CLEAN fingers. COOL!

You'll want one...FOR SURE...

And speaking of Ranger...
Here's the featured tutorial for August on their site. yippee!

Compliments of Ranger...
you get a complete supply list and project instructions...

this could easily be adapted to a guy card...

Beware...
I really did make it, even though there are no flowers on the project...

I know...
it's quite shocking...


Glossy Accents make PERFECT fish bubbles...

and the swivel clasp makes the perfect HOOK...
just cut off a bit...

I LOVE it when an idea works...

Check it all out here...


Back to CHA stuff...
Here's what the art parts sampler package looks like...sort of...

this was the prototype package...


And here's a Ranger video recapping CHA.

Moving on...

On Sunday I realized @ the last minute that I NEEDED a gift...
like in 30 minutes...geez!

So...
you've heard me lecture about looking @ the potential of "things"...

here's an example...

This is an 8 x 8 canvas that I bought @ Hobby Lobby...

I thought it had potential & would make a quickie project...

The only thing I added to the canvas was the gold edge, with the gold paint dabber...


I added the large art parts flower, some studio 490 stamped images, some grunge, a vintage watch face & some ideology & ended up with this...


So the moral of the story...
keep your eyes open & SEE the possibilities.
You just might need a last minute gift...
like me!

And another moral of the day...

comments are good...
VERY good...

Like good enough to win a copy of my new book...


just saying...

make art!
wendy

ps...we'll choose a winner @ NOON on WEDNESDAY...hey...that's tomorrow!

Tuesday, July 13, 2010

hot off the press...

right from the studio to you!

I was up @ 4:30am with an idea for this piece...
I had to get up & get it out of my head...

but...
it looks absolutely NOTHING like the idea I started with...

why is that?

art seems to have a mind of it's own some days...

anyway...

When the art parts frames are cut, you end up with the insert that gets cut out...

so I had several of these & decided they needed to be put to use...

here's today's finished piece...


it's quite substantial, since it has so many layers...(I'm thinking gifts...)

now if you click & enlarge the photo...*EDITED*(OOPS...I guess that doesn't work. sorry)

you'll get a better look @ the memo pin embellishment...


I made a bunch more yesterday, using the same technique...

and I also made this discovery...yippee!

tim's tissue tape is LOADED with minis that fit the memo pins...

one roll must have a billion choices...
seriously...

just adhere a strip of tissue tape to a cardstock scrap...

punch...

proceed to fill the opening with Glossy Accents...

these are really fun & economical to make...
and I like that you'll never run out of the exact pin you need...

you'll see that the pin above is tinted, because of the color in the tape...it was a perfect fit...

and here's a few more ideas that are brewing in my little brain...

you can also fill the opening with Enamel Accents...

allow to dry & then add a mini...really mini rub-on, for a fun custom embellishment...

you can do the same with the Glossy Accents...

just add a mini rub-on on top...

did you spot the 2 Maya Road star trinket pins...
I bought 500...yep...500!
LOVE them!

MR UPS just dropped off a next day air box of...

ART PARTS!

I'm running to the studio to...

make art!
wendy

Monday, June 7, 2010

so I had this little idea...

I tried it & it worked...


I planned to save the idea for book #3...(I'll use plan B there instead)


but since we had so many lovely comments on the last post...

THANK YOU!!!


I decided to share it TODAY...

(see...comments are good...very good!)

One of my favorite products from tim's last CHA release is the memo pins...

they have LOTS of possibilities...

my idea was to create "custom epoxy embellishments"...

let's get started...

first of all...there are 2 different sides to the memo pins...

take a look below...

when making these guys, I set them on the craft sheet like the pin on the right...

with the end of the wire on top...


It sits flatter that way.


Supplies to gather...


you'll want to work on Ranger's non stick craft sheet for sure...

memo pins...of course!

Ranger's Glossy Accents are the magic ingredient...

jet black archival ink

a glue stick

a paper punch sized to fit the memo pin circle

(I think mine is an EK SUCCESS? It's old...it's yellow & it's the perfect size)

some studio 490 stamp word/number images...

would be a great choice (in my opinion!)

imagine that!

or book text...

or tim's tissue tape applied to cardstock...

or this tissue tape...
or...or...or...there are a million possibilities...

here are the simple steps...

#1...stamp images on cardstock, using jet black archival ink...then punch some images to put behind the memo pin...

#2...use the glue stick & put a line of glue on the craft sheet. this will hold the tiny punched images in place...

(incase you sneeze! ha!)

set the punched images on the glue line...

MAKE SURE to leave room between them, if you're making a bunch...

#3...lay the memo pin over the punched image & fill with Glossy Accents...

I started on the perimeter of the circle & filled it to the inside to completely cover the image...

(I made a bunch to have on hand...because now I'm IN LOVE with them)...


They look cloudy when filled, but TRUST ME...

the Glossy Accents magically dries crystal clear...
(ignore the gold & black paint dabber leftovers


I got in a hurry & didn't clean the craft sheet...)


#4...set aside & let dry...it takes about 2 hours-ish...

Remove from the craft sheet...magically, the craft sheet releases them without the paper sticking to the sheet...


like I said...it's MAGIC!

TADA...

a "custom epoxy embellishment" ...

Here's one...


and here is one I used on a CHA project...


You certainly didn't think I'd show the whole shebang...

DID YOU?? ha ha!!

SORRY...CHA is still 6 weeks away!

Now the extra cool thing is that these cuties are "cost effective"...

I MAY possibly be an enabler...

I've been accused of that...

but @ 10 cents each...these guys are the bargain of the century!

You'll never run out of the word or number you need...

because they are...

CUSTOM made! Just make what you NEED...

TRY IT... then let me know how you like it!

Now about the promised giveaway...

since we had over 100 comments we're giving 3 goodie packages instead of just one...YIPPEE!!!

HUGE CONGRATS TO...


Kim said...
Wow!!!! I love the new MR stuff!!! Adding it to my wish list right now!!!!!

June 6, 2010 3:13 PM


and more CONGRATS...

Twyla and Lindsey said...
I love your posts! I love your work!
I can't wait to get my hands on those star stick pins!! Love them!
Thanks!
Lindsey

June 5, 2010 10:02 AM

and another CONGRATS!...

lovetostamp said...
Wendy - what a great post - full of great info. Love it that Ranger got a blog - already subscribed! Thanks for keeping us updated - so much cool Maya Road stuff!

June 4, 2010 11:08 AM


Please email (wbv1213@hughes.net) your shipping info & there will be a little package coming your way...

So now that all these custom epoxy embellies are waiting...

I'm off to the studio to...

make art!

wendy
ps...we LOVE the ipad...
we will be dumping this PC THIS WEEK...but that's a story for another day.