here's how I got started...

here's how I got started...
a 20 minute podcast by Crazy BeYOUtiful
Showing posts with label Ranger craft sheet. Show all posts

Friday, May 17, 2013

customized embossing pastes...

I thought I'd show you today how to easily create custom colors of embossing pastes...

it's as easy as 1  2  3...

working on the craft sheet...

put a small amount of my white embossing paste 
and a drop of any distress reinker...
just touch the tip of the eyedropper to the craft sheet & that is plenty of the reinker...


just to show you the small amount I used...
I put the lid from the distress stain near the paste...


now use a palette knife to mix the reinker into the paste...
looks yummy...
just like frosting...

this is peeled paint...
it makes awesome colored leaves...

use less color for a lighter paste...
more reinker makes a darker color of the paste...


I masked off the flower area with post-its...
then using the palette knife, 
I added the green paste thru the stencil...


***remove the stencil...
clean off the paste 
FROM THE STENCIL & PALETTE KNIFE 
before it dries...***

when the green paste is dry...
 mixed a drop of the rusty hinge reinker with a small amount of white paste...


this is a really beautiful color...


now use post-it's again to block off the dry green leaves...

and spread the rusty hinge paste over 
the flower portion of the stencil...

you can do a nice even layer...


or thick & thin like I did in the photo below...
that creates even more texture...

that's how simple it is to create 
custom colored embossing pastes...


(this links to the original 24)
think of all the beautiful colors you can create, 
with just a tiny drop of any reinker...

so not only do the reinkers refresh your distress ink pads,
they do double duty...
 they also create custom colored embossing pastes!

while my paste dries...
I'll plan my background...

then I'll make art!
wendy
ps...what's your favorite color of reinker?
try broken china...
it's A W E S O M E!


Wednesday, February 15, 2012

with these stains...

happy Feb 15...
one day closer to SPRING...
we're so ready here!

I had several questions about the background I showed in the last post, so I thought I'd show you how it's done...

this was inspired by watching Lady Dy @ CHA last summer...

you may remember that she was looking for a "kitchen roll"...
which actually is a roll of paper towels...

which lead to me asking her if toilet paper was then called a BUTT ROLL...

which she now calls a shimmy butt roll...lol!

Dy makes her backgrounds using her new Dylusions spray inks...
they are beautiful bright & bold colors...
just like her...

I LOVE Dy & we tease & insult each other
thru the entire CHA...
it's a blast!

since I don't have the spray inks YET...
I used my favorite tim distress stains instead...

this gave me a more toned down muted background...
which fits my style...

Dy works in a journal...

I LOVE Ranger's Inkssentials manila cardstock...
it's the same great durable material as the tags...

this allows me to make backgrounds for cards...
ATC's, pages for my creative covers or
or whatever I need @ the time...

I get the 12 x 12 size...and cut it into quarters...

which gives me 4 pieces that are 6 x 6...
it's a nice size to work with...

the same manila card stock is also available
if you like that size better...

here are the stain colors I used this time...


rusty hinge & you'll want plenty of water...
this mister is perfection...

and the other key ingredient is your heat tool...

and for sure...work on the craft sheet...


***WARNING...***
it's UGLY before it gets cute...

#1...mist one manila square with plenty of water,
then tap the stains right over the water to release a good amount of stain...
I started with mustard seed & chipped sapphire...

tapping them kind of hard
opens the valve to allow more stain to be released...

Dy says to make "poodles" of water on your surface...
the interpretation is puddles...LOL...

like I said...not lookin' real good now...

use a second square & press it over the first to transfer the excess ink to the second square...


it will now look like this...
dry both pieces...

#2...I wanted more blue...
so I added another big blast of water & then I tapped the chipped sapphire stain right in the water...
and it looks like this...

tap the second square over this to pick up the excess ink onto the second square...


dry them both & it looks like this now...


#3... another big blast of water...
you can see the "poodles"...

then I tapped the rusty hinge stain randomly...

pick up the excess on the second square again...


dry both and here's the final result...

a very cool starting point for your art...
customize it with your favorite background stamp...
it's very fun...


I did another variation...aka PLAN B...
but accidentally deleted those photos...duh...

for the last step I used water & a squirt of
this adds a beautiful bit of bling...

the binder is built right in to the solution of the PP mist...
so they will not rub off...

and for PLAN C...
you could also sprinkle in a bit of Perfect Pearls powder into the "poodles" too...

it takes very few supplies & very little time to create these backgrounds...
I hope you're inspired to give it a try...

I like to make a few & have them ready...
sometimes it's the jump start for an idea...

moving on...

book #6 *should* be here soon...
I'll let you know when I have them...


but in the meantime...
this copy will be shipped to...

Blogger Marjie Kemper said...

Congrats to all the winners! I love the new pieces, especially the fella with all his funky gears and metal. And yes... there's just the right amount of room on my bookshelf for Book #6! Thanks for asking!

February 13, 2012 1:30 PM

MARJIE...email me with your address please...
wbv1213@me.com

and...

it's another of Alain's extreme stickling "techniques"...
it's bloody hilarious!

thanks to everyone for your comments & emails...
I sincerely appreciate them...

come back on Friday...
I see that I still have some
brand new rubber to share...

until then...

get out your distress stains &...

make art!
wendy
ps...I've started to add my teaching schedule to the right sidebar...

Thursday, August 12, 2010

Thursday's tutorial...

good morning!

as promised...
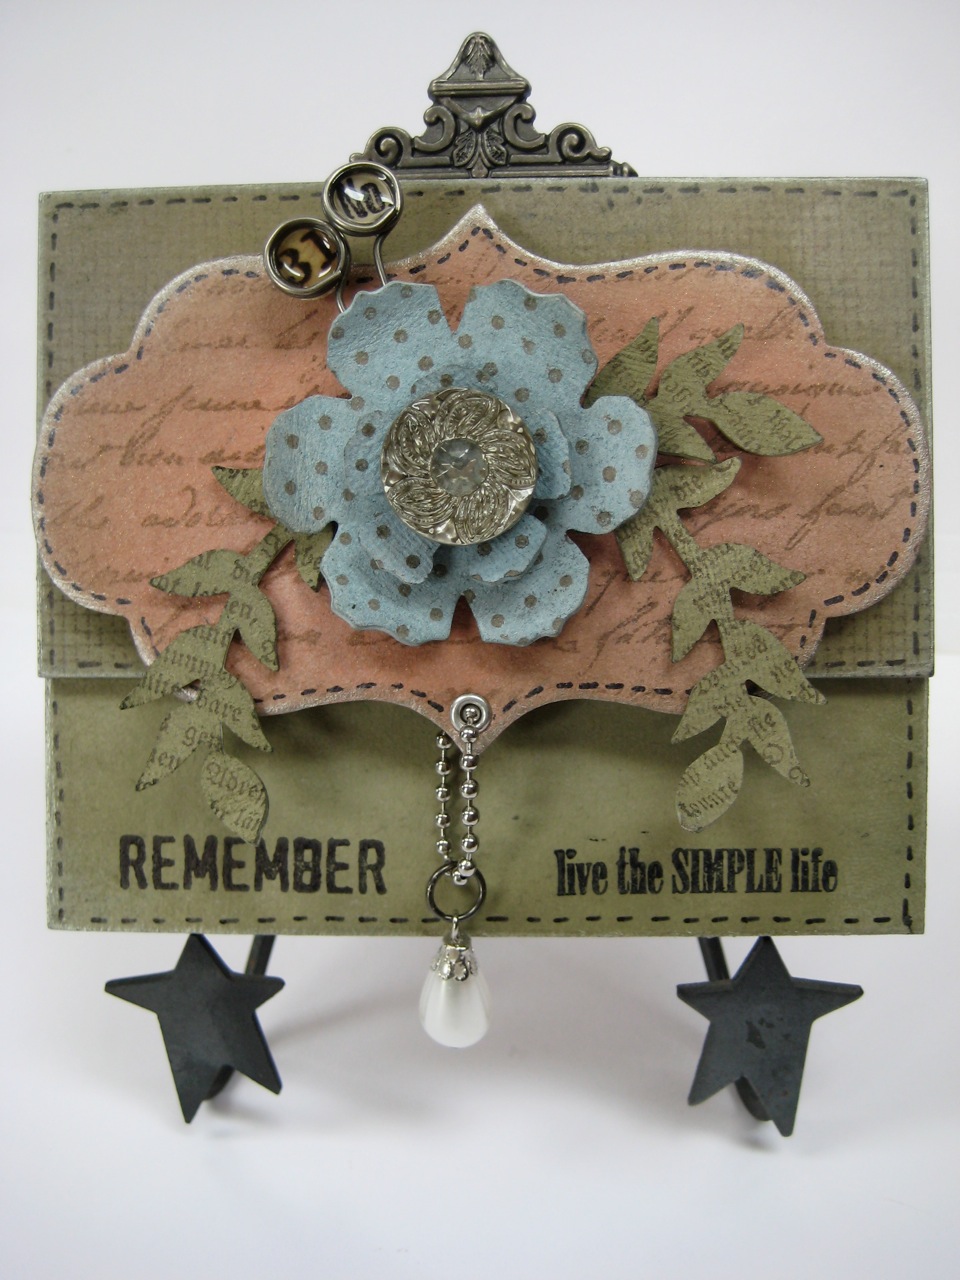
here's a very fun project...
complete with supply list & instructions...
just for you...

my blog friends...


supplies you'll need...

tim's newest distress inks in these colors...


You'll want to work on Ranger's non stick craft sheet...
and have the heat-it tool ready...

then grab these Ranger supplies...
and archival inks in black & coffee...

oops...forgot to include the Glossy Accents...
in the photo...

that holds everything together...


you'll need tim's alterations (Sizzix) dies...
the leaves from regal crest

and speaking of dies...OMG...
wait 'til you see the vagabond...
it's WAY WAY WAY COOL...

check out the video...
it can't come soon enough...phew...hot flash...too excited...can't think about that now...


ok back to business...

from tim's idea-ology line...
a small piece of ball chain
a new button
and a pearl from the new bauble package

and...
2 cut outs from the 3 1/2 x 5 1/2 art parts frame

plus these...

studio 490 stamps:
screen from art rules
script from live & make art
text from botanical art
polka dots from seriously art
remember from collectible art
live the simple life from residential art

general stuff...
this cool tool...opens jump rings like magic
one silver eyelet & eyelet setter
chipboard scraps
precision pen for pen stitching

the info for making the custom epoxy memo pins is here...

ready to start?

*make 2 epoxy memo pins (they take several hours to dry)

*using grungeboard, die cut the leaves and the 2 flowers, using tim's alterations dies

*using chipboard, die cut the styled label

*using snow cap, tap the pad directly onto the flowers, leaves, label & 2 art parts rectangles

*use the heat-it tool to dry, then apply a second coat to each piece, then heat to dry

make sure to cover the fronts & backs of the flowers and leaves

*using the blending tool & forest moss, ink both art parts pieces & also the leaves then dry

*using the blending tool with stormy sky, ink the flowers front & back then dry

*using the blending tool with rusty hinge, ink the label then dry

*using coffee archival, lightly stamp one arts part rectangle with the screen stamp and the die cut label with the script stamp then dry

*using coffee archival, stamp the flowers with the polka dot stamp then dry...
don't forget the backs!

*using coffee, stamp the text over the leaves then dry

*using jet black archival, stamp the plain green rectangle with the word & saying then dry

*using the silver dabber, lightly edge the 2 rectangles & the label

*add the eyelet to the bottom of the label as shown, then insert the pearl bauble on the chain as shown. use a jump ring to attach the pearl to the chain

*using Glossy Accents, glue the 2 rectangles as shown...overlapping them by an inch

*add a scrap of chipboard under the label & glue in place

*shape the grungeboard pieces then glue to the label. add the leaves then the flowers over them

*add the button & embellish with the epoxy memo pins

*add the ornate plate to the back of the hanging...

*a little pen stitching is the finishing touch

*now...sit back & admire the art YOU created!

Here's a closer look...


what I LOVE about this technique is that it totally changes the look of the pigment ink and the distress inks too.

by combining them, you end up with a whole new color palette & TONS of possibilities...

this is the technique that made me fall in LOVE with the pigments...
the chalky look is cool...

and also the fact that you CAN use the blending tool with them too! that's a story for another day...

I hope you enjoyed this...

Get out your supplies and...

make art!
wendy

well...DUH...nice post...

BUT...art parts & a few of tim's things aren't here just yet...
but you'll be all ready when you do get them!

ps...art parts will be shipping soon...
book #3 too!
tim's stuff in Sept...
and that VAGABOND...like I said...
not soon enough for me!

Monday, June 7, 2010

so I had this little idea...

I tried it & it worked...


I planned to save the idea for book #3...(I'll use plan B there instead)


but since we had so many lovely comments on the last post...

THANK YOU!!!


I decided to share it TODAY...

(see...comments are good...very good!)

One of my favorite products from tim's last CHA release is the memo pins...

they have LOTS of possibilities...

my idea was to create "custom epoxy embellishments"...

let's get started...

first of all...there are 2 different sides to the memo pins...

take a look below...

when making these guys, I set them on the craft sheet like the pin on the right...

with the end of the wire on top...


It sits flatter that way.


Supplies to gather...


you'll want to work on Ranger's non stick craft sheet for sure...

memo pins...of course!

Ranger's Glossy Accents are the magic ingredient...

jet black archival ink

a glue stick

a paper punch sized to fit the memo pin circle

(I think mine is an EK SUCCESS? It's old...it's yellow & it's the perfect size)

some studio 490 stamp word/number images...

would be a great choice (in my opinion!)

imagine that!

or book text...

or tim's tissue tape applied to cardstock...

or this tissue tape...
or...or...or...there are a million possibilities...

here are the simple steps...

#1...stamp images on cardstock, using jet black archival ink...then punch some images to put behind the memo pin...

#2...use the glue stick & put a line of glue on the craft sheet. this will hold the tiny punched images in place...

(incase you sneeze! ha!)

set the punched images on the glue line...

MAKE SURE to leave room between them, if you're making a bunch...

#3...lay the memo pin over the punched image & fill with Glossy Accents...

I started on the perimeter of the circle & filled it to the inside to completely cover the image...

(I made a bunch to have on hand...because now I'm IN LOVE with them)...


They look cloudy when filled, but TRUST ME...

the Glossy Accents magically dries crystal clear...
(ignore the gold & black paint dabber leftovers


I got in a hurry & didn't clean the craft sheet...)


#4...set aside & let dry...it takes about 2 hours-ish...

Remove from the craft sheet...magically, the craft sheet releases them without the paper sticking to the sheet...


like I said...it's MAGIC!

TADA...

a "custom epoxy embellishment" ...

Here's one...


and here is one I used on a CHA project...


You certainly didn't think I'd show the whole shebang...

DID YOU?? ha ha!!

SORRY...CHA is still 6 weeks away!

Now the extra cool thing is that these cuties are "cost effective"...

I MAY possibly be an enabler...

I've been accused of that...

but @ 10 cents each...these guys are the bargain of the century!

You'll never run out of the word or number you need...

because they are...

CUSTOM made! Just make what you NEED...

TRY IT... then let me know how you like it!

Now about the promised giveaway...

since we had over 100 comments we're giving 3 goodie packages instead of just one...YIPPEE!!!

HUGE CONGRATS TO...


Kim said...
Wow!!!! I love the new MR stuff!!! Adding it to my wish list right now!!!!!

June 6, 2010 3:13 PM


and more CONGRATS...

Twyla and Lindsey said...
I love your posts! I love your work!
I can't wait to get my hands on those star stick pins!! Love them!
Thanks!
Lindsey

June 5, 2010 10:02 AM

and another CONGRATS!...

lovetostamp said...
Wendy - what a great post - full of great info. Love it that Ranger got a blog - already subscribed! Thanks for keeping us updated - so much cool Maya Road stuff!

June 4, 2010 11:08 AM


Please email (wbv1213@hughes.net) your shipping info & there will be a little package coming your way...

So now that all these custom epoxy embellies are waiting...

I'm off to the studio to...

make art!

wendy
ps...we LOVE the ipad...
we will be dumping this PC THIS WEEK...but that's a story for another day.

Wednesday, March 26, 2008

2 in one photo..a project peek & a tip


Here's an idea for your Ranger craft sheet...
I used red liner tape & adhered mine to a self healing cutting mat, that I found in the quilting section @ JoAnn's. It makes the mat more stable...no sliding around & you can actually see the grid lines thru the mat. Mine is out on my work surface & I use it every day for inking & stamping. An added benefit is that nothing penetrates it, so it keeps my workspace nice & neat....no spots or stains!
*****
I played a bit yesterday (see photo above)...I should have been packing up the supplies for "For Keeps Sake" classes this weekend...but those fragments caught my eye. I couldn't resist... It starts with 2 pages of Maya Road's square banner book for the covers. I add a few fragments...some rub ons... some dots...It's not done...but I sure had fun!!
*******
Gotta run ...LOTS to get ready for the weekend.
Enjoy your Wednesday!
wendy

Thursday, March 13, 2008

Tagged by the boss & 6 others...

again! YIKES!!!

I've had this on the TO-DO list for 2 weeks, but now that Maya Road Caroline tagged me...I better do it, so I don't get fired! HA!

OK...

7 random facts...followed by 7 tags...

1. I HATE white pop dots. They should be outlawed. Black is better for art, because they are much less noticable. Think about it...Make a nice vintage looking project...those white pop dots are WAYYYY too much contrast & ruin your project. The only reasonable use for them is to attach chipboard to your craft sheet, when something needs to be painted.

2. If buttons are attached to a layout or art project, I think they should have thread in the holes...or brads...whatever. I think they look unfinished with naked holes and you see the adhesive too.

3. According to my brother...I'm not in this century, because I don't do texting. No time for that! If it's important...call or send an email! I need both hands for art!

4. I HATE wire hangers. I only use padded. Who wants those ugly shoulder stretchy marks?? YUCK!

5. All my clothes face the same direction in the closet...yes...I know what you're thinking. She's a total wacko!! Don't care!!

6. I said before that I LOVE to vacuum. I even vacuum inside the refrigerator. Yep...got caught one day & he thought I had totally flipped. But...those onions shed their skins in the veggie bin...sucked them right out & went about my business. Simple.

7. Now referring back to #5...I have the freezer drawer the same way.... all lined up & organized. My brother's girlfriend gets entertained when she visits by opening that drawer. It makes her laugh every time. I actually think she's trying to catch a mess...SORRY! It won't happen!

Looks like quite a few folks think I'm a nut case...Oh well...that's me.

Now for the TAGS...
1. Kim Hughes...rubber stamp ARTIST!
2. Michelle Cutts...Oh wait...she doesn't have a blog...maybe this will give her a gentle hint.
3. Candi Tardio...she shops more than I do!
4.Patti Behan...she takes care of my Ranger orders. Gotta suckup to her...
5. I'll do Ginny again...she always writes cool stuff. Sorry to nab you again Ginny!
6. Suzy Plantamura...she's back on our DT! YIPPEE!
7. Katie Watson...my CHA suitemate!

CONGRATS to ALL OF YOU!!!!!!!!!!!

We're over the 100 comments! Keep them coming 'til Monday's drawing. I think I'll have Michelle pick a number, so no one is mad @ me!! Stay tuned.

And the back of the fragments journal cover...kind of appropriate right here!

wendy