I thought I'd show you some fun ways to use one of my most favorite background stamps...
it's in the heirloom art set...
from my newest release...
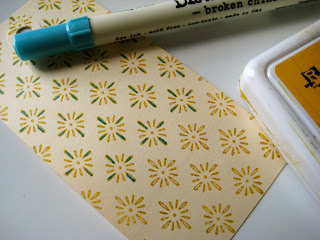
I stamped it with jet black archival on a #5 manila tag...
I used Ranger's Craft Rub-It Scrub-It under my tag...
to protect my craft sheet...
a cork mat would work too...
NEVER EVER use anything sharp on your craft sheet...
working from the tag front...
I used a push pin to make a tiny hole in each of the pattern centers...
and why you ask...
didn't I use my Craft Pick???
because it is MIA...
keep in mind
only 2 people live here...
so I'm on a mission to find it...
most likely "you know who"
used it in the garage for something...
but I LOVE him & I'll forgive him because...
HE DOES WINDOWS!
anyway...
back to business...
here's the tag...
I turned the tag over &
placed it back on the Rub-It Scrub-It
then used a larger push pin to make larger holes...
the tiny holes make it easy...
using a larger diameter push pin
pushes the paper to the front of the tag...
now the tag front looks like this...
to ink the tag,
I used salty ocean & mustard seed distress inks
over the whole tag first...
then to accent the holes,
I used gathered twigs on a blending tool ...
LIGHTLY over the raised holes...
you can see the dimension this creates here...
for the next sample,
I inked my tag first with the same colors
as the first tag...
then stamped my background, using jet black archival...
then I colored in 4 of the "stitches" with the stormy sky distress marker...
the fine tip fits perfectly in the design...
and changes the look of the stamp, by creating a different pattern...
see...?
for the next tag,
I used the "AWESOME" distress paints...
the same colors as I used on the top 3 tags...
salty ocean & mustard seed...
this is tim's wrinkle free distress technique,
but done with the distress paints...
always shake the paints before using...
then apply some paints to the craft sheet,
mist them with water & drag the tag thru the paint...
dry...the tag is now waterproof & will not react with water...
go back & pickup the remaining paint dots & dry...
you can see that the same distress colors
create a really cool
opaque WATERPROOF background...
you can fill in any unpainted areas with any color distress ink using your blending tool...
to create a more subtle background,
I used aquamarine archival ink on my stamp...
and used the stormy sky distress marker
to add an accent dot to the centers...
because I didn't use jet black for the background,
I can use it for my main images & they will really pop...
LOVE it!
and for an even lighter background...
I used saffron archival on my stamp,
then colored in parts of the pattern with my
I like this look too...
this again is a manila tag...
but no ink has been added...
here are some finished samples...
the first one is stamped with french ultramarine archival...
again...to create a more subtle background...
then I added dots to the centers,
this time using the Sakura Glaze Pen...
this allows my embossing paste
my crow & art parts word to be the focus...
here...
the background is bolder, because I used jet black again...
on the art parts scallop tag...
here's a sample with the holes...
it's stamped with saffron over specialty stamping paper...
and I used jet black for my main images...
and one REALLY COOL technique
is to emboss the background...
since this is a fine lined image,
I like to use
I stamped in jet black & sprinkled the powder on while the archival was wet...
YES!
you sure can emboss with archival inks!
here's a better look at the embossed background...
the fine detail powder is perfect!
and speaking of...
DISTRESS PAINTS...
this is exciting news...
YIPPEE!
just what I wanted NEEDED...
these are the PERFECT addition to the distress paints...
check out the video on tim's blog...
oh the fun we'll have!
Happy Easter...
Happy Passover...
I don't want chocolate in my basket...
I'd much rather have these new distress paints to...
make art!
wendy


