here's how I got started...

here's how I got started...
a 20 minute podcast by Crazy BeYOUtiful

Friday, August 23, 2013

on the edge...part 2...

welcome back my friends...

I showed how to cut the sizzix/alterations distress doilies in part one...
it's the post below this one...

here's part 2 of on the edge...

ready set...
GO!

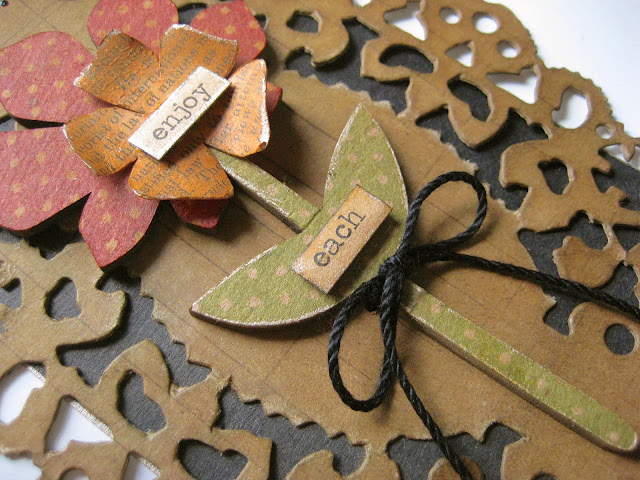
the first tag is really pretty simple, but the kraft doily makes it fun...

I inked over the doily with  gathered twigs, using the blending tool...

look closely & you'll see the doily was lightly stamped using this ledger background and potting soil archival...
ps..it's a beautiful brown! mwah!

I used the tarnished brass distress stain to randomly edge the doily...

the new art parts flower was stamped with red geranium archival, using my reverse dots background... after I dried it, I went over the top with rusty hinge on the blending tool to color the dots...

the smaller flower center was made by stenciling the small flower from the "create a flower" stencil, using orange blossom archival...I stenciled it onto clearly for art that was covered with a vintage dictionary page, dried it, cut it out & edged it with the tarnished brass distress stain...

the new art parts stem was stamped with the reverse dots background, using fern green archival...& it too was edged with tarnished brass stain...

cute chit-chat stickers added the sentiment...
and a little black string bow was the finishing touch...

oh...I added a few black glaze pen dots too...

before gluing everything in place, I edged the #8 black tag with the tarnished brass stain...

very simple...but I like it...


I didn't add anything to the tag top since it will be a page in my art parts tag art journal...


oops...forgot to say that I added tarnished brass to the chit-chat words & raised them up with black chipboard scraps...


I was having too much fun to quit...
one little tag wasn't enough...

so, here's a card...

I think it would also look cute in a frame & it would make a fun hostess gift...or a holiday gift for a friend...

it's a simple design, just change the sentiment & it works well for any occasion...

you'll see I used just the frame portion of the doily on the card this time...

part #1 shows how to snip out the center...


below are the pieces I started with...

2 new art parts leaves...they were stamped with the reverse dots background & fern green archival...and I added a bit of brushed corduroy...
reverse dots is my new favorite background...

a clearly for art flower, die cut with tim's sizzix/alterations tattered florals die...it's stamped with potting soil archival, using my vintage mesh background...

the new art parts flower in the center was inked with cornflower blue & stamped with the "new york school of art" stamp, using watering can archival...

the remaining 4 flowers were stenciled on CFA covered with vintage dictionary paper & cut out...

2 were stenciled with orange blossom archival & 2 with cornflower blue archival...then all 4 were edged with the tarnished brass stain ...

the gold edge is a small detail, but it matters...


the 3 pieces below make the main flower & they're held together with a screw eye...

the CFA flowers were heated & shaped...before layering them...


I cut the kraft card stock base to 41/4 x 5 1/2 & the black base a little larger...

I inked over the kraft with gathered twigs & kept the center a bit lighter...
the base got edged with the tarnished brass stain too...

after I glued the doily to the card base, I stamped the sentiment with jet black archival...

I used the vintage mesh stamp with water to stamp randomly over the background...because I used distress to ink the kraft base, the water lifted the ink & created a subtle pattern & still allows the doily to stand out...

when assembling the card, I snipped the pointy blue stenciled flower in half & used a piece at the top & the other piece under the flower on the bottom...

I added long fasteners to 2 of the flower centers...
glued it all together...

tada...


this guy is pretty dimensional, because of the screw eye, so hand delivery is probably best...

but...

***tip*** 

I like to use the plastic packaging containers from sizzix dies for shipping...
it gives the PO folks something to look at and the packaging keeps the dimensional stuff very well protected...

here's a better look...
in this photo you can see the CFA flower a little better...


random tips & stuff...

to cover clearly for art with vintage dictionary paper, I use Glue N Seal, matte finish...

I like the 1 ounce jar, because it has a built in brush, but I refill it with the 4 ounce jar, which does not have a brush...it's much more cost effective...instead of buying a second small jar, just for the brush...

spread the CFA sheet with a thin layer of Glue N Seal, add the dictionary page over it, brayer, then dry...NO BUBBLES...even when using fragile vintage paper...

covering clearly for art is a good way to use up patterned paper scraps...you can stamp an image & cut or use a die to cut the CFA...

I added a tiny bit of Multi Medium between the flower layers...the screw eye holds the layers securely together & the Multi Medium keeps them in place...no spinning...

to glue the doily to the kraft base, I put a blob gob some Multi Medium on my craft sheet & used a toothpick to apply it to select areas...

make sure the dabber top is fairly dry...NOT super saturated...when using the distress stains to edge pieces...

archivals are awesome...oops...that slipped in!

but I did want you to notice that the color of the base does affect the final outcome of the archival color, since archivals are fairly translucent... 
take a look at the photo above & you'll see cornflower blue over the art parts flower & also over the white dictionary page...
this is cool...because you get coordinating colors...

phew...
all of this because I was inspired by tim's on the edge distress doily die...lol...

well I hope I've inspired you to...

make art!
wendy

Wednesday, August 21, 2013

on the edge...part 1...


I totally LOVE getting new products to play work with...

BUT...I also find it a fun challenge to put a twist on something I've had for a while...

you've heard it here before...
if it works more than one way...I'm excited...

so I was wanting a doily for an art journal page...
but... 
I wanted one that would stand up well to inks...

I checked out the paper doilies in the baking/candy section...
nope...too flimsy for my need...
don't bother...save your $$$...

so I got to thinking, then the little lightbulb in my head turned on  & the idea worked...
duh...you probably knew that...if it didn't work there would be no post...genius!

I'll make my own doily...with this die...

it's tim's on the edge sizzix alterations distressed doily die...
I've had it since it came out a bit ago & I've used it many times as an edge, just as he intended it...


to change things up here's what I did...

I cut my paper to 5 1/2 inches square...
this example is cut from specialty stamping paper, because it's strong & I know I can easily ink it/stamp it & it won't fall apart...

here's the first cut...

before you toss the cut outs in the trash...grab those 2 cuties you see in the bottom right corner of the photo...
they look like funky flowers to me...

with just one cut with the die, it makes a beautiful card base...


next, I positioned the paper on the die like this...
this photo is looking down on the die...
you can see the die edges peeking out on the sides...
make sure it's straight on the die...for both cuts...


here's what it looks like after the second cut...

I snipped those end pieces to remove the doily...
then removed the cut outs...


and this is the result...

a REALLY cool full oval doily...
SUCCESS!


it can also be used vertically & it's the PERFECT fit for a #8 tag...


here's another cool thing...

we can use anything to cut the doily...
any color for whatever coordinates with the project plan...

I was thinking a kraft doily would look good...

yep...it does!

for this one I used 2 layers of kraft card stock, since I'll probably have it hanging off the tag...


and then another thought popped in...
I LOVE when that happens...

hmmm...what if I wanted a doily frame?

so I cut another full doily & then snipped off the center in the spots where it was connected to the frame...

just a few snips and I got this...


now there's plenty more thoughts floating around...

a BLACK doily? 
you bet! I'll be doing that for sure!

a doily cut from manila card stock?
yes...I have one waiting...
it's nice & sturdy...exactly what I originally wanted...

a doily cut from clearly for art to use as a stencil?
oh yes! I'll be spraying distress stains thru one, just as soon as I get a little play time...

or cover clearly for art with vintage dictionary pages (use Glue N Seal) & die cut sturdy printed doilies...they will not break or crease if they hang off the edge...

note to self...try that!

or die cut the clearly for art blackout & have a really strong BLACK doily...perfect for hanging off the edge of a canvas or art parts base...

how about doilies cut from patterned card stock? these will be cool using tim's paper stash & it will totally change the look of both the doily & the paper stash
I might have to try that right now...I'm getting excited...

and another thought...
it's a good way to use up those left over cardstock pieces...

so...what did I do with my doilies?

NOTHING...YET! 

but...pop back on Friday for on the edge part 2...

HOPEFULLY by then I'll have a little time to play with them 
and...

make art!
wendy

ps...what are YOU thinking? got any ideas brewing? do share!


Monday, August 19, 2013

stenciling with archival inks...

when I started playing working around with the idea of stenciling with archival inks, I discovered that it provided a new way to...

make art!

normally, the first step is to create a background, and then to add the main images on top of the background...

because archival inks are permanent & waterproof when dry, they can be added before the background...

I think this makes it so easy...and it's a fun change...

here's an example from my art parts tag art journal...

it's a #8 manila tag that I cut down to 5 1/2 inches tall...


I started by using this flower stencil...


using a piece of cut n dry foam and red geranium archival ink, I stenciled the flower & gave it a quick dry...


instead of stenciling in the stem & leaves, I used fern green archival to stamp these small flourishes...

***remember*** you don't always need to use the whole stencil or stamp...it's fun to change things up & get more use from your products...


now that my main images were done & DRY...I could add my distress inks & stamping to the background...

I added scattered straw lightly over the whole tag, then some brushed corduroy to accent the edges...

next, using scattered straw again, I added the vertical stripes with the polka dots & stripes border stencil...

it was easy to add the stripes exactly where I wanted them, because the main image was already there...

to add more interest to the background, I filled in some random areas with my unmounted cling text stamp (from botanical art), that was inked with cornflower blue...

this blue is BEAUTIFUL! it's kind of a vintage country blue...
MWAH!


I used jet black to stamp my sentiment...
even with several different colors in the background, the jet black really stands out nicely...


using the same stripes stencil, I added borders to the top & bottom of the tag with fern green...

a little pen stitching with the mowed lawn distress marker & the Blossom Bucket mini star were the finishing touches...

here's another look...
you'll see the stripes stencil used 2 ways...


because of the stamped/inked/stenciled layers, it looks dimensional, but the only really dimension is the star...

that's stenciling with archivals...

****TIP***...to clean the archival inks off your stencils, just use cheap rubbing alcohol from the Dollar Store...with a paper towel...
magic!

try it! it's a fun technique & a new approach to making art...

ok...DRUMROLL...

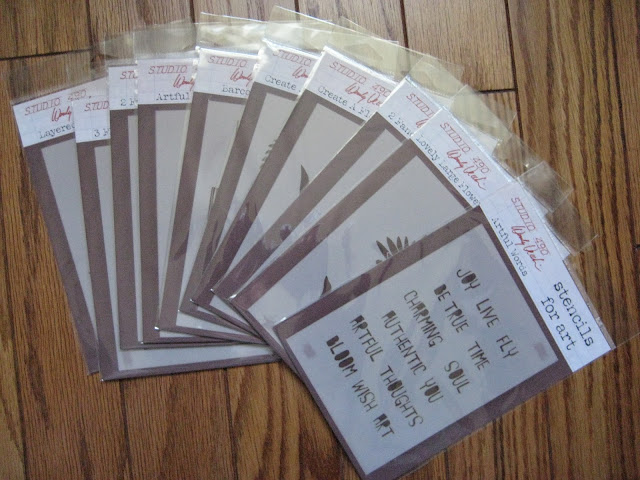
Rick chose the winner of 5 of my new stencils from the comments on my FACEBOOK PAGE...

Kirsten Alicia Sheridan...


the winner Rick chose from blog comments is...

THERESA...


Theresa said...
Great tag...you make it look so easy. Then I try it and IT IS

 EASY!!! I JUST love this tag!!! fingers crossed for the giveaway!


CONGRATS ladies!

please email me with your shipping info & we'll get these on the way to their new homes...

that's it for today...

I have a pretty busy time coming up soon...

I'm headed back to Everything Scrapbooks & Stamps in Lake Worth, Florida...LOVE it there!
that is September 7 & 8th...

then it's back to The Queen's Ink in Savage, Md the weekend of September 20-22nd...this is an amazing mixed media store...

the following weekend I'll be teaching at The Collin's Event in Houston, TX...it's my first gig there, so I'm excited about that & I'm excited to meet/teach some store owners...
I just finished my projects this weekend!

and the next weekend (October 4 & 5) I'll be at Adventures in Stamping in Strongsville, Ohio...I have not been to this convention before, so I'm excited about demoing there...

I hope to see some blog friends at one of these stops...

this schedule explains why I get free drink coupons from SOUTHWEST airlines! 

off to work on instructions & kits...

happy Monday to YOU...it's a PERFECT day to...

make (stenciled archival) art!
wendy


Friday, August 16, 2013

mixed media tag tutorial & a giveaway...

I have no opening chit chat today...lol...

I want to just dive right into the project, 
since it's kind of L O N G......

grab your supplies & I'll tell you how to create this tag...


cut a #8 Inkssentials kraft tag down to 5 1/2 inches tall...

***here's a tip for using my "yikes stripes" stencil"...***

add a piece of stencil tape under the tag to hold it securely to the craft sheet...

place the stencil over the tag & use stencil tape (or post-its) to hold the stencil in place...
taping the stencil to the craft sheet keeps the wiggly stripes from moving around, making it easy to add the embossing pastes...
or to use the stencil with inks...

next, spread translucent embossing paste thru the stencil...

remove the stencil, wash it & let the paste dry...
depending on the thickness, it takes about 25 minutes to dry...


once the paste is dry...shake the distress paints before applying to the craft sheet...

a little distress paint goes a long way...


tap your finger into the paint, tap off the excess and with just a small amount on your finger, swipe the paint randomly over the dry embossing paste...
dry the paints...

the tag will look like this...


next grab  2 "clearly for art, clicker cutts flowers"...a large & a medium clear flower...


tap the barn door over the large flower, spread with your finger & dry...

tap the rusty hinge over the dry barn door paint, spread with your finger & dry...the paint does NOT have to completely cover the flower...
some blank spaces actually add to the worn/vintage charm...

use orange blossom archival to stamp the vintage mesh background over the flower & dry...

heat the flower & shape...
***remember*** clearly for art can be re-heated & reshaped until you are 100% satisfied with the shape...
it's amazing stuff!

the flower will look like this...


use jet black archival to stamp the polka dots over the medium sized clearly for art flower, dry the ink, then heat to shape...


paint the art parts flower with barn door distress paint & dry...

paint the foliage flower with barn door & dry...then lightly swipe the fairly dry rusty hinge dabber over the flower & dry...

touch the long fastener to the barn door dabber & dry...


paint the art parts word (ART) with the broken china distress paint dabber & dry...

use watering can archival with the "train schedule" background stamp & stamp over the word ART & dry...

use walnut stain on a blending tool to add subtle shading to the word & stem...

the pieces will look like this...


you can see below that the tiny text doesn't overpower the small art part, when used with watering can archival ink...
(MWAH...I LOVE this color)...
ok...I LOVE all 6...


to assemble the flower, use an awl to make a hole in the center of the 2 clearly for art flowers & in the 6 petal art parts flower...

insert the brad into the metal foliage flower, then the medium clear flower, the 6 petal art parts flower & finally thru the painted CFA flower...spread the prongs to hold the flower together...

the flower looks like this...

very pretty, very dimensional,very strong & sturdy...


if you're a frequent blog reader, you KNOW I hate waste & it's a joke in our house that I'm always digging something out of the trash to repurpose...

so...

I ADORE tim's new industrious border stickers...
you can see I've already used several...

but look at what's remaining...
these leftovers are stickers too & they are REALLY cool...


I chose the bottom 2 pieces to accent the tag...
a little banner & a thin sawtooth edge...
you'll see in a photo that they fit together...PERFECTLY...


the little straight piece is very thin & just PERFECT too...
I lifted it up for the photo...
you can see it sticking up under the stars...
you'll see that I added it close to the top of the finished tag...


I added barn door distress paint to all 3 pieces & dried them...
I just stuck them on the craft sheet & painted them...EASY cleanup...

I wanted the pieces to coordinate, but be a bit different, so I added a bit of rusty hinge distress paint to the banner piece, dried it, then used watering can archival to stamp the "train schedule" over the banner & dried it...


the tiny text adds another layer & more interest to the banner...
you can see I left some of the stickers UNpainted to fit in with the vintage effect...


here's the finished tag again...

the final touches are...
some brushed corduroy around the tag edges...and over the whole tag, to darken the kraft color a bit...
some barn door paint around the tag edges...
a screw eye to accent the art parts stem along with a little string bow...
some pearls...
ok...LOTS of pearls...

oh...almost forgot...I added a stamped border at the top of the tag with my polka dot border stamp & fern green archival...


look how cute the left over industrious stickers fit together...


and here's a better look at the flower...


so the morals of today's post?

#1...look at leftover products before you toss them in the trash...
and...

#2...the distress paints are FABULOUS & versatile...
you can see that today I used them over my translucent embossing paste, over art parts, over the industrious stickers, on the metal foliage flower & over clearly for art...all with excellent results...

it's amazing that ONE product will work on so many surfaces...

and...

#3...archivals are AWESOME! lol... I HAD to say that again!


NOW IT'S...G I V E A W A Y time!

I designed 10 new stencils for CHA...


and Ted gave me a set to give to blog friends...

so I decided to divide them up and I'll give 5 stencils to a random blog commenter...

and I'll give away the other 5 stencils on my FACEBOOK business page...

if you would click LIKE while you're there...
that would be awesome...

to enter...
just leave a comment here on this blog post...

leave a comment on my FACEBOOK page for your second chance to win the other 5 stencils...

Rick will draw the random winners at 7am CHACAGO time on Monday...
he likes doing that...he thinks it's in his job description...

I hope you have a wonderful weekend & that YOU can...

make art!
wendy
ps...GO BEARS!