here's how I got started...

here's how I got started...
a 20 minute podcast by Crazy BeYOUtiful

Wednesday, July 30, 2014

where does inspiration come from?

I think it's very interesting to try & figure out what inspires our art...

sometimes when I finish a piece, I think to myself...
seriously?...where did THAT come from?

but...this one is very obvious...

from our dining room...


and a closer look...


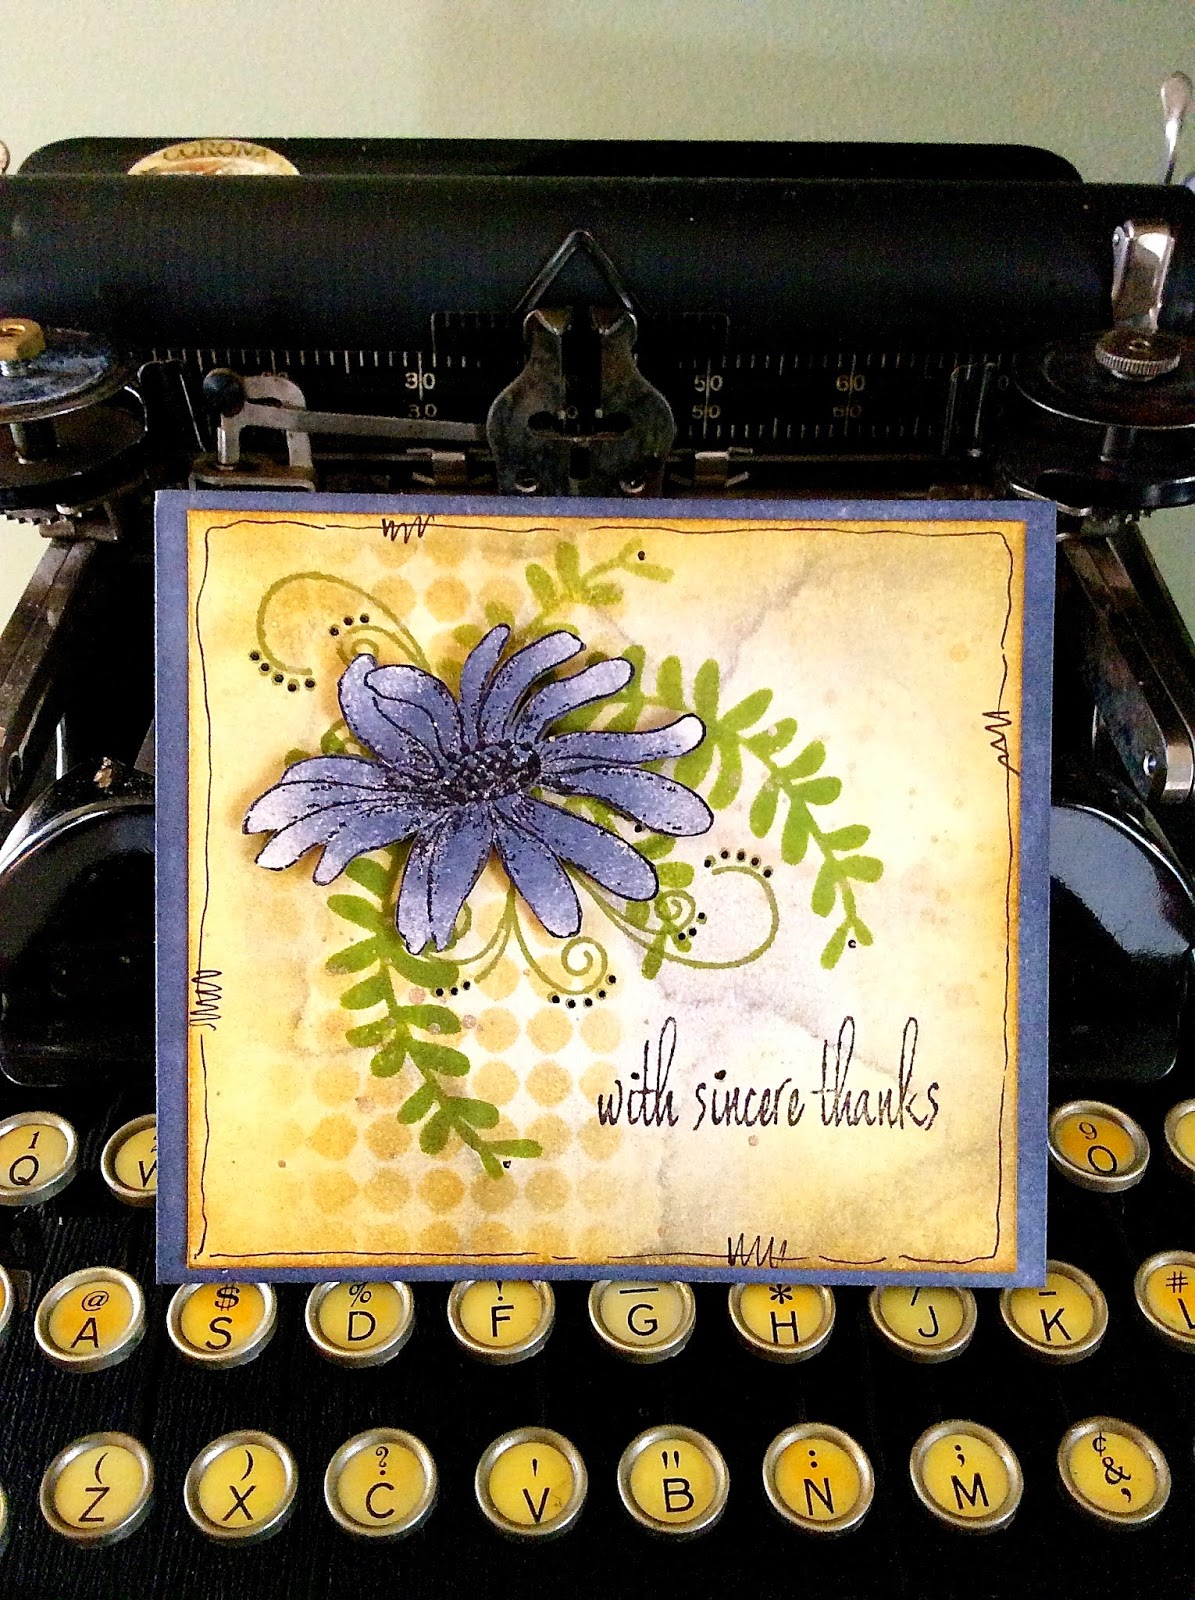
look at the card below & I bet you'll AGREE... 
it WAS inspired by the dining room...

so for those who keep asking if our home looks like my art...

this time I'd have to say YES! for sure!


this card idea started out with the concept that I wanted a different way to use the NEW Pansy SiSi...


normally, I stamp the pansy first, then overlay the 2 part stencil to color the leaves, petals & the outside edges of the petals...

and it turns out like this...


to change up the pansy, I decided to skip the stamp & omit the leaves & to use only the 2 flower petal parts of the stencil...

it goes like this...

make a quick background using tree branch archival reinker/ rubbing alcohol & a drop of the gold metallic mixative...
using manila cardstock...

it's super simple to stencil just the flowers with forget-me-not over a light stenciled layer of watering can archival...that changes up the blue color significantly...
with the stencil in place, stamp polka dots with watering can onto the petals...

then reposition the stencil to ink only the outside edge of the flowers...this time stencil with straight beautiful...forget-me-not...

then lightly add background stamping, using the tic tac toe background stamp with tree branch archival...

stencil some subtle stripes along the right side, using tree branch...

draw some simple stems & leaves...(you could easily stencil them with this stencil, instead of drawing them)...
or you could use either of these stems...
or this stem & leaves would be fun too...

color in the leaves with the peeled paint distress marker...

add the sentiment with jet black archival in the lower light corner...

the reverse dots background stamp is AWESOME & so versatile...
it actually stamps the background...
NOT the dots...thus it's called REVERSE dots...
another GENIUS stamp name...

use the reverse dots background stamp with red geranium on a manila scrap, then use a paper punch to create the flower centers...

you'll also see the reverse dots background used with watering can archival, to make the strip under the main panel...

now, to create a perfectly coordinating card base...

working on a manila cardstock, stencil red geranium thru the checkmate stencil, dry, then ink over it with brushed corduroy distress...

stamp the bow onto manila cardstock, with red geranium & add polka dots, with watering can archival...

add a little pen stitching...

then mount it to a black card...


now...compare this to the first pansy sample above...

I LOVE that they look totally different...

notice the shadow between the flower petals & the outside edge?
that's where the stamp would fit...

this is ANOTHER example of why I LOVE stamps & stencils...
they NEVER need to look the same!

using just stamp or stencil pieces, gives us endless options for creative fun...

so now is YOUR turn
to tell me...

where do YOU get inspiration to...

make art?
wendy


Monday, July 28, 2014

hooked on hydrangea...


I played a bit this weekend & made a few cards & tags...

I wanted to combine some older stamps with some brand new products...

and to make something DIFFERENT with a new stencil...

I chose the new "for the holidays" SiSi...and decided to remodel the wreath into something that can be used year round...

here's what the wreath looks like on a holiday tag,
when using my embossing paste with the basically bricks stencil & the wreath stencil...


and here it is again...
this sample uses both the stamp & coordinating stencil...
the basically bricks again...
but this time I used inks, instead of embossing paste...


today's card started with this stencil...
and a plan to change it up...


I started by making my background on manila card stock, using tree branch & hydrangea archival reinkers with lots of rubbing alcohol & a drop of gold metallic mixative...

hydrangea & tree branch might be my most favorite combo of colors for this technique...(today at least)...
it's not a combo you would expect to work...purple & brown? hmmm...
but it turns out so pretty every time...

I stenciled these 2 portions of the wreathe, using leaf green & fern green archival inks...
toward the top left of the card...


next I filled in more areas with the same 2 green archival colors...
using small portions of the leaves...

don't worry about the (ugly) intersection of the pieces...that can easily be covered up...but keep that in mind when you're stamping...
  

now to use an older stamp...
this is the adorable daisy from daisy art...genius name huh???
some days I amaze myself...some days...NOT SO MUCH!

I stamped just the daisy on a manila scrap with jet black archival, then inked over it with hydrangea archival...


white edges bug me, so after I cut out the flower, I used the pumice stone marker on the edges...


I wanted to stamp a full flourish & a partial one...
it's easy to mask off the unwanted area with painters tape or a post it...
ink the stamp & REMOVE the tape before stamping...


oops... missing photo...

after I stamped the flourishes, I used the new ornate dots overlay stencil with tree branch on the left side of the card...

you can see the full flourish & the partial one below...
both are stamped in fern green archival...


this was looking like it should be a thank you card...
so I stamped the sentiment with jet black toward the bottom right...


below you'll see that I added shading to the edges with brushed corduroy distress ink & some tarnished brass dots for a bit of shimmer...

to add the dots, shake the stain, then dispense onto the craft sheet, pick up with the detailer water brush & flick over the card...


the dots are sure tiny, but they do show up & add another layer to the background...


to make a perfectly coordinating card, I inked the outside edge of the manila cardstock with hydrangea...

I inked just enough, but not the middle, since I was going to glue the card front over it...


a little doodling with a waterproof pen...

some black glaze pen dots to the dots on the flourish...

some dimensional foam to the back of the flower...

glue the card front onto the card & done!


I'm happy that I could use the wreath to make an everyday card...
now it just look like leaves...
and that I used the cute daisy in a new way too...

in the past, I was never a huge fan of purple...
but it always caught my attention when someone used it in my class...
maybe I just didn't know how to use it!

for me, hydrangea is perfect...
a beautiful blueish-purple...
the label doesn't do it justice...

I'm hooked, especially when paired with tree branch & greens...
oh...wait...
I just used it with dandelion & orange blossom...
that tag is coming soon...

yep...hooked on hydrangea!

I've been keeping some questions in a file & 
I plan to do another Q & A post in the near future...

if there's something you'd like to know, you can shoot me an email or ask in the comment section...

and as a reminder, if you need a quick answer, email will get you a much faster response...

I hope you're inspired to get out your hydrangea &...

make art!
wendy
ps...yippee!
NEW PRODUCTS start shipping
TODAY!!!


Friday, July 25, 2014

now that tree stencil is a...

it's a balmy... 61 bloody degrees here today...in JULY?
seriously MOTHER NATURE?
what gives?

anyway...the cool temp gave me an idea for a Christmas card & another REALLY cool way to change up the Christmas tree stencils...
and I just realized that Christmas is just 5 months from today!
YIKES...so it's NOT too early to start creating cards...

this post showed using the tree stencil as a fern...

this time...well...
you'll see...

this is my archival reinker/rubbing alcohol technique on manila cardstock...

I dispensed a drop of cornflower blue reinker, a drop of tree branch reinker & a drop of gold metallic mixative on my craft sheet...

then mixed the rubbing alcohol into the reinkers to dilute them & picked up the color with the cardstock & dried it...


next I grabbed fern green & leaf green archival inks & the cute mini blending tool...it's the BEST for stenciling!


I worked with this NEW happy holidays stencil...
to turn the trees into...

keep reading!


I used some painters tape to mask off the trunk portion of the small Christmas tree...
and I used it upside down...


first stenciling 5 of the small trees, using leaf green archival...
can you see where this is going?


next, I stenciled more trees to start filling in the areas between the trees...
just as I HOPED...

it's starting to look like a WREATHE!


next I stenciled more trees to fill in the open areas...
this time I switched to fern green archival...
it's KEY to have several shades of green...
it adds depth...


then I stenciled a few more spots to make it a nice full wreathe...


I used jet black archival to stamp the bow onto a manila scrap...

the bow stamp is included with the NEW for the holidays SiSi...


I inked over it with cornflower blue, then stamped the dots border (seriously art LCS034) with carnation red archival...
and cut the bow out...

once it was cut, I added a bit more cornflower blue to the inside parts of the bow to make it more dimensional...


next...I added the new flourish & used jet black to stamp it 3 times over the wreathe...
I added flourishes to both of these new stamp sets...
there's 1 here...


 and another 1 here...


and this is where I lost my mind & forgot to snap photos...
oopsie!

in the finished card you'll see that I added some stenciling with the checkmate stencil on the left, using cornflower blue...


and then stenciled some bricks on the right with tree branch archival & the new basically bricks stencil...


then I did a test drive with the bow to see what was next...

I added shading to the edges with brushed corduroy distress ink...


this might be my most favorite way to use the new marker spritzer...

see those tiny specks?
adorable...right?


I wanted a black card base, with a little something...

so I used tarnished brass distress paint on my lace border stamp & stamped the image at the bottom of the card...

the lace border stamp is hiding vertically on the far left on this set...


below is the finished card...

you'll see the stenciled background, pen stitching, black glaze pen dots, and the sentiment stenciled with jet black at the bottom of the card...

oops...
I added some berries too...I used red geranium archival with the berries from this wreathe stencil...


is it a tree?
is it a fern?

nope...it's a wreathe this time!

and here's a better look at those tiny metallic dots...


they were the perfect thing to unify the background & to add a bit of shimmer...

ahhhhhh...that was a BLAST to create!

new products start shipping on 
MONDAY the 28th!

here's the front cover of the new flyer...


I've had multiple requests to purchase this flyer...

BREAKING NEWS...


thank you Mr. Stampers Anonymous!

just click the link above & you'll be magically transported to see all the pages & new products...

you can view it on-line or print it out to enjoy later while sitting in your favorite comfy chair!

there's more samples on the pages to inspire too...

one more thing...

I have recently had multiple questions about the pricing of my embossing paste...

check out the last page of the flyer...
you'll see that all 6 flavors are priced at $9.99...

there's a whole LOT of fun in that bottle!

you'll also see our new mix & store jars at the bottom of the same page...
they are...SUPER CONVENIENT...
there's no clean up...
and best of all...
there's NO WASTE!

I'm happy to report that our chemist just gave us the final analysis on the mix & store jars last week & he reported that custom colored paste will last 1 to 2 years in the jars...

he also performed his yearly review & confirmed that all 6 flavors of embossing paste will last a minimum of 5 years in their original containers...

just a little reminder...

when you use the contents of the jar... wash it out...
it's perfect for storing custom colored paste...
just change the label...

don't toss it out!

I hope you have a wonderful weekend and that YOU can take time to...

make art!
wendy
ps...what ideas do YOU have for using the new products in different unique ways?  let's share!

do you have a favorite product? I'd LOVE to hear!


Tuesday, July 22, 2014

is it a Christmas tree...

or is it a ________...?

when I announced my new products last week,  I mentioned that I designed images that were not all strictly "holiday" images...

but could easily be used for holiday art...and used year round too...

this is the "holiday icons" SiSi (stamp-it stencil-it) & it includes 2 stamps & a coordinating stencil...


below is the "happy holidays" stencil...


take a look at these tree stencils...
do you see what I see?

it started like this...

I put rubbing alcohol onto my craft sheet, added a drop of the gold metallic mixative & a drop of tree branch archival reinker...
then mixed the reinker into the alcohol to dilute the reinker...

then placed the tag into the inky solution to soak up the color & then dried the tag...

honestly, I've not used this tag much in the past, but I'm LOVING this small size for super quick projects...

I'm planning to use them for all my holiday gift tags...
their small size will make them a quickie project...
I plan to make all the backgrounds at once...
with the rubbing alcohol/reinker technique, it will only take a few minutes...
once my backgrounds are done, I can finish the tags in small increments of time...

it's VERY interesting to note that even though the tag gets completely saturated, there is NO warping AT ALL...

that's because I used rubbing alcohol...NOT water...

the rubbing alcohol actually gives the manila tag a velvet feel...
a very fun discovery...

next, I used watering can archival to stamp small portions of the new lace to the tag top & tag bottom...


to create the oval, I used a  scrap of a reinker/alcohol background that I had created previously...

it's cut from a larger sheet where I used forget-me-not & cornflower blue reinkers, to create a monochromatic background...

the oval is the left over, cut-out part of tim's ornate frame die from Sizzix...

NOW...
if you look at the tree stencils below, I think they look like FERNS!

I stenciled leaf green & fern green archivals thru the upside down trees...


SEE...how the trees have been transformed into... ferns! 
I'm flippin'...happy that now I can use these stencils all year round...

you'll see I used jet black archival for my sentiment...
and added some gathered twigs distress ink to accent the oval edge...


next, I stenciled tree branch thru the "add a stencil"...
a small detail...BUT...
EVERY little detail & EVERY layer matters in the end!


back to the tag...
I used the "yikes, stripes" stencil with tree branch, then moved the stencil over to mask off the stripes & used cornflower blue to add another color of stripes...

if you don't position the stripes stencil exactly...
you'll get a third color of stripes...
see the manila peeking thru?
I think it accentuates the stripes & creates a faux dimensional effect!

it's a very simple background & easily customizable for any project you're working on...

I added gathered twigs to the tag edges & flicked on some water using the detailer waterbrush...

that bleaches out the distress ink & creates some water spots in the areas that were inked with distress inks, but the water didn't affect my permanent archival inks...

now...on to the oval...
I used watering can to stamp the flourish...
and the tarnished brass distress paint to add an edge to the oval...


what's a project without a flower?

I stamped just the pansy SiSi flower using jet black, onto a "clearly for art" scrap, that was covered with vintage dictionary text...

then positioned the stencil over the flower...
you'll see below that the pansy is a 2 part layered stencil...


I added orange blossom archival first, using the portion of the stencil that inks the outside edge & the flower center...
then I positioned the open part of the stencil & added yummy dandelion...
and cut out the flower...


I heated the clearly for art to soften the material & slightly bent the petals to create some dimension...

here's my finished tag...

don't forget a few black glaze pen dots & some pen stitching...


it may be a small tag...but I think it's CUTE & it makes an impact!

I like that the oval hangs a bit over the tag edge...
and I LOVE the super simple multicolored background!

so the moral of this post is to look at what you have & ask yourself...

"what else can I use this for...?

when I...

make art!
wendy

ps...like the stamp says...