here's how I got started...

here's how I got started...
a 20 minute podcast by Crazy BeYOUtiful

Monday, February 27, 2012

distress markers = MAGIC...

I'm excited to share some fun little "arts"

I have been patiently waiting for these markers,
since the distress pads came out...
YES...that long...

let me just say...
they are well worth the wait...

I really wanted them to ink small areas...

but when tim showed me the magic of these markers,
I about fainted...

like the title says...
PURE MAGIC...
you'll see...

here's the first "art"...
it's an ATC made from
Ranger's new "specialty stamping paper"...


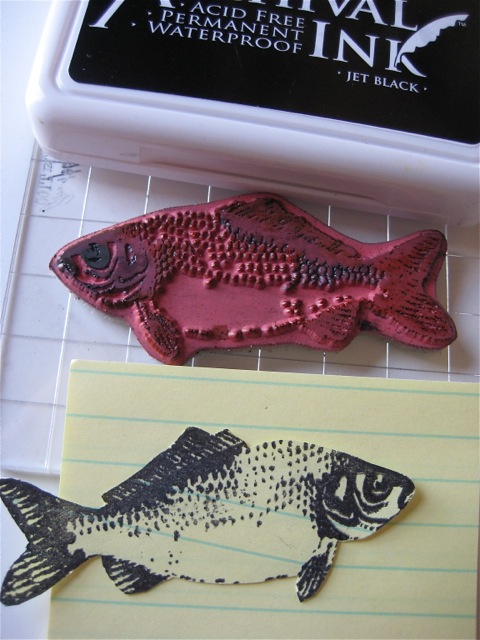
let's get started...

use the distress markers to color right on the fish stamp...

it doesn't matter if you go from light to dark to dark to light...

just randomly color...
overlap...it doesn't matter...

I used rusty hinge, broken china, peeled paint, black soot & mustard seed distress markers...

you DO NOT need to work quickly...

to rehydrate the inks before stamping,
just lightly huff on the stamp...

stamp & dry...

it takes just a little huff...not a big blast...

your fish should look like this...


next, use the blending tool with bundled sage & broken china to ink over the entire ATC...

do you see the MAGIC?
normally distress inks blend & create beautiful custom colors...

but look...
the markers resist the distress inks &
the color is still vivid...

MAGICALLY...
the markers have NOT blended with the background...

next...
fill in the fish with rusty hinge on the blending tool & dry...


now create a mask,
by stamping the fish onto a post-it note, using jet black archival...

make sure to stamp a portion of the fish over the sticky area of the post-it...

that will hold it in place & the post-it won't leave any residue on the ATC...

cut it out...right on the outline of the stamp...
or even a tiny bit inside the stamped image...

*tip* if you cut outside the line & make the mask larger, it creates a halo around the image...
and you won't have any background stamping there...


place the mask right over the fish...


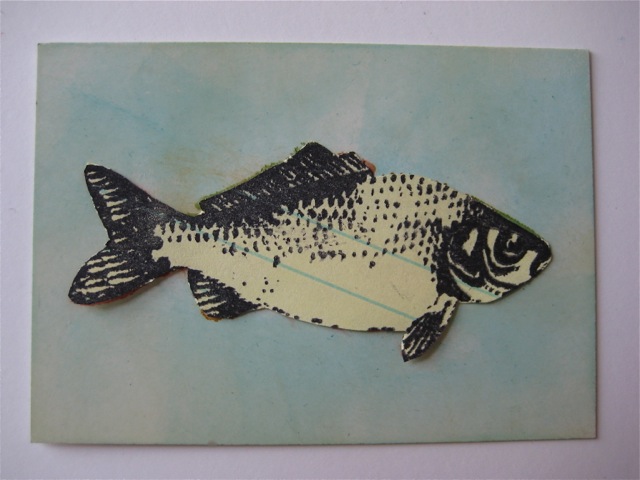
ink the background stamp with olive archival & randomly stamp over the fish...

I usually don't press over the whole background...
I like the random, worn look...

leave the mask there...


aquamarine archival & stamp over the entire ATC...


remove the mask, then add shading to the edges with walnut stain & the blending tool...

it will now look like this...

stamp the saying, using jet black archival...

*TIP*
stamp the full saying first...
then stamp a portion of it on both sides of the saying to create a continuous saying...

add some simple doodling with a waterproof pen...
that's it...

I mounted mine on black card stock...

and added Glossy accents to the eye & for some bubbles...


*WARNING*...
these markers are like potato chips...

you can't do just one...

don't like fish?

here's the same technique,
with a little twist,
using my tree stamp, forest moss, peeled paint, fired brick, walnut stain & brushed corduroy distress markers...

ink the tree with the markers...
huff, stamp & dry...
this time I used watercolor paper...

it looks like this...

you'll see the image is NOT perfect...
I missed some areas...
it doesn't matter...
trust me!


next, use the new detailer water brush to go over the tree...

do it quickly...
not real precisely...

this creates a cool watercolor effect...

dry it & it will look like this...


then add background colors with distress inks & the blending tool...
just as in the first ATC...

I used brushed corduroy & broken china,
then walnut stain around the edges...

this background was randomly stamped with

Lady Dy showed using large backgrounds without the acrylic mount...

just roll the inked stamp over select areas & you don't end up with harsh edges...
LOVE IT!

the saying was stamped with jet black archival...

*TIP*
here's a fun way to use the water brush...
I used it to make the water spots...

tap a tiny amount of distress stain onto your craft sheet...
add a bit of water with the water brush...

I used broken china first & then brushed corduroy stains...

pick up as much color as the brush will hold & tap the brush against your hand to create the drops...

what's cool is that the distress inks in the background react with the water, so you add color from the stains & a bleaching effect, because of the water...

here's the finished piece...

this is 2 3/4 inches x 4 inches...
and it's cut from Ranger's manila card stock...


I couldn't stop...

here's one more...
this time a flower...

this is a 3 1/2 x 5 journal page...
cut from the manila card stock...

I colored the stamp with these marker colors...
rusty hinge, fired brick, peeled paint & forest moss...

stamped it once on the right...
then huffed on the stamp to get the second generation (lighter) image on the left...

dry it...

and again...
I went over the the stamped images

added the background...

with aquamarine archival again...
my new favorite...

stamp field notes & the saying with jet black archival...

accented the flower centers with
that tiny dot defines the flowers...

this took a total of 10 - 15 minutes...

for something so quick & easy...
I like the result...


I hope you can see how much fun the markers are
and that they really are MAGIC MARKERS!

ok...studio time for me...
I gotta

make art!
wendy

Friday, February 24, 2012

a peek @ a post...

I've said lots of times that I'm a
V E R Y S L O W
creator...
it drives me nuts some days...

but the photo below was finished in 10 minutes or less!
it couldn't be easier...

seriously...

here's a peek @ a simple card...
I'll be back next week with the whole scoop...


if you want to be ready...

the secret ingredients are:

honestly, when I heard about the paper, I thought...
OK...that's nice...
paper is paper...
bring on the markers...

I was WRONG!!!

I guarantee...
use this paper once & you'll be hooked...

the surface is AMAZING & smooth...
it's a dream to stamp on...
it holds up really well to lots of techniques...
and works well with every Ranger product!

I just ordered 300 sheets for classes...
YES, I do LOVE IT!

other KEY ingredients...


these are NOT your ordinary markers...
they have a VERY unique feature...
no surprise there...

my favorite use is to ink stamps with them...

some Glossy Accents ...

and a stamp...

I used my fish...

some archival inks...
I used jet black for the saying & olive & aquamarine for this background &

I LOVE the new water brushes too...
if you want just one...
I've used it lots already & just ordered a boatload for classes...

you can use any backgrounds,
depending on the main image you choose...

the main ingredients are the markers & the specialty stamping paper...

and like I said...
the whole scoop next week...

we're up to our ears in signing & shipping books!

THANKS SO MUCH for your support...
our little PO appreciates it too...

today Friday, is the last day to get a free *something* included with your book order...

the ordering info is on the previous post...

ok...get your supplies ready...
have a GREAT weekend...

and then we can...

make art!
wendy

Wednesday, February 22, 2012

book #6 ready to ship & an extra tidbit...

yippee!

it's here...

brand new...hot off the printing press...

book #6!

it's loaded with tips & helpful hints...

it's got 11 art parts projects,
with complete instructions &
some step out photos...

it's a new larger format...

I'm pleased with how it turned out!

THANK YOU MATT YOUNG!


here's the scoop, if you'd like to order the new book...

it's $14.95 plus $5.00 for priority tracked shipping in the USA...

international shipping is $14.50....

I can fit 3 books in one mailer, to save you shipping $...

so...if you want to share shipping with a friend...

or if you need any of the past books...
I have books 4 & 5 in stock here...
but just 3 copies left of book #3...sold out!

  1. send me an email @ wbv1213@me.com
  2. let me know if it's a US order or international
  3. let me know if you'd like it signed with or without your name...
  4. if it's a gift...remember to include that name...
  5. I'll send you a PayPal request...

here's the tidbit part of the post...

if you're a blog reader, you've seen my technique for making custom epoxy memo pins...

the complete instructions are in book #3...

here's the basics...
punch a letter/number etc...
place the memo pin over the punched circle...
fill with Glossy Accents & allow to dry...
it takes several hours...
like 4 or more...

but it's well worth the wait...

the other day I wanted to use one of these memo pins...
but it just seemed a bit small...
I was wishing for a larger one...
it needed more impact...

I've made @ least a thousand of these guys to use in my classes...
why didn't I think of this before?

it finally dawned on me that if I hot glued
an idea-ology foliage flower
to the back of the memo pin...

look...

it really jazzed it up LOTS!


cool huh?

that one little extra layer completely transformed the whole thing...
now I LOVE LOVE LOVE them even more!

***NEWS FLASH***

for anyone ordering books...

orders placed TODAY,
THURSDAY or FRIDAY...
will have a little extra ***something*** included in their package!

what is the ***something***?

I have NO CLUE...

just thought it might be a nice touch...
so...I guess...

whatever I find...lol!

happy Thursday!

I hope the memo pin idea & book #6 inspire you to...

make art!
wendy

Tuesday, February 21, 2012

metallic Clearly For Art...

today I wanted to share another fun technique that uses

it creates a very cool metallic effect...
and adds a fun twist to CFA...

this is one of the techniques I demoed @ CHA.
Christine & Mark from Scraptime, in Canada,
filmed the video...

THANKS Christine & Mark!
check out their site...
there's tons of videos & inspiration there...

I wanted to share a few close up shots, so you can really see how cool these turned out...

the first sample shows the CFA blackout flower on a card I did for the Ranger booth...

the flower was created with my flower stamps...
the smaller flower was stamped with my
using jet black archival...

the cute center is a new Blossom Bucket piece...
oh...
new art parts flourishes are there too...


the next shows the new clicker cutts small journal pages...
and this flower was made with the new clicker cutts blackout flower...
I don't think the clicker cutts have shipped just yet...

the gold center flower is new from my Blossom Bucket line...
this one is my MOST favorite...
seriously...it IS!
this is what it looks like right from the package...
very vintage...


and here's a close up of a whole sheet of CFA blackout...

that has been painted with a layer of Glue N Seal...
use the matte finish...


then I added both silver & gold metallic mixatives...

you can really vary the amount of each mixative you use & get lots of cool looks...


in the video I also show how you can add other colors of alcohol inks over these layers...
and you get yet another totally different result...

try it...this is so much fun!

ok...


I'll be interested to hear your thoughts...

while you watch a video...

I'll...

make art!
wendy
ps...I see a "DELIVERY" is scheduled for today...
guess what?
could it possibly be BOOK #6?
I'll be back tomorrow when I actually have them in house!
yippee!

Monday, February 20, 2012

kits, journals, water brushes & more...

but first...

THANK YOU!

you asked...
we listened...

the #1 "kits for art" is a huge SUCCESS!
I'm so glad you liked it...

we've heard from store owners & customers too that it's so convenient...

to make art!
awesome!

here's kits for art #2...
it's shipping this month...

it includes all the art parts & clearly for art needed to complete this project...

also in the package are the instructions & some step out photos...

you can follow along exactly...
or you can use the kit for a starting point & customize it with any colors, inks, papers or backgrounds you choose...


kits for art #3 will ship in April & it will include
my new Embellish Your Art Blossom Bucket pieces...

included in the kit are...

the cute clear resin bottle, the shutters and a black metal corner...

I'll remind you when April comes!

yesterday I was playing around with tim's new water brushes, distress inks, paint dabbers &

when I taught @ The Queen's Ink in Maryland last fall,
Hels Sheridan came over from the UK for the weekend...

she introduced me the Stabilo all pencil & I ordered some as soon as I got home...

I got black, red & yellow...
I have no association with them, just passing on a fun find...

keep in mind that was October...
I just got them out to play yesterday...

these pencils react (bleed) with water...

I found that they are PERFECT
when combined with tim's new water brushes...

I am certainly NOT an expert...
but I thought I'd show you 2 journal pages anyway...
since you're my art friends...

the background was created with the distress stains & water...
like the technique I showed in this post...

the doilies are from the cake decorating section of Hobby Lobby...
just glued on with Glue N Seal...

ignore the paper clips...
I needed them to keep the pages flat for the photo...


the left side...

I used the pencil around the doilies...
and to write LOVE...

by using the water brush, I was able to easily add shading...
so even though the page is really very flat...
the pencils/water add lots of depth...

the cute word stickers are new from tim...
they are called chit chat...

my alphabet stamp seemed to fit well...
randomly stamped in jet black archival...


the right side shows the shading around the hearts...
the water brush makes it simple...

the white dots were created with a stencil &


that was fun...
so...

then I started another...
it's not finished, but what the heck...
I'll show you anyway!


on the left page you can see that I outlined the flowers with the pencil, then used the water brush...
this time I used the detail water brush...
love the fine point it has...

because I used distress ink on the flowers...
and then added water...
you get cool outside the lines watercolor-ish shading...
now there's a word...

note to self...
do not go over the edge of the stencil...
it leaves a mark....duh...


and the right hand page...

the giant mask is from idea-ology...
I think I'll play a bit more & finish it later...


I'm jumping all over subjects today...

I wanted to share a video that my friend Lynne did...
she uses clearly for art...
and Perfect Pearls...
check it out...

I think it's fun to see how people use the same products...
very inspiring!

THANKS Lynne!


tomorrow I'll have another video to share,
using a fun new technique with

I hope you can pop back in tomorrow...

now about those winners...

I'll be sending new rubber to...

Blogger SusanK said...

Floor plans....thank you SO MUCH!!! Cool project...off to check out the videos for more tips on using CFS.

February 17, 2012 1:00 PM


and a set to...

Blogger mrich2500 said...

Here's hoping you will be teaching somewhere close to me ;) Would love to win a stamp set!

February 17, 2012 10:42 AM


please send your shipping info & we'll get these off to you...

my email is wbv1213@me.com


have a GREAT Monday...
see you tomorrow...with that video...

until then...
make art!
wendy

Friday, February 17, 2012

2fer FREE on Friday!

try to say that title quickly 10 times...lol!

first...some random catch up things...

I wanted to share a link to Snazzy's DT blog...
where this month the focus is on studio 490...

each DT member was given the stamp set of their choice & a package of Clearly For Art...
how fun!

you'll see some awesome art there...
and I wanted to let you know that they are giving away a studio 490 stamp set...
just incase you like rubber stamps...

check it out HERE...

Gillian is their DT coordinator...
you can find her blog HERE...
you'll like what you see...

NORTH SOUTH EAST & WEST...
that's the start of my teaching lineup for this year...
the schedule, so far, is on the right sidebar...

and speaking of Clearly For Art...
I got an email yesterday telling me about 4 videos that were filmed @ this past CHA...
they were recently uploaded to YouTube...

the video is broken down into 4 segments...

if you're interested...
it's best to watch them in order...
it's the CLEARLY FOR ART SCOOP...

DO NOT LAUGH @ how I talk with my hands...
YIKES...
I tease Rick about this all the time & I am as BAD...
if not WORSE than he is...
the teasing will stop...
immediately...
I had NO clue...

anyway...
here are the video links...


next up...
for some reason, I've had some questions about altered books lately...

it's ironic...

since the very first classes I ever taught were altered book classes...
I had taken a class from Beth Cote...
hmmm...wonder where she is...

anyway, I had an idea to put a whole different twist on the class & that was actually the beginning of my teaching love...

my first published art was in Beth's book...
Altered Books 102...

if I can find my copy, I'll show you what I did...

I have some ideas brewing...
I want to incorporate my stamps, art parts & Blossom Bucket embellishments...

I hope I can play with this idea soon...

next...
THANKS so much for the comments about the last technique post...
it's real fun...
give it a try...

here's what LADY DY had to say...

Whey hey, have a look at Wendy taking the mick out of me, cheeky mare, lmao.

I think I'll need an interpreter for that one...LOL!

now about that free rubber...

I have 2 favorites sets to send out...

the first is European Art...
this is my most favorite...
ever...

I know I say it lots...
but it's true...
I love this set & I'll be happy to send it off to a good home...
I LOVE the
and the 2 piece car...


and another favorite...
hey...
it's MY blog...
I can have as many favorites as I want...RIGHT?

LOVE LOVE LOVE the jar &
the coordinating art part ...
love the flower LOTS...

LOVE the floor plan...
love the sayings...

and I'd LOVE to send it to a random commenter...


this is one of the projects in my new book...
it was a blast to make...
and I'm thrilled with how it turned out...

were the starting point for this stand alone piece...
they're very sturdy...
so it worked just as I imagined...
I like when that happens...


the jar looks fab with


and here's another piece that focuses on the European Art set...
there's 2 complete boards in each package for double the fun!

do you see another
I've been telling you that they are addicting...
they're like chips...
you can't do just one!

the airmail piece & the postage mark are both Blossom Bucket embellies...

they'll be arriving in April!
I CAN. NOT. WAIT. to use them in classes...

this cool collage background paper is from

here's the fine print...
if you'd like one of these stamp sets...

just leave a comment...
that's your entry ticket...

it's quite simple...

I'll draw the winners @ 7am on Monday morning...

have a great weekend...
and as always...

I hope you can
take some time for yourself to...

make art!
wendy

Wednesday, February 15, 2012

with these stains...

happy Feb 15...
one day closer to SPRING...
we're so ready here!

I had several questions about the background I showed in the last post, so I thought I'd show you how it's done...

this was inspired by watching Lady Dy @ CHA last summer...

you may remember that she was looking for a "kitchen roll"...
which actually is a roll of paper towels...

which lead to me asking her if toilet paper was then called a BUTT ROLL...

which she now calls a shimmy butt roll...lol!

Dy makes her backgrounds using her new Dylusions spray inks...
they are beautiful bright & bold colors...
just like her...

I LOVE Dy & we tease & insult each other
thru the entire CHA...
it's a blast!

since I don't have the spray inks YET...
I used my favorite tim distress stains instead...

this gave me a more toned down muted background...
which fits my style...

Dy works in a journal...

I LOVE Ranger's Inkssentials manila cardstock...
it's the same great durable material as the tags...

this allows me to make backgrounds for cards...
ATC's, pages for my creative covers or
or whatever I need @ the time...

I get the 12 x 12 size...and cut it into quarters...

which gives me 4 pieces that are 6 x 6...
it's a nice size to work with...

the same manila card stock is also available
if you like that size better...

here are the stain colors I used this time...


rusty hinge & you'll want plenty of water...
this mister is perfection...

and the other key ingredient is your heat tool...

and for sure...work on the craft sheet...


***WARNING...***
it's UGLY before it gets cute...

#1...mist one manila square with plenty of water,
then tap the stains right over the water to release a good amount of stain...
I started with mustard seed & chipped sapphire...

tapping them kind of hard
opens the valve to allow more stain to be released...

Dy says to make "poodles" of water on your surface...
the interpretation is puddles...LOL...

like I said...not lookin' real good now...

use a second square & press it over the first to transfer the excess ink to the second square...


it will now look like this...
dry both pieces...

#2...I wanted more blue...
so I added another big blast of water & then I tapped the chipped sapphire stain right in the water...
and it looks like this...

tap the second square over this to pick up the excess ink onto the second square...


dry them both & it looks like this now...


#3... another big blast of water...
you can see the "poodles"...

then I tapped the rusty hinge stain randomly...

pick up the excess on the second square again...


dry both and here's the final result...

a very cool starting point for your art...
customize it with your favorite background stamp...
it's very fun...


I did another variation...aka PLAN B...
but accidentally deleted those photos...duh...

for the last step I used water & a squirt of
this adds a beautiful bit of bling...

the binder is built right in to the solution of the PP mist...
so they will not rub off...

and for PLAN C...
you could also sprinkle in a bit of Perfect Pearls powder into the "poodles" too...

it takes very few supplies & very little time to create these backgrounds...
I hope you're inspired to give it a try...

I like to make a few & have them ready...
sometimes it's the jump start for an idea...

moving on...

book #6 *should* be here soon...
I'll let you know when I have them...


but in the meantime...
this copy will be shipped to...

Blogger Marjie Kemper said...

Congrats to all the winners! I love the new pieces, especially the fella with all his funky gears and metal. And yes... there's just the right amount of room on my bookshelf for Book #6! Thanks for asking!

February 13, 2012 1:30 PM

MARJIE...email me with your address please...
wbv1213@me.com

and...

it's another of Alain's extreme stickling "techniques"...
it's bloody hilarious!

thanks to everyone for your comments & emails...
I sincerely appreciate them...

come back on Friday...
I see that I still have some
brand new rubber to share...

until then...

get out your distress stains &...

make art!
wendy
ps...I've started to add my teaching schedule to the right sidebar...

Monday, February 13, 2012

8 letters & 4 winners...

happy Monday!

technical difficulties resolved...

not a good way to start the week...

neither is getting in the shower with your glasses ON...
I thought I could see really well...
YIKES!

I thought I'd start today by showing a really funky project I made for tim's idea=ology booth...

one day we found this mini binocular case @ a flea market...
the leather strap was mostly missing,
only small pieces were still attached...
but the left over metal connectors hanging there looked like arms to me...

this was the inspiration for this piece...
I started with the phrenology head...

and I used LOTS of idea=ology here...

here's the list...

it's over a grungeboard alterations die cut gear...

2 facets to make the funky glasses...
they are a perfect fit over my Blossom Bucket scalloped circles...
look close & you'll see 2 mini fasteners...
they are in the facet holes...
just like real glasses!
makes me laugh...

big bulb on the front...little on the back...
I TOLD you I'm addicted!

makes the perfect earring...

link chain...


2 new clock keys...one is on the back...

an alpha card...that's on the back too...
photo below...

jump rings...

long fasteners...

meet the steampunk queen...


a couple things I wanted to share in the photo below...

I altered the faucet knob with pitch black alcohol ink, then added a tiny bit of the copper metallic mixative...
then I blasted the knob with the heat tool & added some verdigris embossing powder,
to the hot metal, which created a crusty rusty effect...
and to finish it off, I lightly touched some areas with the gold paint dabber...

the other thing I wanted to do,
was to make the large art part gear look textured & rusty...

it's simple...
so I used it on all the gears...
I used walnut stain distress stain randomly on the gear, then added some black soot with the blending tool to cover it with color...
I used the gold paint dabber randomly around the edges...

to create the texture...
I randomly added spots of Glue N Seal over the gears, then sprinkled those areas with vintage photo distress embossing powder...

let the Glue N Seal dry...
& it holds the embossing powder in place...
no heat needed...
and it creates a cool rusty finish...
the distress embossing powder is matte & gritty & adds great texture...

you can barely see her big Blossom Bucket lips...
LOVE how the facets magnify her eyes!


here's the back...

the alpha card was perfect for stamping the title...

every steampunk queen needs a sweet ride...

her wagon is a

how stinkin cool are these guys?
I LOVE that they actually roll...

the handle is made from an art parts ruler & I added a new faucet knob...to pull her on the ride...

it's attached to the box with portions of
alterations die cut hinges...
they're cut from grungeboard, so they're nice & sturdy...

you'll see the new box corners too...
perfect finishing touch...

I had a blast when I figured out that the new destinations stickers were a perfect fit...
no cutting needed...
each side of the configurations was completely covered with 8 letter stickers...
thus the post title...8 letters...get it?

I had fun choosing the 8 letter words...


another view...

hmmm...what else can I share?

oh...yesterday I made a few new booth samples to send to Ted...
very simple pieces...
but they were fun...

you'll see that both backgrounds are similar...
that's because I used Ranger's manila card stock to make a large background...

I didn't like it for what I was working on...
so I chopped it up into smaller pieces for smaller arts...

that worked...

the circles were stamped with the glue stick holder I talked about the other day & the white you see is from the new

the new distress markers made it simple to give her a 2 color dress...
I LOVE them millions...
they make inking small areas on art parts sooo simple...

the background stamp was inked with


and this guy is sporting a Blossom Bucket heart...
and a few spiders...


now for the 4 winners...
congrats to...

#1 Blogger Susan said...

Love all these stamps and the samples you've made. I'll have to get some of those adorable lips! Thanks for sharing so much.

February 12, 2012 2:36 PM


#2 Blogger Vic said...

Congrats, Candy! Wendy, all your samples are so great! I love all the details.

February 10, 2012 1:59 PM


#3...Blogger Kaz said...

gorgeous stamps I just love the worried for art!! that describes me down to a tee xx thanks for the chance wendy and good luck all x

kaz

February 10, 2012 11:28 AM


Wow loving all those stamp sets and the pieces of ART that you have created with them. My favorite I think is the telephone and the wash board--takes me down memory lane LOL
Thanks for a chance to win
Marilyn

February 10, 2012 1:10 PM

please send me your shipping info to
wbv1213@me.com

ENABLER ALERT...

Heidi had requests for a DISCOUNT DEAL for purchasing ALL my new stamps...

so...she created this special...

& the good part... you save over $30.00...
just saying...
1 1/3 stamps sets for free...


let's change it up today...
would you like
book #6 to
live with you?

if so...just leave a comment & I'll draw the random winner @ 7am my time Wednesday morning...

this time, a comment is your chance to win
my new book!


thanks for popping in...
see you Wednesday...

I hope your Valentine's Day is awesome & you get to spend it with those you love...

I best get moving...
I've got to...

make (valentine) art!
wendy