here's how I got started...

here's how I got started...
a 20 minute podcast by Crazy BeYOUtiful

Monday, March 30, 2015

I LOVE Glue N Seal...


way back in 2011 I found a way to use distress rock candy crackle paint on glass...
you'll find the original post HERE...

this technique must be surfacing again, 
because I had 2 questions about it just last week...

so...
here's the updated version and another reason 
why 

first the basic info...

rock candy crackle paint was designed for porous surfaces...
NOT slippery surfaces...
it needs tooth to stay put...

if you read the original post, 
I REALLY wanted to be able to use it on glass...

since glass is NOT porous, it will NOT stay permanently adhered to the glass...
believe me...I tried...

but I found a way...

enter the MAGIC of Glue N Seal...

it goes like this...

choose any glass vase or jar...
it can be new or a recycled jar...
doesn't matter...


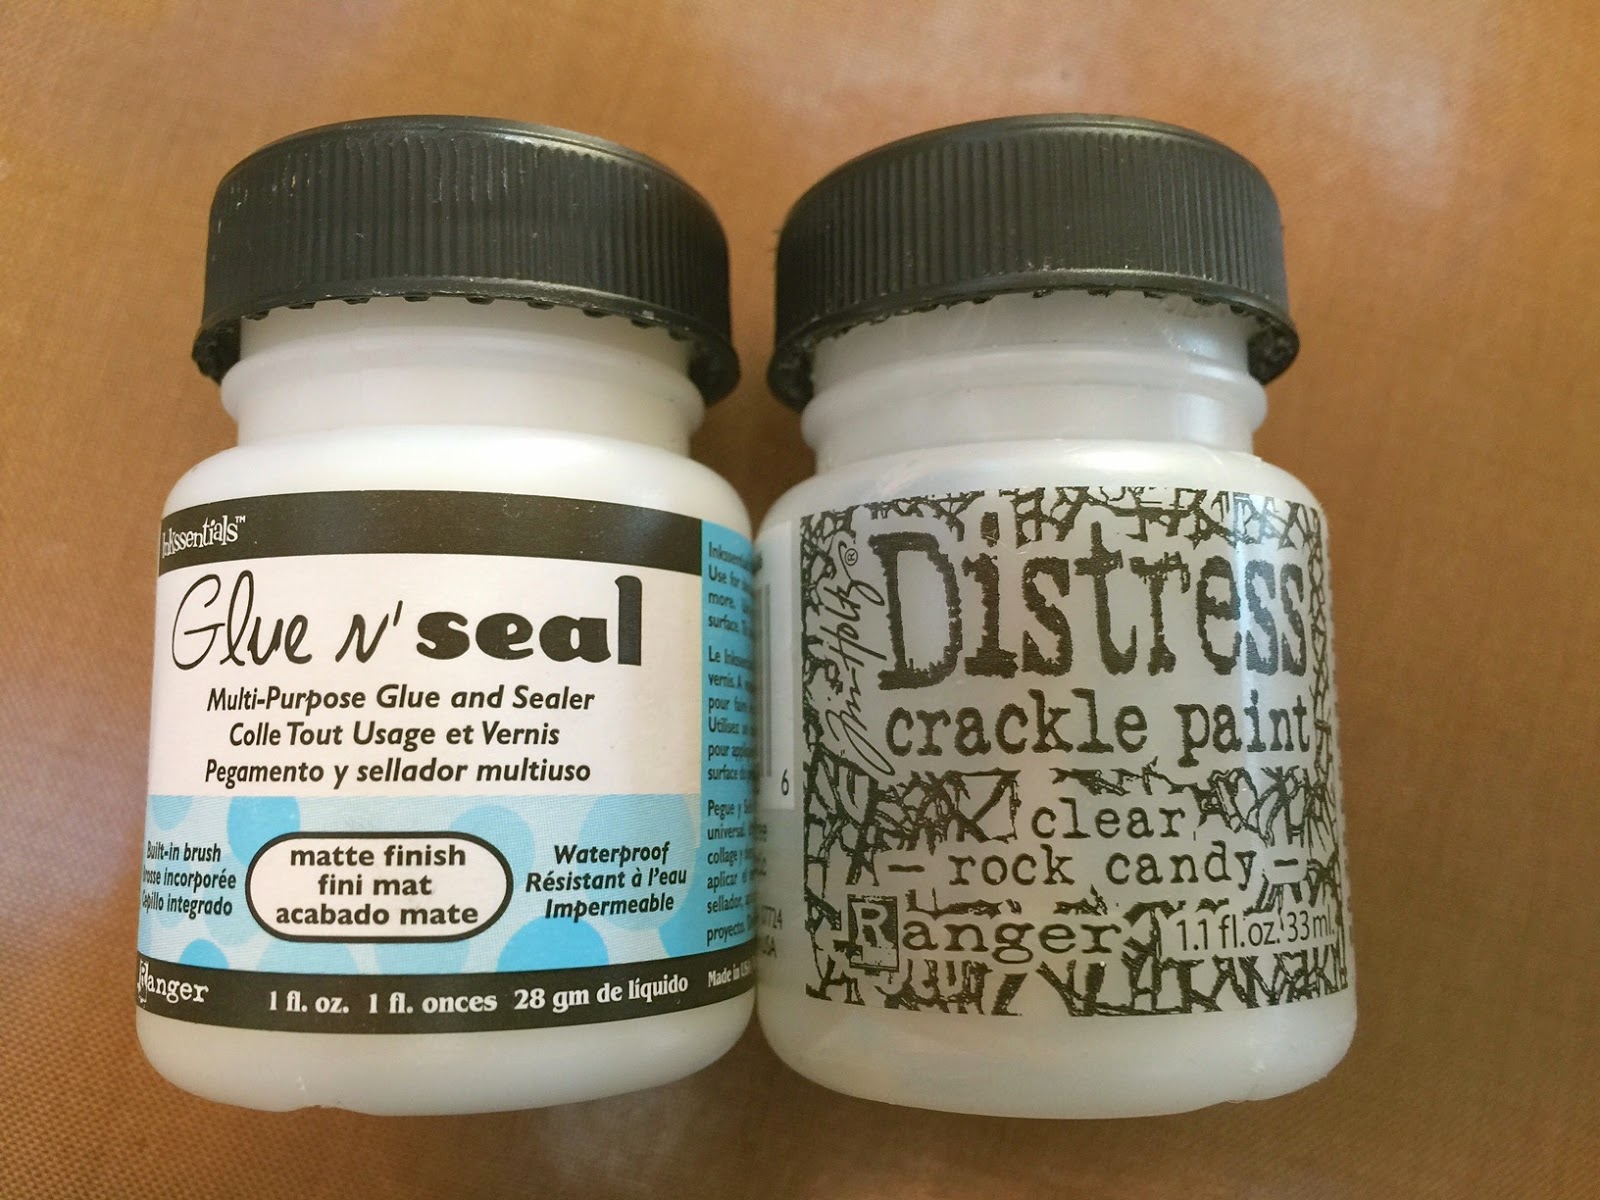
the best bang for your $$$ is to get the small jar...
it's super convenient, because it has a built in brush...

and the large jar to refill the small jar...
this is what I do for classes...

you can also use the large jar with a foam brush if you're working on a really large project...

oopsie...
I just checked...
looks like the small jar is discontinued...
so if you have it, 
KEEP IT...
just use the large jar to refill it...


paint a thin layer of Glue N Seal onto the glass...
no other prep is necessary...


it will dry & look just like this...


next, paint on a medium heavy coat of 
 set it aside to air dry...

drying time will depend
on your humidity & the thickness of the layer of rock candy paint you apply...

I would say mine dried in an hour...
I put it in a sunny window to help speed it up...
make sure to let it air dry...
do not use the heat tool...


when it is dry it looks like this...
you'll see
MAGIC awesome crackles
 that are firmly attached to the glass...

without the Glue N Seal base coat, 
the paint falls right off...

one other thing...
when I did the original post, I got several emails saying the technique didn't work...
after investigating, 
I discovered that they tried to use Multi-Medium as the base coat...
and it did not work...

Glue N Seal is the key ingredient...
and works every time...
look how cute...


in the original post, I added distress stain to add color...

since our kitchen is red, blue, green & off white, I wanted a simple blue vase...

I used my sky blue archival ink...

I tapped the blending tool over the vase & gave it a quick dry...
now it's permanently blue & adorable...

since this is a vase I will use for fresh flowers, I wanted to add an embellishment that would not be damaged if it got wet...

to pull in the red, I decided to use 

I tapped on some red geranium archival ink...


sprinkled it with 


& heated it to melt the powder...
 I like to use a hemostat to protect my fingers from the heat...


I added a remnant rub, using the new remnant rub tool...

then added a little ball chain...


and hung it on the vase...


a project like this is awesome because...

1. it's inexpensive

2. it can easily be customized to any color, using archival inks or alcohol inks...

3. it's 100% waterproof, 
so it can actually be used for fresh flowers...

4. it makes a great hostess gift, 
or a little gift for any occasion...

5. it's another way to use products you already own...

6. it's quick & E A S Y & so FUN...

7. it's a great way to upcycle...
look around & I bet you'll find something you can rescue from the trash...

8. I think these would be adorable, done in several pastel colors & used at each place setting for your Easter feast...

so, in addition to adhering your paper to surfaces with NO BUBBLES...

this is reason #112  

it's a great supply to have when you...

make art!
wendy


Friday, March 27, 2015

INTRODUCING...

YES...
ALL CAPS...
because I'm super excited to share my new product...


here's what the package looks like...
it has 50 sheets & it's a bargain...
THANKS TED!

and I'm happy...
 it's READY to ship NOW!
YIPPEE!


so...what's the big deal?

in the past I've used vintage dictionary pages to cover my "clearly for art"...

one day as I was making some flower samples,
that text really annoyed me...

 I wanted to stamp a pattern over the flower...
BUT...
the dictionary text really competed 
with the stamp & it became lost...
& looked really chaotic...

that got me thinking...
I wish I had a thin 
white paper with NO TEXT...

tada...
is the perfect answer...

the next photo shows the HUGE difference...

on the left is the marigold SiSi
stamped on vintage dictionary paper...

on the right...
 the same marigold,
stamped on NEWSPRINT PAPER...

with the flower on the right, I can easily stamp polka dots, text, plaid...

really, any pattern over the flower
 to change it up big time...

the actual detail of the stamped image also shows up much better...


here's how it works...

you can use any of 
the 3 "clearly for art"(CFA) colors...
clear...
white...
or black...
all 3 CFA flavors 
work exactly the same...

the next photo shows 30 sheets of CFA that are covered with NEWSPRINT PAPER, in preparation for my upcoming classes...

I covered 30 sheets in 20 minutes...
it's simple!


and this photo shows that there is 
NO BUBBLING 
on any of them...

I brush a thin layer of GLUE N SEAL onto the CFA, lay the NEWSPRINT PAPER on the CFA sheet, burnish it down by rubbing my hand over it, then I give it a very quick dry with the Ranger heat tool...
like 5 seconds...
done!

glue n seal is the KEY 
for adhering paper to ANY surface...

always add glue n seal to the solid surface...
NOT the paper...


I am L O V I N G the CFA covered with NEWSPRINT for these reasons...

1. it totally changes the CFA & allows us to easily create very strong & sturdy, 
very dimensional custom embellishments
 for our art...
we get the beauty & ease of working on paper,
 but the CFA adds extreme durability...

2. we can use both archival inks and distress inks to color the surface...
both work very well...
distress inks do not work directly on CFA...
they wipe right off...
but on NEWSPRINT?
they are PERFECT!

3. archival inks and distress inks are translucent inks...
now we can use them on a sturdy white surface and see the beautiful true colors of the inks...

4. the CFA can still be warmed to soften it, which allows us to shape the pieces...

adding the NEWSPRINT 
does not affect that property...

5. we can get more versatility from stamps when using them with NEWSPRINT covered CFA...

6. we can also cover art parts with NEWSPRINT to change those pieces from kraft colored to white!

because the paper is thin & the art parts are sturdy, just sand away the excess paper from the edges, for a perfect edge...

7. NEWSPRINT is inexpensive & 
won't break the bank!


so...what's THE BEST adhesive 

the only product I'm using is 
it adds the perfect dimension between the layers & the adhesive is VERY strong...
I like the black best, because it isn't visible between the layers...

this is a good photo of that marigold again...
you can see much more detail on the NEWSPRINT...
and again...these layers can easily be stamped...


because the CFA is so strong...
these thin tiny ends of this thistle are rock solid...

cut from plain cardstock, they would be much more fragile...

if I'm taking the time to make something, I want a good presentation & I want it to last!


here's probably my most favorite flower...
this little hosta...
I L O V E this little guy...

see the thin stem?
it's amazingly strong & won't bend or break off...


this little egg gives you some perspective of the size of the hosta stem...
it super T I N Y!
the paper mache egg is the size of a real egg...


so that's my newest baby...
I think you'll love it as much as I do...

NEWSPRINT PAPER...

your local stores can order it for you right from Stampers Anonymous...
just ask them!

or the colored links will take you to
my fav on-line shopping spots...

NEWSPRINT PAPER...

try it when you...

make art!
wendy
ps...
one more thing about glue n seal...
(I LOVE the convenience of the built in brush)
and the large jar to refill the small jar...
the large jar can also be used with foam brushes for larger surfaces...
like a full sheet of clearly for art 

HAPPY WEEKEND!


Friday, March 20, 2015

custom magic mat board minis...

HAPPY SPRING!
I hereby declare this 
NATIONAL

BUY A PAIR OF SANDALS DAY!

Rick was so happy to hear this...
or maybe not?

it's a balmy 41 degrees here, 
but I'm wearing sandals anyway...

yes...
my toes are freezing, 
but it's a matter of principle...
I'm O V E R winter!

ok...
onto business...

this package of goodness arrived earlier this week...
I couldn't wait to get these mini movers & shapers out & test drive them...

check out the penny, to give you a good perspective of their cute MINI size...

they're mini & ADORABLE!


one of my new products for this past CHA is this package of magic mat board...

in the package you get two 6 x 12 sheets...
one white and one black...
they are a nice convenient size to use & store...

I specifically wanted the black sheet for the faux graniteware technique & I wanted the white to show the true colors of our inks...

the black is also really cool to use with foil...
and with the metallic embossing pastes...
you'll see that below...

and why did I want mat board?

SIMPLE...

to use with tim's Sizzix dies...

the mat board is very sturdy
VERY inexpensive 
and it's great to use 
with many products for mixed media art...

inks, paints, embossing powders & embossing pastes are PERFECT to pair with the mat board shapes you die cut...

I'll be sharing even more ideas soon...


if you've been following my blog, you know I HATE to waste any art supply...
Rick frequently sees me digging something out of the trash...
I try to sneak, but he always seems to catch me...

so...
after you die cut your shapes and have left over small pieces of magic bat board...


they are PERFECT for using up those tiny scraps...

I LOVE IT...
NO WASTE!

mat board pieces less than 1 inch square can be used to create these awesome embellishments, that you can customize to perfectly coordinate with your art...

below, you'll see the minis cut from both black & white magic mat board...

you'll see that you can ink them & stamp them...
you can heat emboss them...
you can foil them...
triple emboss them, then stamp into the hot embossing powder...
and so much more...

and I like that they are
 very light weight for cards...
so... they're easily mailable...


here's some other ways these mat board die cuts can be altered...

this was a little display board I made, that shows 10 ways to alter the new mat minis...

these 2 mat mini packages are 
already cut for us & ready to go...
just pop them out of their storage sheets...


but...

these same ideas can be used with any die cut magic mat board shapes you create...
just grab a favorite Sizzix steel ruled die & the magic mat board & you're ready to go...


those 3 little hearts you see in the previous photo were the inspiration for this mini canvas...
it's a 4 x 4 inch flat canvas panel...
I'm really liking these...
they are sturdy & easy to change up with lots of different products...
they take lots of abuse!

for the background I used
click the link to see the original tutorial...

that's those dimensional plaster chunks you see toward the right...
there are also a few toward the bottom...

my colors were sky blue & cornflower blue, mixed with rubbing alcohol & then misted with picket fence distress spray stain...

after I dried the background, I added tree branch to the edges & also stamped the script background with tree branch archival...


I didn't take step by step photos, because I was having too much fun...
but I think it's pretty simple...

the 3 white mat board hearts were inked with tea rose archival and then stamped with tree branch & this stamp in the lower right corner of the set...

the mini butterfly was inked with sky blue archival & also stamped with tree branch & the same text stamp...

I had stenciled just one row of polka dots, with cornflower blue archival & you can see that the mini die cuts fit between the dots...
I like when things work...

to alter the industrious sticker, I inked over it with leaf green archival to cover the whole sticker, then LIGHTLY swiped the sky blue archival pad only over the raised areas...
when dry, these colors are permanent, because I used archival ink...

I KNOW...
sky blue is sold out most everywhere...
but I heard from a good source, they will be producing more VERY soon...

the carnation SiSi was stamped 2 times on the newsprint side of clearly for art, with jet black archival...

I used one full image and just a portion of the flowers for the top layer...

it's inked with tea rose...

I always adhere the newsprint to CFA with 


the bow was stamped with jet black onto the CFA newsprint, inked with sky blue & cornflower blue, then stamped over with the new 4 leaf clover background, using tea rose archival...

a vintage button & some gold metallic thread is a simple accent for the bow...

so far it looked like this...


I like the pastel vintage colors...

you can see the minis better below...


and here's a better look at the layered carnation...
I used the black foam adhesive roll between the layers & to add the carnation to the canvas...

the foam adhesive is A M A Z I N G & STRONG!


it was still lacking something...
ah...a border...

I swiped the tarnished brass distress paint dabber along the edges...
better, but it still needed more...

these new remnant rubs were just what I wanted...
a partial thin frame...


that little gold paint edge is a great simple finishing touch...


these minis are adorable & so useful...
they will never be out of style...
and like I said...
they are a great way to use up your magic mat board scraps...

and best of all...
make them ANY color or any style...
and the price is GREAT!

so that's my love of mini...

now...
moving to maxi...

 it's true...

sometimes...
size does matter...

 at CHA we introduced a 
you get DOUBLE the amount of paste for a REALLY GREAT price!

we had lots of requests for a larger jar of white paste to use with the mix & store jars...

they are perfect for MIXING & STORING custom colors of embossing paste right in the jars, for no waste...
no cleanup...
I like to use reinkers to color the paste...

these mix & store jars were chosen to keep the paste nice & fresh, without drying out...

that's it for today...

I think I'll go add a new board to Pinterest for the things we do with the magic mat board...


and then I'll look for a new pair of sandals...
shhhhhh...

after all...
it IS NATIONAL

 BUY A PAIR OF SANDALS...
or flip flops
DAY!

I hope you have a wonderful weekend and that you'll have time to grab your supplies and...

make art!
wendy