here's how I got started...

here's how I got started...
a 20 minute podcast by Crazy BeYOUtiful

Friday, September 8, 2017

NEW Stampers Anonymous Release!

HAPPY FRIDAY...

I'm EXCITED to share my new stampers anonymous release today!

we had planned to release these new goodies at the Collin's event this weekend, 
but evil Irma had other plans...

I've been thinking of my friends to the south constantly and I hope Irma moves out to sea without causing major issues...

we've been to the islands many 25+ times and to think that Irma is hurting them & the residents is simply heartbreaking...

I'll be praying for ALL of you...
BE SAFE!

Ok...

I thought I'd share the flyer pages...
there you'll find examples of how I used the new products...

here's the direct link to stampers anonymous, where to can also view the pages...


please let your favorite stores know what you need & would like them to order...

they too are just getting the flyer now...

you can also order directly from 


I'll be doing mini videos to show close ups there...
and I'll do a GIVEAWAY too!

stay tuned on FACEBOOK over the weekend & I'll have a GIVEAWAY there too!

remember...
you can click on the photos to see them larger...

Here's the front cover...


we have 2 new stamp sets, 
one with a twist...

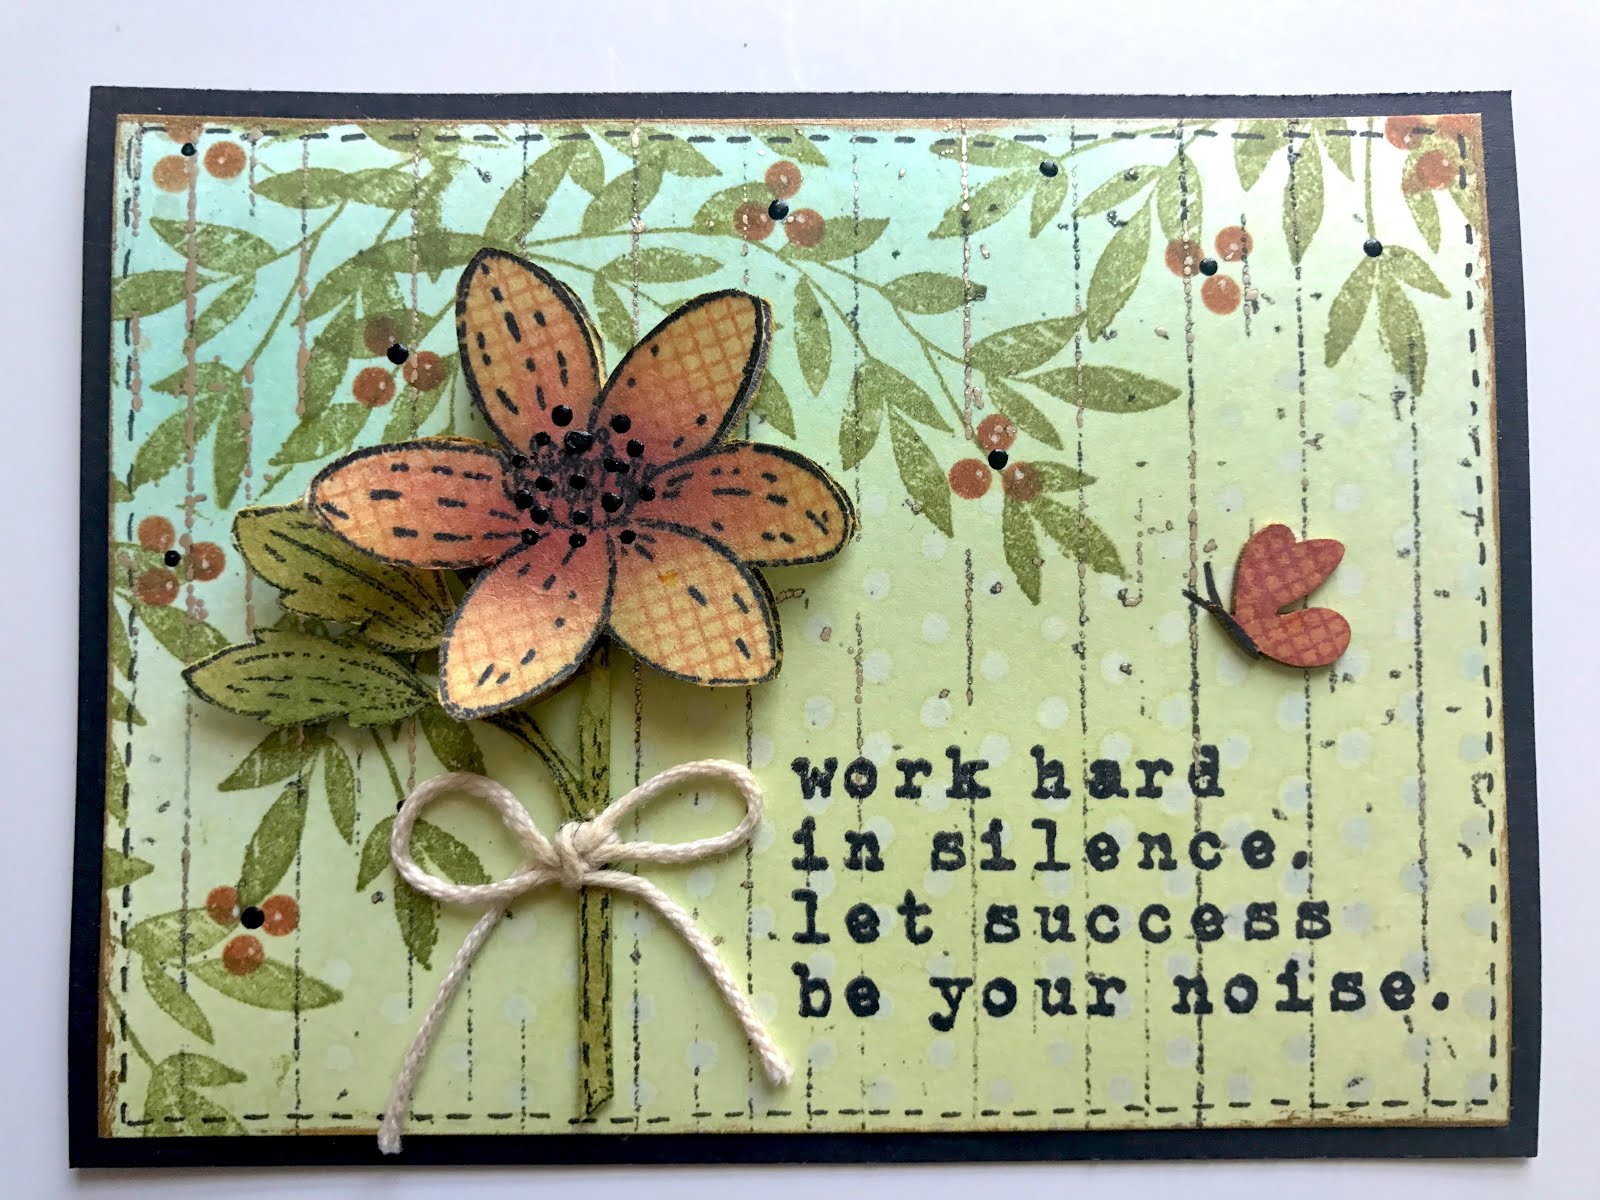
SCS152 is CAFE ART...
that lace stamp is SUPER pretty!
and 

SCS153 AUTUMN ART 
also includes a STENCIL!
I'll explain that later...
but at $1.00 more...
TED gave us a great deal!


next...
3  new BACKGROUND STAMPS...

LINEN...
taken right from a shirt I was wearing...

the DOODLE WREATH is ADORABLE and has the perfect spots to add Enamel Accents to create berries...
I like it stamped in Fern Green or Potting Soil...

and the 3rd new background is 
a REVERSING/TECHNIQUE background stamp...

it's a sheet of solid rubber with LOTS of possibilities...

I especially wanted this to use with mat minis...
I'll show you how very in a mini video on Instagram/Facebook...

I've use it with Dina's scribble sticks too...

it's a GREAT tool!

next we have 
2 new STAMP-IT STENCIL-IT's...

these are super fun...

SIMPLE REALITY and 
AUTURM HARVEST...

with these you get the stamp and the coordinating stencil in the same package...

we included the
 SELECT A SENTIMENT in the flyer,
so that you can see
that some of the new sentiments will
fit in the label area...
you'll see that example 
on the front cover...

there's a better sample of SIMPLE REALITY in the photo after this one...


next up is a new Stencil called 
WALLPAPER...

this is based on the wallpaper I remember from my grandmother's bedroom...
I think her's was stripes with tiny roses...
but I LOVE polka dots...

the stencil is simple stripes & dots 
that can be used to fill a background or 
use just one section as a border...

below is an example of the SIMPLE REALITY
stamp-it stencil-it...
that pretty yellow flower/leaves...


this next page has the new
INK PALLETE...
O M G...
it's simple, but EXACTLY what I needed...
and at $2.99 the bargain of the century!
it's a MUST HAVE...


sit down for this...


THE CUTEST MAT MINIS
E V E R!!!

we have GET MUGGED, which includes cups with saucers & a nice sized mug...
these are perfect for year round cards...
and these make GREAT guy cards too!

and MY MOST FAVORITE 

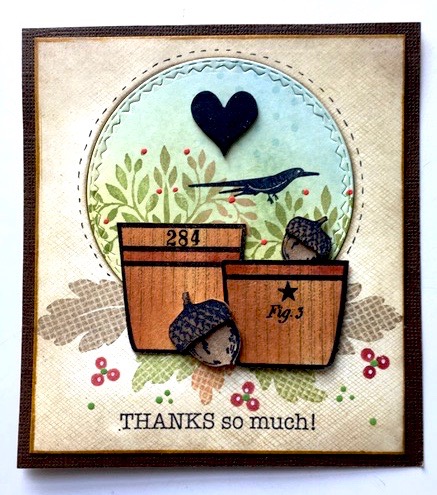
AUTUMN ESSENTIALS...

the most ADORABLE pumpkins...
there are 2 sizes and seriously you'll faint when you see the mat mini ACORNS in the set...

I smile every time I use them...

they coordinate with 
the acorn stamps from SCS 153...
just ink the stamp with JET BLACK & press the mat mini onto the inked stamp for perfect placement...

seriously, the detail in them is awesome!


and here's more samples from the back cover...


and here come more samples...

the mat mini mug got run thru the stripes embossing folder twice to create the plaid...

the stamped leaves?
hmmm...the leaf stamps are solid...

here's how to create them & change up the stamp...

ink the leaf stamp...
stamp over the inked stamp with a clean stamp...
I use the screen background...
that REMOVES the ink and leaves the pattern on the stamp...
then press the coordinating mat mini onto the inked stamp...
MAGIC!
it makes the ink color different & I'm LOVING this technique...

you'll see this in lots of samples...
a simple trick, but it really changes up the look of solid stamps...
use a different stamp each time...
super fun!


here's another example of that...
the cup and saucer from SCS152 are solid images and the cup was done the same way...

the NEW LINEN background, the herringbone background, the vintage mesh and the SCREEN background stamp are awesome for this technique, because they have small patterns...

I also used it on the leaves from the older set SCS137...
and gave them a new look...

combining older with new is what I LOVE...


the mat mini's can be inked, stamped, stenciled, embossed with embossing powder & run thru embossing folders for a MILLION possibilities...

since they are laser cut, they are the same on both sides...

that means the handle can be on the left or right, whichever orientation fits your design...

love that LACE stamp!


this next sample shows how to change the mug from SCS152 to a flowerpot...

stamp it...
cut it out, but chop off the handle & now it's a flowerpot...

and then it you chop off the section above the stripe, it shortens the pot, so now we have 2 perfectly sized coordinating pots!


here's an example
of the leaves stamped as a background to create my own paper...
the Potting Soil enamel accents make it pop!


now the INK PALETTE...
since distress and archival inks are translucent inks, when these are put on the craft sheet, you don't get to see the beautiful colors...
with the bright white INK PALETTE...
YOU DO!

you can watercolor right from the palette & see the exact color...


here I'm using my mini Archival pads...
and now I can mix a custom color & see exactly what it is...

if you use distress, the INK PALETTE will clean up with water...

if you use it with the archival inks, clean up is simple with rubbing alcohol or the new Archival stamp cleaner from Ranger...

I LOVE this thing...
it's 5 inches square, so it's designed to take up very little of your workspace...

it's laser cut from the same strong material that my stamps sets are stored on...

mine is always out, but I've added a second one to my stencil binder...
I used the crop-a-dile to punch a hole & it's a perfect fit...

Potting Soil & Garden Patina?
YES please!


so there are my newest babies...

I'll be waiting to hear YOUR FAVORITES!

sorry it's been so long since I've posted...
I'll try to be better...

but you can always find me on INSTAGRAM...

here's the link again to view the whole flyer...

BE SAFE MY FRIENDS!!

make art!
wendy


Thursday, March 23, 2017

come visit the Ranger blog!

I hope you can take a few minutes to
pop over to 
for a tutorial for
 a THANK YOU card...

here's a little peek...
it uses the 
and the new 
select-a-sentiment stamp-it stencil-it...
I found it here...
and...here...
and here...

if you have the 
lower case, they work perfectly in the label area...
you can say anything...
any word...
any name...
any date...

and just a little scoop...
this is one hugely popular (just restocked)
so expect to see an add on, that's a perfect fit...
shhh...
that a secret...
for blog friends only!

in the tutorial you'll learn 2 ways to use my new

if you haven't tried them...
I hope this will give you some ideas...

I love to add Dina's (paint tip)
just pop off the nozzle and 
screw the applicator on...
 you can make dots extra easily...
and the stylet keeps 
the enamel accents flowing...

I'm loving multicolored background stamping, and it's so easy with tim's stamp platform...
this is a GREAT must have tool...
every detail was 
very well planned and perfectly executed...
I'm using it daily!

this combo of potting soil and watering can is a favorite, with the new 
brown & grey doesn't sound too cool,
 but trust me...
IT IS!

they'll be shipping soon...
after you have them, 
I'll be posting some fun ways to use them...

they are super convenient for adding multiple colors to a stamp...
it's TRUE...

size DOES matter!
ps...they are super cute too!

OK...

ready...

set...

GO 
over to Ranger and check it out!

after that...
I think you should 
enjoy yourself and

make art!
wendy


Friday, February 17, 2017

enamel accents technique...

sometimes an idea works &
 you can share a fun NEW technique...

this one DID work...

here's another way to use enamel accents...

I posted a 1 minute video yesterday,
 explaining this technique 

you can see it here on Instagram...

and here on Facebook...
for some reason Blogger won't publish it here...
probably tech error on my part...

anyway...

here's the tag I made using the technique...

it's the same tag you see in the video...
I started with  a #8 heavystock tag...
it's a very nice surface to work on...

it's swiped with potting soil and
they're thin & when applied this way, 
they dry in about 2 minutes & add
 both texture & shine...
they also act as a resist for inks...

I used my "never enough hearts" stencil & traced the heart on the back of the tag, then cut it out...
tracing on the back is best, 
that way no tracing lines show, if your cutting isn't perfect...


here's the heart...
I inked the white edges with potting soil...


to create the background for the heart,  
I used a #8 heavy stock tag...
it's cut down to 5 ½ inches tall...

I inked the tag with orange blossom
then added potting soil to the edges...

I stenciled the square grate on the left side of the tag with cornflower blue...
then stenciled some polka dots with potting soil over the square grate stencil...

moving on to the right side, 
I knew the ink was not completely dry & that embossing powder would stick where there was wetness...
perfect...
I wanted melted embossing powder
in the background as extra texture, 
but with no foiling...
I was careful to only added bits of foil on the stamped lines,
so I wouldn't end up with a big blob of foil...

I inked the old wood floor background with cornflower & sprinkled on the  
I reheated it & pressed the 
over the warm embossing powder...
it will release easily when it has transferred...
it takes just a few seconds...

here's a video that explains 
how EASY this is......

***I am addicted to foiling 
the embossing powder***

be warned!
if you try it...
I'm NOT responsible
for YOUR addiction...
haha!

I added 3 pieces of tim's new design tape

I used watering can to stamp the flourishes that you see below...

look closely & you'll see the screen background stamped in several places, 
using the 3rd generation tiger lily...
(I stamped off 2 times)
I wanted it barely visible...

here's the tag base...


next are the components...

the little "make art" is from 
stamped with jet black onto a scrap, then inked with potting soil & orange blossom...

the new mat mini flower was stamped with cornflower blue, using the plaid background, embossed with cornflower blue embossing powder, then foiled with the same turquoise foil sheet...

the center is a hex head fastener, inserted thru a fluted fastener collar, then thru a mini gear...

I held the pieces together with a hemostat, 
heated them as one, 
then dipped them into the cornflower blue embossing powder...

the hot metal holds the embossing powder in place...
once cooled, I used the sanding grip to sand part of the hex head back to the original color...

those leaves are tim's gold 
they're die cut
then inked with fern green...
I sprinkled on the 
to give it a bumpy look...
crummy photo...
but trust me...it's pretty cool!

***since archival inks are translucent, you can easily change the color of these metallic card stocks & tint them to any color of metallic***

then I stamped over them with 
the "les roses" background with watering can...

I cut off the last 2 leaves, because
I thought it was a bit too long...


but then...
I dug them out of the trash...
this is normal for me...


and turned them the opposite way when I added them to the heart...

why?

NO CLUE...
but I liked it!


here's the tag all assembled...

under the heart to add dimension...
it's great stuff for it's adhesive properties & the perfect dimension!

I added an extra strip of the same 
to the bottom, edged the tag with the tarnished brass paint dabber & used 
my CUTE
to add some dots...


it's got a vintage feel & when the light hits it, 
the bling is really cool!


I hope you'll
give this enamel accents technique a try & 
you'll see how fun it is...

have a GREAT weekend...
I hope YOU can
take some time to...

make art!
wendy


Monday, February 13, 2017

foiled embossing powder and...

lately I've been hooked on adding foil to my embossing powders...
I like that there is no special equipment needed...
I like that we just use the things I'm sure you already have...

embossing powders...

Ranger's foil sheets...
oops...

I say in the video that there are 8 sheets, but there are really 10!
this is my fav set, 
it's the vintage...
but there are others to choose from too...
like these basics...
and this set has pretty brights...


you can add as much foiling as you'd like...
you can foil the whole image or
 just foil the sentiment... 

here's some examples...


this one has foiling in the background on 
the script background and 
on the mat mini tree...
the focal image...

the trees aren't just for holidays...
the new "homestead" set was designed to work with them for all year round art...


for this sample the old wood floor background stamp is foiled...


here's a better look...
it's subtle & great for a background...


for this one, I foiled just select parts of the new circle collage background stamp...

it's embossed with 
 watering can embossing powder...

any of the embossing powder colors will work...
so, emboss with a color & use a different color of foil...
it's really fun!


 here's the video that SCRAP TIME filmed last month in Phoenix...
this explains how the technique works & shows you how really simple, but effective it is...

I LOVE that combining products in a different way yields a whole new result...


if you pop over to the SCRAP TIME blog,
you can enter to win the demo tag I made...
you just need to leave a comment there 
by Feb 19th...


so who won these new enamel accents?


congrats to...


Blogger SusanK said...


Love how you combined so many items and colors to come up with this super adorable piece of art!
February 10, 2017 at 2:27 PM
 Delete
please get me your shipping info & Rick, 
head of shipping & receiving,
will get these off to you...

NEWS FLASH...

to celebrate Valentine's Day,
I'm giving away a set of 
my new Ranger designer bags...


be watching on Instagram 
for the announcement...
tomorrow...
it will be a 24 hour giveaway, so everyone has a chance to enter...
you'll just leave a comment there...
that's your entry ticket!


don't forget to leave a comment over 
at SCRAP TIME...
they make great videos!

today I think we should...
make art!
wendy