here's how I got started...

here's how I got started...
a 20 minute podcast by Crazy BeYOUtiful

Monday, October 21, 2013

one stamp...2 ways...

I like when a product can be used more than one way...

here's a fun example...

the stamp you see below is an oldie I designed about 4 years ago...

it's a flower  in set LCS019...the set name is "lower case art"...


I cut a #8 black tag down to 5 1/2 inches tall...

I used the watermark resist pad to stamp the spider (botanical art LCS 037) & the 2 large flourishes, and while the ink was wet, I sprinkled on some superfine detail embossing powder...

heat the powder to melt & create a tone on tone effect...

I added a strip of tim's new laboratorie tissue tape to the bottom of the tag...
it's perfect for the halloween theme I had in mind...


I wanted my archival ink colors to be good for everyday use...
and I wanted them to be a perfect fit for holidays...
SUCCESS! 

orange blossom makes a great pumpkin, fern green makes lovely leaves & red geranium is a great flower color & will be perfect for Christmas projects...

to make the pieces you see below...

cover a sheet of clearly for art with a vintage dictionary page...
spread a thin layer of Glue N Seal over the CFA...add the paper, brayer & dry...

you will see NO BUBBLES...
this is why I LOVE Glue N Seal for adhering paper to any surface...

now use the new (favorite) reverse dots background with fern green & stamp over a portion of the CFA...
***stamp on the paper side & dry...***

stamp over another section (paper side) with orange blossom & the reverse dots stamp...

use jet black archival to stamp the flower (just the top) over the orange area...stamp this 3 times...

ink the leaves portion of the stamp with jet black archival & stamp over the green paper...stamp 4 sets of leaves...

dry & cut out the leaves...

cut out one full flower & one with 4 sections & the last will be just the 2 middle sections...

stencil the flower with red geranium, using this flower stencil...
again on the paper side of the CFA & cut out...

heat each piece to soften the CFA...then shape each piece...

I used hot glue to assemble the pumpkin...add 3 leaves between the layers...

I also twisted a small piece of green floral wire to create the stem & stuck that between the layers...

the pieces will look like this...


ink an art parts tag topper with mustard seed distress stain & add shading to the edges with gathered twigs, on the blending tool...

I stamped the plaid background (LCS027 be inspired...make art)  with (MWAH) watering can archival...

dry...then add the cute birds rub, some glaze pen dots & an eyelet...


glue everything in place...and here's the finished tag...


the things I LOVE about this tag...

I used an old stamp in a new way...

the cool monochromatic background...

the dimension the CFA creates...

the (MWAH) archival colors...

and how quickly this came together...

hmmm...other ideas???

this same leaves/pumpkin design would make a fun TREAT BAG...

because the CFA makes sturdy pieces...the pumpkin can be added to a napkin ring for your halloween dinner/party...and used again next year...

I also like to add things like this to a jar candle for quickie hostess gift...

**************
today is a special day for us...
41 years ago I wed the love of my life...
yes...I was only 10...

a favorite memory from that day is when my parents drove me to the church...

my dad...(who was kind of emotional that day) turned around when we approached the street that the church was on & said "I don't have to turn here if you don't want me too"...

lucky lucky me! he turned!

YIKES...I NEED TO MAKE Rick A CARD...

I better go...

make art!
wendy


Monday, October 14, 2013

distress paint plaid...

it started like this...
a catalog arrived in the mail with a quilt on the cover...

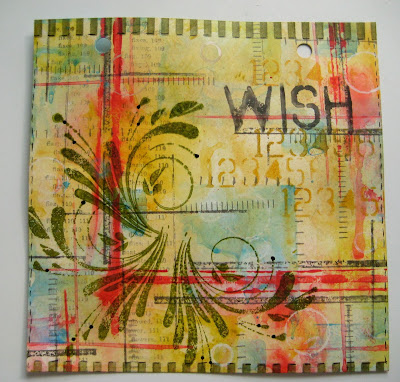
this inspired me to think of a way to make a "quilt" (paper, of course!) with tim's distress paints...

plan A was REALLY ugly & is residing in the landfill now...
I can't even show a photo...it would hurt your eyes!
I'm serious!

plan B was so-so...but not inspiring...

plan C worked & I had a blast...

the base is a 5 1/2 inch square specialty stamping paper page in my square art parts art journal...

I also did this technique on the new distress watercolor cardstock...it's fantastic!

anyway...here's the result...


I'll walk you thru what I did...

if you want to play along, I used these distress paint colors...

REMEMBER...this is important...
***you MUST DRY between layers***

this technique works because distress paints are waterproof when dry...
this makes layering colors foolproof...

I applied distress paint to an acrylic block...
I used a 2 inch square one & dabbed the paint on, then misted it with water...I used 2 squirts from the mister...that seemed to be the right amount...but try it yourself, to see what you like...

I pressed the acrylic block onto the paper in 3 places to start...

dry between layers...
and keep adding more paint "squares" with different paint colors...

I used the acrylic block, because I wanted some corners/straight lines, to create the quilt like effect...

overlap the layers...and use just portions of the acrylic block...
use different sizes of blocks too...

so far...not too cute...
it goes thru the uglies before it gets better...
just keep going...


next I added my accent color, barn door...
I applied the paint to the edge of a grid block & used that as a stamp...

while the paint was wet, I misted it with water, then dried it...

***MAKE SURE TO CLEAN THE PAINT OFF THE GRID BLOCK***...

next I added some lines with my watering can archival ink...
I used an old credit card for the skinny lines & a grid block edge for the thicker lines...

looking much better...


to tone down the white, I inked over the whole page with scattered straw on the blending tool...

the large flourishes are stamped in fern green archival & wish is stamped with watering can archival...

the dots/stripes stencil makes the borders...I used fern green...


to make the embellishments...

I stenciled red geranium archival & orange blossom thru the layered flower stencil, onto manila cardstock & cut it out...

I die cut a tattered florals flower from clearly for art, that had been covered with vintage text...then stamped over it using my reverse dots background stamp (my new favorite) with red geranium. once that was dry, I toned down the white with wild honey on the blending tool...

the little bird is a mini movers/shapers...it's CFA covered with vintage dictionary page, but this time I added just a bit of black soot distress paint to the CFA side & allowed some of the text to show thru...it's a cool effect...especially for Halloween...

the smallest flower is also a tattered florals die cut, painted black...
and it has a black rhinestone center...


here's a better look at the layered flower stencil...
to create the flower, just ink thru one flower...either is fine to start with...


then lay the other stencil over the inked area & this will cover up the stenciling from the first color...
then stencil a second color ...
or...use one of the embossing pastes for one flat & one raised layer!
simple & FUN!


and again...
plan C...


oops...somewhere along the way you'll see that I stenciled some numbers around wish...I used wild honey paint with the blending tool...

another oops...I also lightly stamped the index stamp along the left hand side, with watering can archival...that stamp is in an older set LCS038...live & make art...

it's subtle...but it adds another layer of interest...

yikes forgot this too! the little circles are some lids that I pressed onto the snowcap pigment ink pad...

and don't forget to add some doodle lines...


so...the moral of this post?

if plan A is UGLY...
and plan B isn't much better...

PLAY PLAY PLAY...
plan C just might work!

really...it's all about having FUN & trying new things...

when YOU

make art!
wendy

Friday, October 11, 2013

the 15 minute journal page challenge...

the head of shipping & receiving (aka Rick) and I are going full speed ahead here at kit making central...
we're getting ready for my last 2 store visits for this year...

first up is a new all day mixed media tag art journal that's happening on Saturday October 19th in Bloomington, Illinois at The Scrapbooking Studio...

that's my home store...only 65 miles away!

sorry to cut you out Southwest...
this time I can drive!

the following weekend is a new to me store & I'm excited to be teaching at Craft Fancy in Arlington Heights, Illinois on Saturday October 26th & Sunday the 27th.

Saturday is an all day (8 hour) Ranger inks studio 490 style techniques class...I totally LOVE to teach this class...

and Sunday is another all day art journal class, with loads of fun techniques...this is a marathon...so if you're signed up...rest up!

Carol said they are doing a major store re-do with a huge expanded classroom...
it sounds fabulous...

another drivable store makes me happy...

I took needed a break so
yesterday I set the timer & challenged myself to do a quickie art journal page...

this is in my small art parts journal & the page size is 3 1/4 x 4 3/4 inches...
I like to make my own pages using different surfaces using 

I like the fact that I can work on the individual pages on a flat surface & if it turns out ugly...I can trash it & it's my secret...

I like the small page size sometimes, because even with a short play time, you can still accomplish something & actually complete a page...

here's the result of my 15 minutes...


this time I worked on the new distress watercolor cardstock...
this is the smooth side...

the base was created with distress paints, using broken china, crushed olive & wild honey...

I stenciled my flower with a combo of red geranium & orange blossom archivals & if you look closely, you'll see that I stamped some random text thru the flower stencil with watering can archival...

the stem/leaves are a quickie doodle with a waterproof pen & colored in with the peeled paint distress marker & the detail water brush...

MWAH...yes...kissing the lid before I open...
watering can archival is perfect for the subtle script stamping in the background & for the chandelier...

using jet black archival for the main sentiment & stenciled words makes the chandelier appear to be stuck further in the background...watering can & jet black work very well together...

by using just a small portion of the ornate dots background stamp, it creates a fence type effect...
love it lots!

the numbers (35927)  border on the left was stamped multiple times with orange blossom archival...

and I finished it off with glaze pen dots...and a little pen stitching around the edges...

so the moral of today's post is that even if you only have 15 minutes to play...

you REALLY CAN...

make art!
wendy

WAIT...

stop the press!

this just popped into my email...
"can I use your archival reinkers to change the color of the embossing paste"?

YES!!! you sure can...just 1 drop is all you need! it works very well!


Wednesday, October 9, 2013

creative chemistry 102...


I know....I KNOW!

long time no blog...
but I've been B U S Y...
HONEST!

have you joined tim's on line class?

it's called creative chemistry 102...

it's over the moon F A B U L O U S!

here's a version of a technique he shared today...

watch the class video & you'll see how to combine some cool products for a very fun result!


YES! those gorgeous brown stripes are my potting soil archival ink & I stamped the flourishes in fern green archival...
thanks for asking! lol...

and the background is my new vintage mesh background stamp...
I could use this background on everything I make...


I'm honored to have contributed 3 card samples to tim's class...

here's a peek at some art from the guest artists...


the moral of today's post?

SIGN UP for 

you will LOVE IT...

because you'll learn so many ways to...

make art!
wendy
ps...see you soon!