here's how I got started...

here's how I got started...
a 20 minute podcast by Crazy BeYOUtiful

Monday, December 27, 2010

my other favorite C word...

besides CHRISTMAS is ...

CHA!

and believe me...
we're in full CHA mode here...

there's LOTS going on...
it's all still TOP SECRET stuff, but here's a few tidbits I can share...

I have ALL my new studio 490 stamps here & they have all been inked & tested...
I may be prejudice...
but I'm thrilled with them...
OMG!
we'll have a few flowers, a few new backgrounds & some images just might have an interesting twist...

we'll have more stamps that coordinate & work well with the current sets giving us more possibilities...

I have stepped "out of MY box" for some these images...
I can't wait to share them...
I think you'll be surprised...

I leave for CHA on January 24, so you can expect to see them...
MID JANUARY...ish

and...

I'm TOTALLY over the top excited with this second release of art parts...
and now that I've used them & made some art...
yep...
they are exactly what I envisioned...
I'm sooo happy...

again...
some of these have a different twist too...
and LOTS of potential for fun...

I'm very anxious to see what others will create with them...

here's a little art parts peek...

hey...it's the best I can do...
it's still DECEMBER!

so...

some things I'm working on ...
more projects for book #4...
instructions/photos for the book projects...
and a re-do of the tips & hints section...

my CHA class project photos & instructions...
the sample is done...
I like it...

getting supplies requested for the CHA class...

a REALLY top secret assignment...
it's pretty exciting...

my Ranger designer challenge art...
several artists are given the same supplies & we are asked to use a product line to...
make art...

these are all on display in the Ranger booth @ CHA...
it's very cool to see how each person uses the same supplies...

I WILL take photos for you...
it's a promise...

and then there's...

art parts packaging...
deciding what pieces go together to make "sets"
and the art that is needed for each package...

CHA samples...
CHA samples & MORE...
CHA samples...

so this may explain why I won't be doing daily blog posts...
or doing that other C word...
cooking...

but I'll pop in as often as I can...

I hope your holidays were fun...

and now you can relax a bit & take some time to...
make art...
wendy
ps...I'm off to dig into that art parts bag!

Saturday, December 25, 2010

from both of us...

to ALL of you...

we wish you a
VERY MERRY CHRISTMAS!!!

may the spirit of this holiday stay in your heart each & every day of the coming year...

we hope your day is filled with family,
friends, good food & fun...

oh...
and some new goodies to...

make art!
wendy & Rick too...

ps...wow! now that's a lot of rubber!

Tuesday, December 21, 2010

you're gonna FLIP...

for my birthday, one of the great gifts I got was a FLIP video...

this is my first try...

it's funny...
& it's NOT edited...
I had no clue what I was doing...
I can't spare the time learning it right now...

in addition to Christmas (which is also rick's BD), we're in FULL CHA mode here...
we have projects EVERYWHERE!

but I wanted to try the FLIP & see what it would do...

and since we're friends...
I thought I'd share...
don't make fun of me...
remember...
I'm old...

I ended up with this...


was I right? HILARIOUS?

the race...?
it's to get everything done for CHA!

our trip was soooo much fun.
after the holidays I'll try to do a better video with explanations of the process...
or after CHA?

just a quickie report...

we started @ the factory that makes the natural blocks of rubber into rubber that ted uses to make stamps.
it was awesome to see the whole process right from the beginning...

the big roller thing you see in the video is making the natural rubber into usable sheets...

the rubber sheet is laid over those brown boards you see...

then it's slid into the vulcanizer, which is 300 degrees & it's pressed with 50 TONS of pressure for 7 minutes...

so..."hot off the press" really means HOT off the press...

we also got to see how my books are printed...

we had no clue that it is printed 4 times, with each pass thru the machine adding another layer of color...cool!

we got to meet everyone who works for ted to make us art parts, books & stamps.
VERY FUN!!!

if you look closely...
those piles of rubber stamps are...

THE NEW ONES!!!!!

I hope I started your day with a laugh...

NOW...
it's time to...

make art!
wendy

Sunday, December 19, 2010

NEW studio490 stamps!

ok here you go...Rick got a photo for you of my brand new...literally, hot off the press stamps...
seriously...

I'm hoping this link works...

if not, I'll be back next week with some photos...
try this...

http://gallery.me.com/wbv1213#100002/IMG_0318

the tour was amazing & just plain fun. we both loved it.

we got to see how stamps are created & art parts too.

gotta get ready...headed out to brunch with Ted & Michelle...

we need new stamps to...
make art!
wendy

Saturday, December 18, 2010

a quick hello.....

from balmy...

Cleveland...home of STAMPERS ANONYMOUS!

We're here...

We enjoyed the Christmas party last night & meeting all the employees who make the fun things we get to play with.

Ted & Michelle made it so much fun..

awesome decorations...
good food...
good drinks & LOTS of GIFTS TOO!

we have the factory tour today...we can not wait...
Rick is in charge of the camera...
HOPEFULLY I'll have photos to share...

How exciting to see MILLIONS of stamps...

We'll be back next week...

have a wonderful weekend...

WE ARE!!!

as always...
make art...
wendy

Tuesday, December 14, 2010

from the bottom of my heart...

THANK YOU ALL
for the hundreds of emails, comments, Twitter & Facebook birthday wishes...
YOU ALL made my heart so happy...

we had a very fun FRIGID day...
SHOPPING of course...
we braved the brutal Illinois weather...

HUGE thanks to the guy who invented cars with butt warmers...
I REALLY love you...
seriously LOVE YOU...

as we were driving, Rick asked what was going on with all the dinging from the IPad...

well it was message after message...
and then more messages...
WOW!!!

THANK YOU AGAIN!

and speaking of hearts...

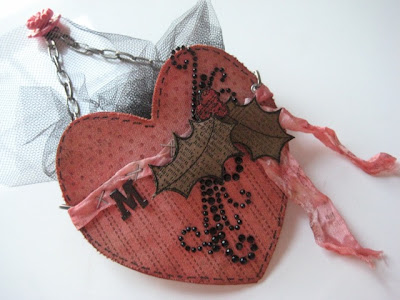
here's a holiday gift card holder I made for my friend...

the base is grungepaper covered with Claudine's sticky back canvas...

I must admit that when this canvas first was released...
I was a little intimidated...
but now that I've used it & found out that it's not hard...
I'm REALLY enjoying it...
& now the ideas are brewing for more canvas projects...
and there are 5 sheets in the package...
so a good deal...

and...
the color washes are PERFECT for canvas...
just my opinion, but it's quick & easy...

anyway here it is...


and here's a little quick HOW TO...
I made just for you...
my blog friends...

cover a piece of grungepaper with sticky back canvas...
I used the natural again...

die cut 2 hearts...

PLAN B, if you don't have the Sizzix die...
would be to trace 2 hearts onto the grunge & cut them out...
or even 2 squares would be just fine...
2 pieces of the same size are the ingredients to start with...


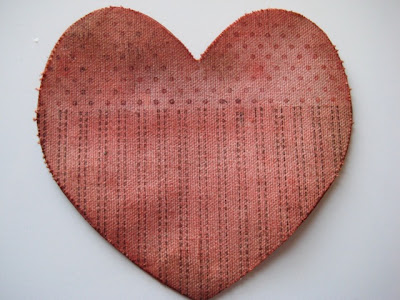
mist the hearts with red pepper color wash, then mist with water & a squirt or 2 of heirloom gold Perfect Pearls Mist...

dry with the heat-it tool...

use the blending tool to add red pepper PIGMENT ink to the edges to accent them...
I frayed the edge just a tiny bit...

use the red pepper PIGMENT ink to stamp polka dots across the top of the heart...

use coffee archival to stamp the lower heart with this background...

tip...you'll also want to color the insides of the heart, because they are visible & everything should be colored for a more professional look...


hey...
how did Ranger sneak in here?
this guy thinks he's a dog...
he follows me everywhere...
this is the bathroom...

on a funny note, since he thinks he's a dog, I'm training him to come when I call...

if he DOES...
he gets a bit of COOL WHIP...
I work for stamps...
he works for Cool Whip...

we're quite the family here...

ok...back to business...

put the 2 hearts together & use the Crop-a-dile to punch holes to attach the link chain...
(this is a great tool...ask Santa to bring you one)

add eyelets in the holes...

add pen stitching detail around the heart...

it's simple to make perfectly coordinated ribbon...
just start with a piece of tim's trimmings...

moisten with water, scrunch it up, mist with red pepper color wash & a blast of heirloom gold perfect pearls mist...

dry & then randomly stamp with the text stamp , using jet black archival...
I keep it all squished/crushed up & just stamp randomly...

attach the ribbon with the tiny attacher to the front...(another tool to ask Santa for)...
then wrap around the heart & tie on the right...

add 2 rhinestone swirls (ZVA, I think?)...

add grunge holly...
I highlighted the berries with barn door distress stickles...

add an initials to personalize...

add the link chain to hang & a vintage button or 2 @ the top of the chain...

stuff with black tulle...
(JoAnn's)

note to self...
don't forget the gift card!

here's the final again...

and a closeup...
I used this tiny text on the leaves...


the die really makes it a quick project...

if you're a blog friend, you'll see that I use polka dots a lot...
I like them...

a lot...

but I DO NOT like polka dot windows...


stay warm & be merry while you...

make art!
wendy

Thursday, December 9, 2010

Thursday evening post...

kind of like the Saturday Evening post...
but on Thursday...

anyway...

happy holidays!!!

I LOVE to shop...
Rick teases me that if shopping was an olympic event, I'd be on the center podium...

so it kills me...
but sometimes you have to just give cash...
but here's a quick unique way to make it a little more special...

the first one takes a few minutes to figure out...
but when you have a sample, it's quick to zip more out...
the 2nd & 3rd take less than 15 minutes to complete...
TRUST ME!

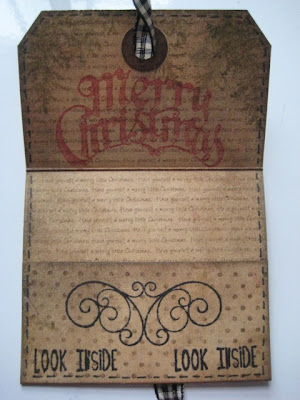
here's how to turn a manila tag into a cash envelope...
to look like this...


if you want to play...

start with a #8 manila tag...

one tool that I don't use every day, but I LOVE, is the scor-it...
it makes perfect folds very time...

so...
measure 2 inches from the top of the tag & score...

and measure 1 1/2 inches from the bottom & score again...

your tag will look like this...


ink the tag with vintage photo distress ink using the blending tool & completely cover both sides...

add walnut stain distress ink to the edges...

working on the BACK of the tag...
use walnut stain to stamp the ticking as shown...
over the top 2 sections of the tag...

for backgrounds, I usually, not always...
press unevenly to create a worn vintage look...
or I apply the ink in random areas...

now it looks like this...


use coffee archival to stamp the polka dot border on the lower section...

use jet black archival to stamp the saying over the middle section...

stamp the mini branch with forest moss...
over the middle section...

here's a tip...
you can protect the top section with a post-it note, to prevent stamping on the top...

this is the BACK of the tag...


turn the tag over & work on the FRONT of the tag...

use coffee to stamp the Christmas background over the top 2 sections...

a little tip...
the "have yourself a merry little Christmas" background has teeny tiny words, which makes it hard to read & tell which side is up...

so, to avoid stamping it upside down...
I used a sharpie & put an arrow right on the cling to know which direction is up...
saves an oops & it's a quick tip...

use fired brick to stamp the greeting...

use forest moss to stamp the mini branches several times on the top of the tag...

fold the bottom section up...and use jet black to stamp the mini scroll & "look inside" 2 times...

fold the bottom up & use a thin line of Glossy Accents on just the edges to create the pocket...

the inside now looks like this...


stamp the holly 2 times on grungepaper with jet black...
cut out one full image & an extra leaf...

ink the leaves with forest moss...
front & back...

use a cut & dry nib to ink the holly berries with barn door distress ink...

use jet black to stamp the border of polka dots over the leaves...

add barn door distress stickles to the berries & dry...

cut a ribbon to approximately 14 inches...
put one end thru the hole, across the top of the tag & down the back...

glue the holly over the ribbon to hold it in place...
this is the only adhesive I used on the ribbon...
it's not glued on the back, so the greeting can be read...

fold the tag...
and tie a bow to keep it closed...

here's the finished envelope again...


like I said...
the first one takes a bit to figure out...
if you're using text...
but this next one took no time to finish...

I needed one for a boy...
so, the same folds, but a little different closure...

tim's truck was stamped with jet black...
the initial, from tim's new lost & found salvage stickers...
was put onto black presentation board...
cut out & distressed with tim's sanding grip then a little vintage photo...

the T was glued with Glossy Accents to look like it's in the back of the truck...
a simple way to personalize the envelope...

so...
follow the instructions above...
and after gluing the edges to create the pocket, insert an eyelet on the bottom of the tag...

this time I used black string to keep the envelope closed & cash safe...


this also works for a quickie birthday envelope too...
or it's a simple way to hide a mini love note!
think valentine's day...
YIKES...
let's get thru Christmas first...

one other tip...
if you decide to use other background stamps for stamping the back of the tag...
remember that when the tag is folded, text or numbers will be upside down...
on the top flap...

so, keep it simple & use patterned backgrounds to save time...
just saying...

how about more prizes???

OK...FIRST...

we have one for...
Anonymous Jacki said...

This tree is so cute - and so you, Wendy! I love EVERYTHING that you create! We are so lucky you create ART and share it with all of us! Thank you. :)

December 8, 2010 6:07 PM


and one for...

Blogger karen said...

I made this comment out loud to myself when I saw this atc..and so now here it is in writing...
ahhhhh...that is so adorable!
I love the techniques and the ingenious idea for making the tree. Wendy...You rock!

December 9, 2010 8:22 AM


and a third for...

Blogger Wanda H said...

Lots on my to-do list also and now I MUST make a scalloped corner stamp tree... totally awesome!!!!

December 8, 2010 7:29 AM

I hope your weekend is wonderful & the shopping is moving right along...

stay warm & remember to take time to...

make (envelope) art.
wendy
ps...note to the winners...
email me with your shipping info @ wbv1213@me.com