

ALL OF THEM...
because they beautiful..
because they are versatile...
and
because they are like no other paints...
tim showed us how to paint over his alpha parts numerics
with the distress paints,
to create a very cool chipped enamel effect...
that got me wondering if I could achieve the same effect
or something similar...
on art parts...
and I wondered how I could adapt his technique
for larger backgrounds...
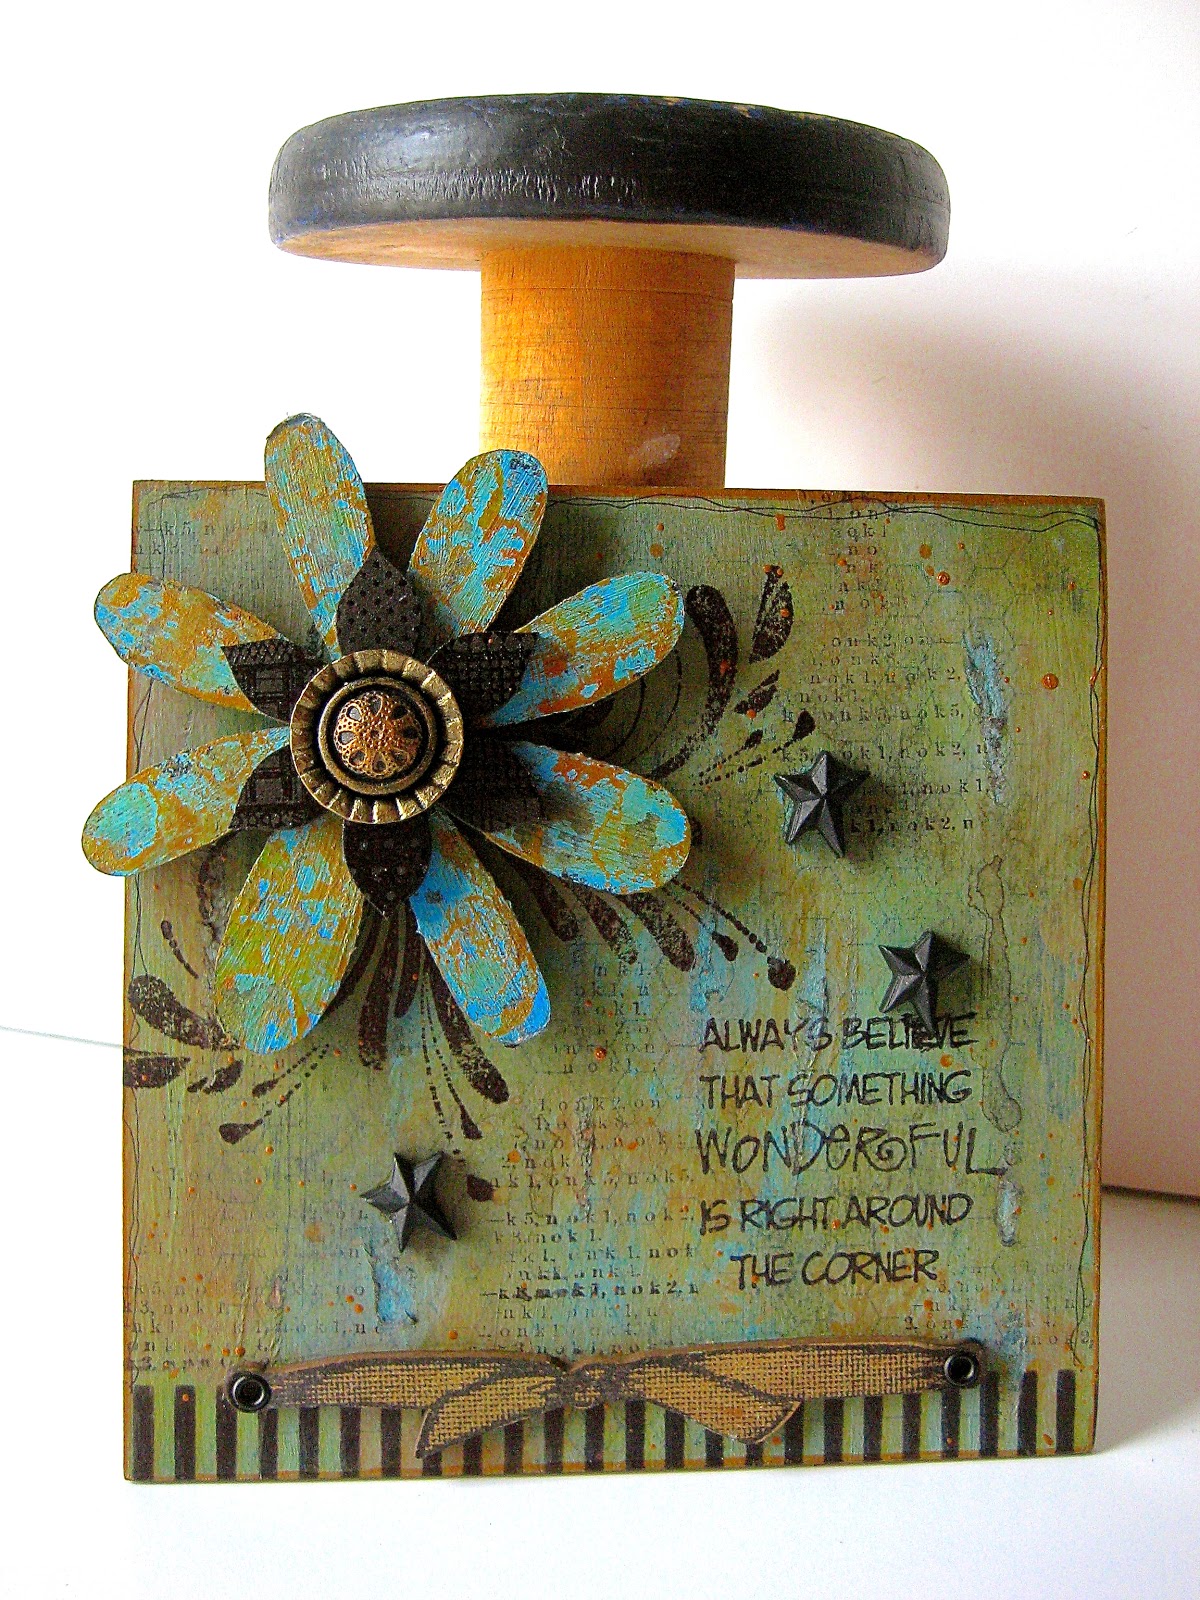
here's what I made...
the steps are below, if you want to give it a go...
it's kind of long...
so maybe...
grab a chair...
I painted my 5 1/2 inch square art parts base
with black soot distress paint, dried it,
then gave it a coat of my favorite...
Glue N Seal & dried that...


over the DRY Glue N Seal base,
I added peeled paint, forest moss, salty ocean & broken china distress paints...
yes...it looks UGLY...
but it gets better...
PARTIALLY dry the paints...
you want to see some matte areas & some areas
that are still quite shiny...

rub over the partially dry paint with a cloth towel...
to reveal some black...
work fairly quickly, so the paint does not dry completely...
(I tried a paper towel...didn't work!)
the base now looks like this...

a closer look...
it's amazing...
it looks very textured, with lots of layers...
but it's completely flat...

over the whole base...

just blobbed dabbed it on like this...
for this layer you'll want to dry it,
but leave LOTS of shiny areas...
and VERY FEW matte areas...
DO NOT COMPLETELY DRY...

use the cloth towel again to rub off the paint &
you'll be left with this...
random metallic areas...
and a cool background...

I wondered about adding more texture...
so I jabbed scratched it with a screwdriver,
to open up some bare art parts material...
***DO NOT DO THIS on your craft sheet...
just incase you slip...
craft sheets do not like sharp objects...***
I added a bit of salty ocean & broken china distress paints to the bare areas...
I dabbed them on with my fingers & dried it again...
I used the blending tool to add walnut stain distress ink over the base & then misted it with water to get some drips...
***the distress paint is magically waterproof when dry,
so nothing changed...
my painted base is the same,
but it has subtle distress ink drips now...***
looking better...

next, I used french ultramarine archival ink
with my honeycomb background &
stamped over the base & dried it...
***archivals are AWESOME!***

that extra stamped layer made the background even more interesting & textured looking...

next I used jet black archival
to stamp the flourishes in the upper left of the base...
the large flourishes are in the set below...
apparently I neglected to get a photo of the base...
duh...

next I used my striped border stencil with jet black archival to add the border at the bottom...
I used Cut N Dry foam to add the archival ink...
***a blending tool with foam works fine too***
***cheapo rubbing alcohol will take the archival ink off the stencil, & make it look brand new again...***
***keep the Cut N Dry foam to use over & over again***

I used jet black to stamp my sentiment toward the lower right...
below the flourishes & above the stripes...
I edged the whole base with the tarnished brass distress paint...
and dried that...
***you want the dabber top to be slightly moist...
not super saturated...***
***
now on to the art parts flower...
same process as above...
paint it black,
dry,
then add salty ocean & broken china distress paints...
PARTIALLY dry...
rub off the excess...
paint over the flower with the metallic paints again...
partially dry...
rub off the excess paint
and this is the result...
I LOVE IT!

to make the art parts bow that you see over the stripes,
***below***
inked it with jet black archival...

then pressed the coordinating art part bow ONTO the inked stamp...
this gives you perfect placement...
I dried the archival, then used wild honey distress stain to ink the bow & dried it...
I used the Crop A Dile to add holes to the ends of the bow & inserted black eyelets to add a little more detail...

oh how I've missed this cute mini collage stamp...
I designed this one specifically to use with flowers
& mini letters or numbers...
or small leaves...
& I haven't grabbed it in a while...
ink the stamp with jet black archival & press the art parts flower onto the inked stamp...
this allows you to select the area of the stamp you want to use...
while the ink is wet, sprinkle the flower with
***I chose the super fine powder,
because this stamp has tiny text & very tiny details***
heat to emboss...

look how cute...
with amazing detail...

I checked the background to see what else was needed, before I started gluing the pieces in place...
I used jet black with this stamp to stamp several random areas of the background...
***this stamp is excellent, because the numbers/text are tiny & it doesn't overwhelm the sentiment ...***
this stamp is one I use frequently
for my art journal backgrounds too...
it's a great filler stamp...
refer to the photo & glue everything in place...
I used Multi Medium...
I used a grungeboard scrap under my flower to raise it up a bit...
when everything was glued on...
I used the detailer waterbrush to add random metallic dots over the whole piece...
just put a bit of your chosen color of
metallic distress paint
on your craft sheet...
***I used tarnished brass...***
pick up some with the detailer waterbrush & tap the water brush on your index finger rather sharply over your art...
this creates THE BEST mini accent dots...
the finishing touches were 3 of my Blossom Bucket mini stars...
mini & BLACK = perfect!
and the flower center is 2 Blossom Bucket pieces glued together...
I used the small bottle cap & this new cutie...
I added some doodle lines around the perimeter with a fine waterproof pen...
here it is all finished...
the new metallic distress paints
are the perfect compliment to the distress paints...
they add just the right amount of vintage metallic shimmer...
like the title says...
in LOVE!

and speaking of stamps...lol...
(the bold blue links will take you there...)
the sale code is still good at Simon Says thru THURSDAY...
here's the code again...
WENDY25...
just enter the code at checkout...
for 25% off all my stamps...
even wood mounteds,
there's a really nice selection...
like my berry tree...
the fun numbers border...
(emboss it, then color in the numbers
with the distress markers...)
and this fun glass jar...
perfect for spring flowers!
talk to me...
have you played with the distress paints yet?
I got more ideas brewing...
I think I'll go now and
make art!
wendy
27 comments:
Lovely, simply lovely. Fabulous step by step tutorial that will have us reaching for the paints pronto!
Very cool Wendy!! TFS!
Yes I have two of the distress paints and I do LOVE them!! so TFS the tips along the way as you play with them. :D
Wow Wendy...so many steps but sooooo beautiful!!
Thank you for sharing!!
Fantastic!! I guess I do need the distress paints in my life after all... I was really trying to not need them!!! Have fun making art.
Wow, this is beautiful!!! Thank you for the tutorial!
Love the faux patina effect the combo of colors you used has created! I won a Bundled Sage distress paint but it's not fun to play with by itself...way too light. Need to remedy that. : )
great project. I've been playing with my distress paints, I just love them.
Fabulous background with the paints Wendy. Love your embossed dimensional flower too. Very striking. Tracy x
Great post Wendy girl!
Mary
What fun you had dabbling in the studio! I haven't tried the metallic paints yet but I LOVE the other ones. I still can't get over the texture when they're dry. Good stuff.
love when you share with us - so inspiring!
Sandra ltb
Got some paints but not the black. Will remedy that soon. Love that this technique works with art parts and I have some larger flowers that would be fun to make with this technique. Thanks for sharing!
I love how it looks. Thanks for sharing, Johanne L.
I am loving all the techniques here Wendy, the paints can really give some awesome effects and I love how you took us through your process. Thank you! I have played with mine quite a bit too. I actually used them to paint some items on a tag I made and also used them with my gelli plate, so fun!!!
Yip, I have a full set, they are AWESOME! I love to marble them and the fact that they are permanent when dry is just the best!
Fabulous... I love your finished effect and your artistic knowledge is wonderful! Thanks for an awesome Tutorial on the paints! Have a fabulous day!!!
QUESTION ....
What is the black flower on? Paper on foam?
Love this whole project and love the painting technique!
Wow! I love EVERYTHING you did - I need it all!
What a fabulous project! Thanks so much for sharing the details.
I know you and Tim are so excited about the new paints, but I have not had good luck with the dobber tops. Even when I store them upside down, they still get dry and gunky. Can you give me any advice before I spend the money on them.
This is lovely Wendy! I particularly like the sentiment - please could you tell me which stamp set it's from? I don't have any of the paints yet, so will have to save up for some.
Fantastic Wendy! Just got my first 4 distress paints and I loooovvvee them! Waiting for my LSS to get in the metallics. Really appreciate the tips you give. And can I say, again with the French Ultramarine Archival ink? I love this color and it will be my next archival ink purchase. Love it. Thanks!
Lovely piece. Thank you so much for sharing.
Oh WOW, this is absolutely gorgeous!! I love the design!! I don't have any of the Distress Paints yet but you are making me want them now!! This is fabulous!! Thanks for the inspiration and happy Monday :)
Lisa
A Mermaid's Crafts
Your tutorial is very helpful!Can't wait to try it with some of my new Distress Paints. Love your project and style. I am part of the EWV yahoo group but I struggle coming up with projects that look like your awesome style. I guess thats because I am not you. But I still love your work and all your projects.
Kate
Very cool project! Love the rusty look of the paints...awesome!
WAY cool!!! And I have to get some paints and try this!!!
Post a Comment