

the last 3 sets of mini distress pads are HERE!
FINALLY...brushed corduroy! I waited a long time for this cute little guy...
you might want to read all the way to the end...
I have a set of ALL 3 to giveaway!

today I wanted to share another way to use distress inks...
this is a little something I figured out one day & I really like the look...
if you've taken my Ranger technique class, you know that I LOVE the snowcap white pigment pad...
for all it does, it should cost $50.00!
get it quick, before the Ranger guys figure this out...
this post will show you a few of the reasons why I LOVE it...
to create my card for today, I started with Ranger's kraft card stock, cut to 4 ¼ x 5 ¼ inches...
the photo below shows that I masked off half of the NEW vintage lace background stamp, then inked it with the snowcap, removed the tape & stamped it at the bottom of the card...

while the snowcap ink was still wet, I sprinkled on some frosted crystal embossing powder & heated it to melt the powder...

next, I positioned my basically bricks stencil right above the lace & used the tape to protect the lace area...

I used the blending tool & tapped it on the snowcap ink pad, then stenciled over the brick stencil...completely covering the all bricks...
***one thing to note***
the snow cap white pigment pad has a foam pad, not a felt pad like the distress & archival pads...
it's important to tap the blending tool onto the pad & NOT rub it, like we do with distress & archival pads...
brisk rubbing can tear the foam pad...
tapping works just fine...
***one more thing***
when using the white pad, make sure your stamp is clean...
trust me on that one!
with the stencil removed, you can see this snowcap white ink looks great on darker card stock...
I dried the ink before proceeding...
***this is IMPORTANT***...
if the ink is still wet, you won't get the desired results...

next, I inked the mini blending tool...
it's the perfect size for the mini pads!
and I applied peeled paint over the lace, going over the entire bottom of the card...
I used a paper towel to remove the ink from the embossed lace to make it stand out more...

the next step is to ink the top portion of the card with broken china...
just remember to dry after adding ink...
you'll notice that the snow cap slows the drying process when adding distress inks on top of it...
do you see how the snow cap changes the distress to a beautiful chalky matte finish?
and best of all...
that one magic white pad can be used with every color of distress ink to create this chalky finish...
I'm telling you...
it's worth $50.00~

now for some embellishments...
I had 2 scraps of clearly for art (CFA) that were covered with vintage dictionary text...
using jet black archival, I stamped the pansy & the leaves onto the dictionary paper side...

position the stencil over the stamped image & use festive berries to stencil the outer edge of the flower petals & the center accents...

reposition the stencil...
this open stencil allows coloring inside the petals...
I used festive berries again, but I kept it much lighter...
***one thing to note***
this stencil was designed to allow 2 different colors to be added...
to create an authentic looking pansy, use a yellow ink on the outside & a purple inside...or do just the opposite...
or any 2 colors that you'd like...
the pansy is a SiSi (stamp-it stencil-it)...meaning you get the stamp & the coordinating stencil in the same package...

because the leaves will be cut out, I just inked right over the scrap with shabby shutters...
then cut out the leaves & the pansy...

here's my pieces...
I heated them to soften the CFA, then shaped them a bit to add a little dimension...

I stamped the sentiment toward the right, above the lace, using jet black...
I test drove my cut out flower & leaves with the flourishes stamp on the card, to help me decide where to stamp the flourishes...
the flourishes got stamped with jet black...
the color is weird here..sorry...

archival inks are awesome for altering metal...
I used carnation red archival, and pressed the heart charm onto the pad to ink only the raised edge...
then sprinkled it with frosted crystal embossing powder before heating it...to melt the embossing powder...
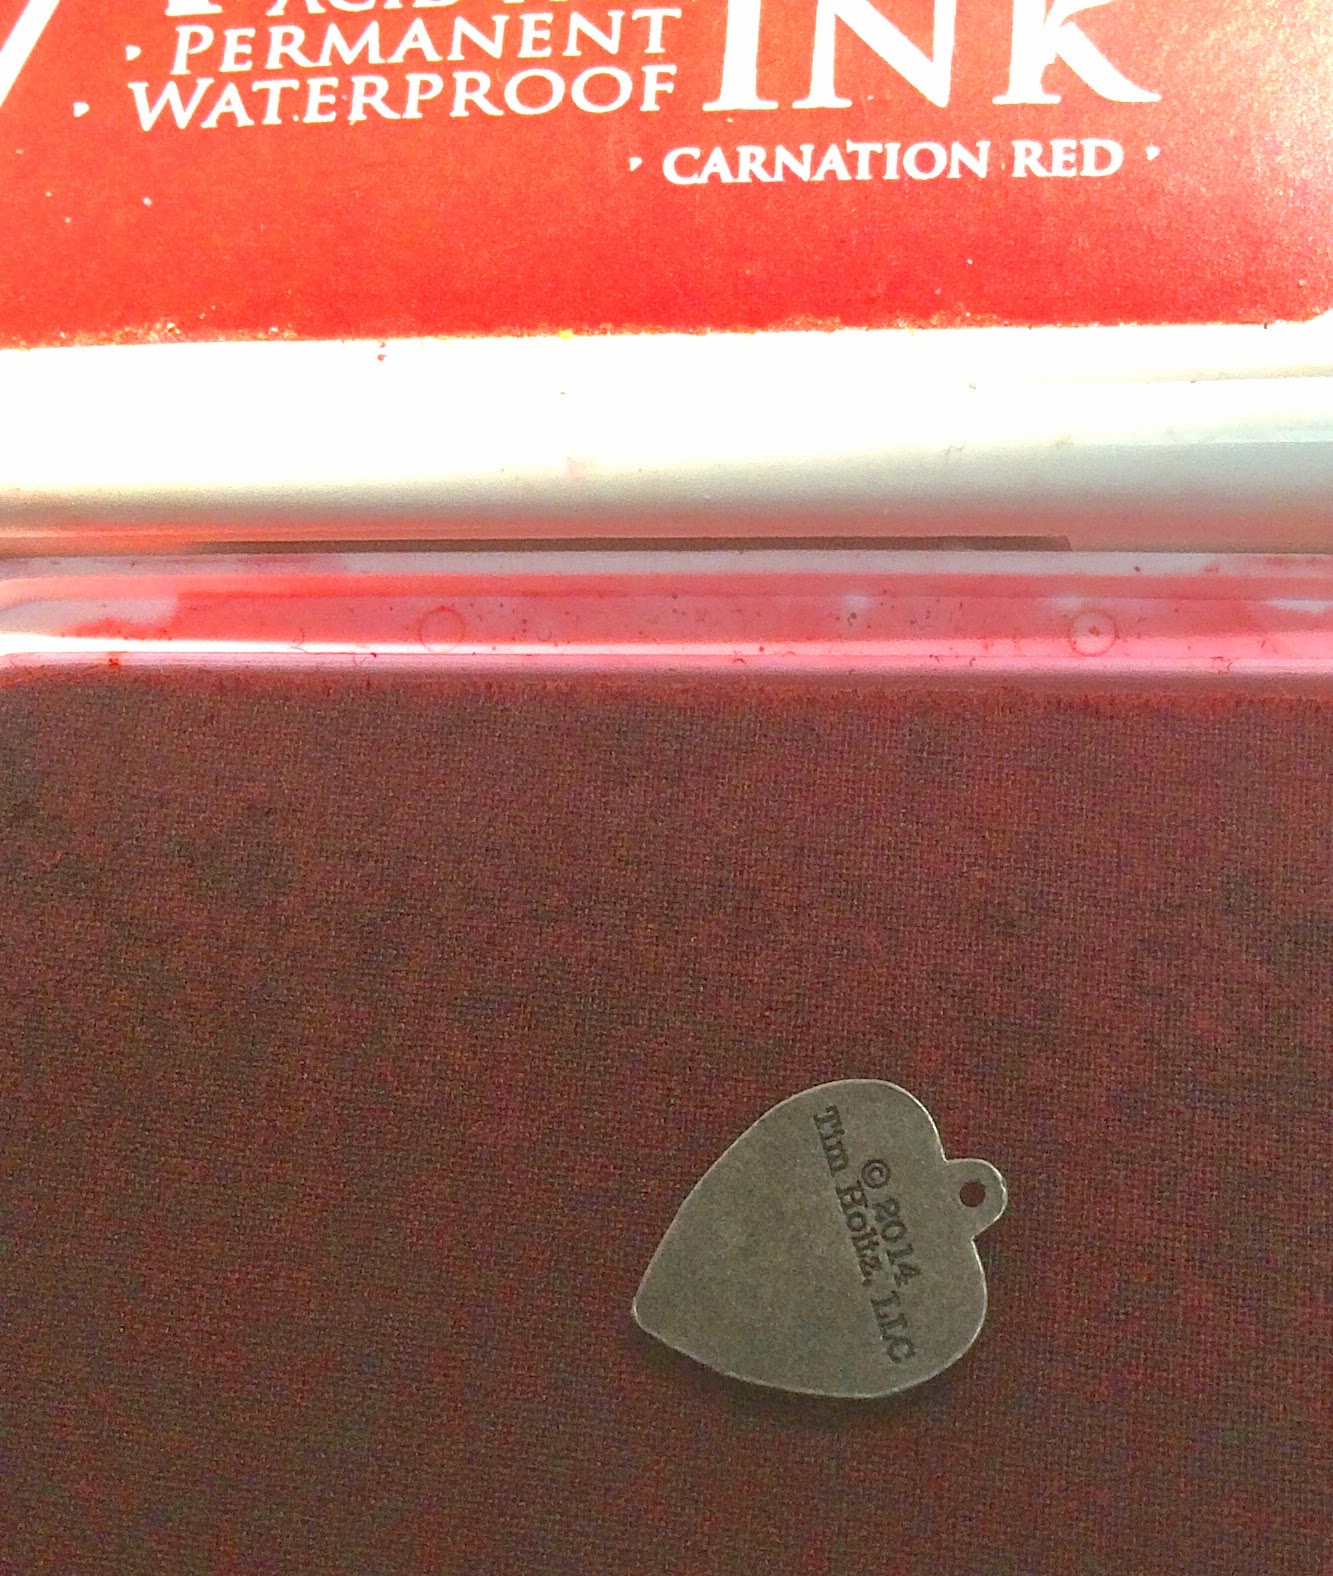
hemostats are a very useful tool...
I grabbed the little loop & that allowed me to blast the heart with the heat tool...and NOT blast my fingers...
***remember***
heated metal is HOT! be careful...
when it cooled off, I added the "love you" insert that comes with the heart charms...

hmmm...
the brick background looked too plain...
I replaced the brick stencil & randomly stamped text using tree branch archival...
***one thing to note***
by replacing the stencil, it keeps stamping off the grout area & you'll only see stamping ON the bricks...
it's a small detail...but it DOES matter!
***another thing***
when stamping thru a stencil it's much easier to use an UN-mounted stamp...
it's much easier to press wherever you need to...

you can see that subtle text adds another layer of interest to the background...

to alter 3 long fasteners, I used festive berries distress paint...
it's great to have coordinating products in the same color palette...
just shake the bottle, press down lightly on the craft sheet & then tap the fastener onto the wet paint dabber top...
again...
that hemostat makes it simple to hold, cover with paint, then heat the fastener to dry...
distress paints are awesome on metal...

this is not a tool that I use every day...
but when you NEED it...nothing else works...
I wanted to add the heart with a mini fastener, but the hole was too small to fit the prongs...
I used this tool to enlarge the hole...it drills right thru like magic!
sad to say...it's discontinued...I hope you snagged one!
if you don't have the tool, you can change things up & use the heart charm with a jump ring instead...

no project is complete without some brushed corduroy around the edges...
it sort of adds a frame...
and leads the eye to the main images...

now...the last details...
I added the painted fasteners to accent the lace on the card bottom...
and then added a piece of red/cream trimmings & the little altered heart charm...
the flower & leaves were added with hot glue...
the hot glue is a good way to adhere the CFA to paper...
next, some pen stitching detail...
and some black glaze pen dots...
and here is the finished project...
added to a black card...
tada...it's pastel distress!

this photo shows how awesome the frosted crystal embossing powder is...
see the texture it adds? I LOVE it with the lace...
and I think it's the perfect compliment to the pastel distress on the card, to create a vintage feminine effect...

this technique works just fine on manila cardstock too...
try it...it's a lighter/brighter look, but still chalky matte & pastel...
but...I think it's extra special on kraft cardstock...
DID I MENTION THAT
I HAVE A GIVEAWAY?
it's compliments of Tim & Ranger...
if you would like a chance to win ALL 3 sets of the new distress minis...
just leave a comment on this blog post...
it's that simple!
I'll draw a random winner on Tuesday, August 19th at 4PM Chicago time...
well...right now I'm in Connecticut...
getting all set up at The Papercraft Clubhouse...
I have big plans to get inky, meet some new art friends, have fun, &
make art!
wendy
314 comments:
«Oldest ‹Older 201 – 314 of 314What a great project! Thanks for sharing and thanks for the opportunity to win these great little ink pads
Thank you for showing us the use of the white pigment ink with the Distress inks...and for the chance to win the new mini pads!
Beautiful card! Thank you so much for sharing your technique and great tips!
What a fun tutorial! Love the lace-brick combination .
The 19th is my anniversary my lucky day!!!!
Maria V.
I've always loved black ink on craft paper, but you have now turned me on to the white ink on kraft. What a great look!
Gorgeous card! Now that I've taken your technique class, I love the white snowcap pad too.... plus it's just fun!
Ah-mazing project. Mini distress
inks are amazing too.
Great tutorial. Thanks for sharing your talent with all of us. Does it matter what type of embossing powder you use to achieve the chalk look?
Thanks for all the techniques. Your cards are lovely!
This is stunning and lots of fun elements. Love the step by step for the gals like me that have to have help. TFS Count me on a chance to win this last set of minis. I am so in love with them.
Please disregard my earlier comment. I just re-read the tutorial and realized that yo did not emboss the bricks. Love the chalky look.
I love your card - and so many tips! Thanks! I'll be adding the snow cap pad to my list. Thank you for the chance to win!
You really do great more than your money's worth our if the Snow Cap White ink pad! I love all of the inky techniques you shared!
Gorgeous ... love all the new ideas!
Okay, that chalky look is amazing! I have to try it out this weekend. Thanks for the detailed tutorial and the giveaway!
Such a lovely card! The flower is beautiful & I love the brick effect - so cool.
Your art is FABULOUS, Wendy! :) Thank you so much for the chance to win these yummy inks.
Beautiful work, thanks for sharing your talents with us. Can't wait to use the new minis!!
What a great card & technique tips..!
Love your card and all the great ideas! Love your product too!
Aww, just beautiful as always!! I just bought the other two sets and was sad that the rest were not available yet, so now I can either win them or purchase them!! Loved all your techniques - thanks for sharing your amazing art!!
Great work, Wendy! Makes me want to forget everything else I need to do today and start creating! Thanks for all your hard work. - Donna Jean
Wendy, your work is always awesome. And thank you so much for all the wonderful extra 'tips', to keep us from 'learning' the same way I'm sure you did -- trial and error! Beautiful work. And oh, do I love the one set of mini's I have, am using them all the time, now making holiday cards!
You and your projects are A M A Z I N G !!!
Great tutorial, Wendy!!
Some great new ideas and another item to add to my shopping list. I had not seen that ink pad before.
Bricks and lace together? Why ever not? Texture is the name of this game!
Love everything!
Lovely Thank you card. I think this Pastel Distress technique gives such a soft look, I'll have to give it a try. Thanks for sharing it and the step by step pictures.
Wow, the distress inks took on a whole new look over the white ink. But the flowers stamped on the book print have my heart. Gorgoeus!
Loving the look of the new inkpad. So useful! Would love to win the minis for crafting on the move. Xxx
interesting card!
Beautiful project! Thanks for sharing the techniques and the opportunity to win the new mini sets!
Great example of many fun techniques with these fun minis. I also checked out your trip to England, which sounds like a blast!
Beautiful card! Thanks for tip to use the distress inks over the snow cap pigment...can't wait to try it!
Wendy I am always amazed at what beautiful projects you make. Thanks for the great step by step instructions - you're awesome.
Wonderful tips! Leave it to me to be the one to try and pick up a metal embellishment with bare fingers after blasting it with the heat gun! Also thanks for the tip about the snowcap pigment pad...this is amazing what you have done with the Distress Inks layered over that! I would love to win the Minis--thanks for the opportunity.
I do love that chalky look you get with the snow cap ink covered with distress ink. Thanks for the tip! As always, love your lace stamp.
Thanks for sharing your great talent with us. Your detailed instructions are perfect for us to follow. Don't ever stop making art!
Wendy I absolutely love your new stamp (the border) just ordered that set today! It sure would be neat to win the minis but in any case they are a must have, all of them and the cases too! : ) Sue
Wonderful creation
Wonderful tutorial
Thanks for the 'extra' tips
Thanks for the chance to win
Love distress inks
They r my FAVE
Awesome idea to put distress ink on top of pigment ink to achieve a more pastel version. Love learning new things like this!
I love the way the lace turned out! Thanks for the chance to win.
Noreen
http://craftyjournal.com
Great project! Love the step by step photos and all the different techniques!
AWESOME!! I TOTALLY LOVE the New Mini Ink Pads and I can't wait to get my hands on them!! THANKS SO MUCH for sharing and for the chance to win!! Have a Fabulous Weekend!! =)
Wendy, you and Tim are the best. I signed up for your Antioch, Illinois class and was so disappointed that it was cancelled. Thank you for the opportunity to complete my mini distress set.
So Pretty, Wendy! I love the snow cap pigment ink pad too! Thanks for a chance to win!
Love the new inks and loved what you did with them! That lace trim is beautiful!!
Wow...what a fabulous card!! And you have sooo many cool gadgets!!! Hopefully you'll be contacting me soon to share in the giveaway! ;) thanks for the instructions!., gabbylou@live.com
gorgeous card. I'm with you set 12 is the top of my want list :) love all the colors the just look so danged yummy :) thanks for the chance to win.
Your card is AMAZING! Thank you for all of the little details.
I am wild about the lace on your card! It is awesome. I love it when I can learn new technique! Thanks for the chance to win some wonderful new minis and for sharing your talent with us!
wonderful! thanks for all the tips - I do so love your work .... I can not believe you are in CT! Welcome ... sorry I missed you =( (last weekend home with my kiddies before they leave for school)
Sandra ltb
Fun card! Love the soft chalky look the snow cap ink gives! :)
I love these minis! Such a great idea!
Love the use of snow cap ink, have added it onto shopping list, thanks for the lovely technique
Wendy, Thanks for the tutorial with so many new ways to use our supplies and the opportunity to win some new supplies...minis of course.
well the sun is shining and the garden calling but so is the craft room dilemma - will have to be both today
I will have to try the Snow Cap idea, hopefully with my new mini distress inks! Thanks!
I love your card and you make it seem so easy!!!
i have a couple of those ink pads and am never sure what to do with them..now i know!! thanks for the chance to win
Wendy, this card is Fabulous!! Love the mix of the lace and brick stenciling--how Awesome is that?! You make the BEST cards!! OH--and Thanks for giving us all a chance to win the last release of DI Mini's!! WOW! Are all the colors now in Mini's?! They are the cutest little ink pads!! Happy Weekend!! XOXO-Shari T.
Such a beautiful card. Makes me want to get back into stamping after many years. Thanks for the inspiration!
Love your prjoject, I can't wait to get my hands on that lace stamp. I can't wait to complete my mini ink collection.
Wendy love how you show how to use the different products. I love anything itty-bitty I am happy about the brushed corduroy too
Wonderful techniques and lovely card -- thanks for the opportunity, I can't wait to try these sweet new minis!
Thank you for sharing this beautiful card! I love the mini distress pads!I hope to win!
What a fun tutorial! So many ideas to try. Thanks for the mini distress contest too.
Gorgeous piece of art Wendy, love all the elements. Aren't the mini Inkpads adorable, I love them and what a fabulous giveaway. Tracy x
Thanks for sharing your advanced techniques. Love the snow pad and would love to win the minis.
Love that vintage lace stamp! Thanks so much!
Such a beautiful card...love the embossed lace. Thank you for the tutorial. Thanks for the opportunity to win the mini distress inks.
I was out of WIFI reach this week end I hope it's not to late to join the contest. Love all the Destrestvinks! Thanks for the demo!
so pretty!!
Thanks for all that info...off to snag a white pad!
I SO love that Vintage Lace stamp - mine is back-ordered, and I can't wait until it gets here. Loved this project!!!
Love the card! And I would love those inks...they are the only ones missing from my craft room! :) Thanks for the chance to win. Did I mention that I love that card? Cause it is fabulous!
What a fantastic idea!! I love using kraft cardstock, and I absolutely love the pastel, chalky look of the distress on this!! I'm totally going to give this technique a try!! Thanks so much!
Great tutorial on the blog *and* in person in Connecticut! What a great weekend! Thanks for the chance to win the rest of the Distress minis!
Thank you! I've been considering which white ink to invest in; think I have the answer! Great techniques on a great card.
Thank you for the wonderful tutorial for your beautiful card. I cannot wait to try it out. So many great techniques and the colors you used are so lovely. What a great giveaway! Brushed Corduroy is color I use the most (just the right shade of brown). Thank you for a chance to win and for your blog!
Back from MN and I am catching up on everything missed! Better late then mini distressed!
Love your technique! But LOVE that lace stamp MORE!
I have to get that ordered!
Thanks Wendy!
another great lesson thank you once again. And the tip about the snowcap ink pad thanks for that also.
Amazing tutorial, Wendy! I need to get the combo of stamps and stencils! Thanks for the fantastic giveaway!!
Love both projects, especially the first one.
Love both projects, especially the first one.
Love both projects, especially the first one.
I loved your card and the way that you combined different elements. The minis are such a great idea!
Beautiful card - thanks for sharing great ideas!
WOW!! So Many photos and how to... Great Job!! Fantastic Result!! Great whole driller tool.. Never seen that before!! Great Style of your work! Love it!!
Your card is gorgeous! Love the pastel distress look and also love how you mix your goodies with stuff that we may already have in our stash. I am definitely going to invest in the snow cap archival ink. Love how it gives the distress inks a matt finish. That is very cool! Thank you for the mini distress ink giveaway. Awesome!!
Love all of the techniques you show in the creation of this pretty card Wendi! Thanks for the chance to win - love these mini inks!
I love the white crystal embossing technique!
I love the white crystal embossing technique!
Love your awesome techniques! You make me wish for every single product you used on this card!
Great layout and well explained.
lovely
Regards lou
Great tutorial. The steps were broken down well & explained perfectly - thank you. I'm going to give some of these techniques a go. You always make me feel confident that I can tackle anything...... here goes !
Love how you used the brick stencil. I am doing more w stencils. And, of course I have wanted the Brushed Corduroy for a long time. I don't have any minis YET....hope to win! Thanks!
Your card is amazing! I love the effect from embossing using the Snow Cap ink!
Thanks for all of the tips :-)
I love these minis!
I took your technique tag class in Buffalo, NY (twice I believe!) and use them often (especially the ghosting technique) with that white ink! So cool! Thanks for the chance to win!
I'm loving the mini Distress for taking to crops and working with the must-have stencils! SO awesome!
Thanks so much for sharing the technique!
Hugz, Z
Beautiful! I must head over to eclectic Paperie and get that lace stamp!
Man o man would I love to win these minis. I really like the way you colored the page before stamping and cutting out the image. The card turned out super. Thanks for the giveaway.
Think I missed the deadline for the drawing but I wanted to say that I was at the class on Saturday In CT and had a great time!!!!
Thanks Wendy!!!
Jean Pierce
Wendy: I love your tutes. Thanks you.
Wendy: I love your tutes. Thanks you.
Thanks for the great card. Really would love to win the distress marker sets!
Thanks for the great card. Really would love to win the distress marker sets!
You are so inspiring, I don't say thank you often enough! so Thank you Wendy!
Post a Comment