here's how I got started...

here's how I got started...
a 20 minute podcast by Crazy BeYOUtiful

Thursday, May 30, 2013

selective embossing with distress...

I'm packing today & getting ready for some southern hospitality!

I'll be in Texas for 10 days...
I wonder if I'll come home with an accent...

I'm teaching 2 full day (8 hour) Ranger technique classes
I was there a few years ago...
it's an AWESOME store!

the first one sold out, 
so we added a second Ranger class 
to accommodate the people on the wait list...

after that I'm teaching an all day ( 8 1/2 hours) art journaling class...
we'll make the entire journal from scratch & create lots of fun pages too...
with each page focusing on a specific technique...

after that I head over to GASC...
that's The Great American Scrapbook Convention, in Arlington Texas...

tim & I will man the Stampers Anonymous booth 
and we'll be demoing there all 3 days...

come see us...

our booth will be LOADED with all the supplies you NEED to...

make art!

as an added bonus,
you can even meet Mario at the register...

**************************

in my spare time, I've been putting the finishing touches on NEW products for CHA...

new stencils, new stamps (with a twist), new art parts & a few super duper surprises...
will be coming in July!

I received some of the new stencils & some of the new stamps on Friday, 
so I started my CHA booth/catalog samples over the weekend...

 I am totally FLIPPING in LOVE...

 it's too soon to start the peeks/teasing...
but get ready...

***************************
ok...here's a quickie art share...

another "selective embossing" tag, with a twist...
no embossing pen is needed...

here's what to do...

use the blending tool to ink thru the wildflower stencil
with barn door for the flower & peeled paint for the stem & leaves...

keep the stencil in place & use jet black archival to stamp over the flower with the polka dot border and this mini collage stamp for the leaves...

*oops* can't find the mini collage stamp...
the set is called ART GONE POSTAL & it's #LCS051...

remove the stencil & sprinkle with clear embossing powder, then heat to emboss...

add the background inks right over the embossing...
the embossing will resist the inks...

use rusty hinge thru the brick stencil to add some random bricks to the background...

LIGHTLY ink the tiny text stamp with
 stamp several random areas...
look close & you'll see it...

stamp the sentiment in jet black...
and to stencil the stripes border at the top...

use the barn door marker to add the tiny hearts...


this photo shows that only the flower & leaves are embossed...

SUPER easy & SUPER fun!


a few little tips...
***because the distress inks & the archival stay wet, you can emboss with them***

***clean the archival ink from the stencil with cheapo Dollar Store rubbing alcohol***

***choose stamps with a tiny pattern when stamping thru a stencil over small areas***

***Ranger's Heat It tool is AWESOME...
it has a built in diffuser...so it won't blow your embossing powder all over the place & it's really super quiet***

***stencils are plastic...they DO NOT LIKE the Heat Tool***

***if you decide to emboss after the inks are dry, just ink over the areas you want to emboss with the Perfect Medium pen..., then sprinkle with embossing powder***

*** the Inkssentials Emboss-it Pen pack has one clear pen & one BLACK pen...think about this...doodle in black...or write something, then emboss it!***

selective embossing...

try it...
it's a fun technique!

ok...
time to finish up packing...

10 days? how many sandals is that?
oh boy...

see y'all soon...

I'm headed to Texas to...

make art!
wendy

ps...earlier this week we finalized the classes for
click the link for all the info...

I'm teaching the full day Ranger techniques class & also the all day art journal class there...


I hope you can join us... 


Thursday, May 23, 2013

Ranger...melt art MANIA...

I'm happy to once again to be sharing a tutorial 
or actually 2...

this time my pieces were designed for 
Ranger's Melt Art Mania event...

be sure to check out the Ranger blog,
 for LOTS of inspiration...
the event continues daily thru May 31st...


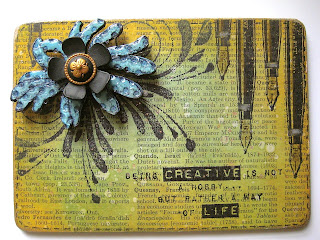
here's the first project...

my focus for this first piece,
was to create a 
textured UTEE embellishment...

it's E A S Y & fun...
with LOTS of options...


here's the supply list...

Tim Holtz Distress Ink Pads
Tim Holtz Distress Paint


Tim Holtz Idea-ology 

Stampers Anonymous Wendy Vecchi studio 490 stamps 
Stampers Anonymous Wendy Vecchi studio 490 art parts


Misc:
waterproof pen
vintage dictionary paper

and here's the step by step instructions...

  1. apply a layer of Glue N Seal to the art part small creative cover (project base), then add vintage dictionary paper, brayer & dry.
  2. sand the edges with the sanding grip
  3. ink over the base with broken china, wild honey, scattered straw & peeled paint, using the blending tool
  4. add shading to the edges with rusty hinge on a blending tool
  5. use jet black archival to stamp the flourishes (My Kind of Art LCS092) in the top left corner and the sentiment (British Art LCS107) in the bottom right corner as shown 
  6. use jet black archival to stamp the pen (British Art LCS107) 5 times, to create a border
  7. shake the tarnished brass distress stain, then dispense a small amount onto the craft sheet. pick up the stain with the water brush, then sharply tap the water brush onto your finger over the base, to add tiny metallic dots. dry
  8. add pen stitching detail around the base edge
  9. shake the tarnished brass metallic stain and with a fairly dry dabber top, edge the base & dry
  10. paint the art parts daisy with broken china distress paint & dry
  11. ink the coordinating stamp (Daisy Art LCS101) with jet black archival & press the art part flower onto the inked stamp and dry
  12. tap the Emboss-It Dabber over the flower to cover & sprinkle with UTEE. use the Heat-It tool to melt the UTEE. while the UTEE is still hot, sprinkle with another layer of UTEE...
  13. ***have the polka dot background stamp (All About Art LCS011) inked with french ultramarine archival***
  14. melt the second layer of UTEE & while the UTEE is hot, press the polka dot background into the molten UTEE. allow to sit about 30 seconds. the UTEE will cool & the stamp will release easily, creating a very cool textured flower
  15. add a scrap of grungeboard under the flower before gluing in place, to raise the flower off the base & create more dimension
  16. accent the flower center with Blossom Bucket black & gold flower

here's a close up of my textured UTEE flower...
                        

since I was having so much fun...
I decided to play a little more...

this time the technique is 
distress UTEE art parts...

I discovered that tim's new distress paints are so cool with UTEE, and together, they create a vintage enamel effect...

I cut a #12 kraft tag to 6 inches tall...
that's my base...
(save the cut off for another project)

I stamped the flourishes 
(yes... again...I LOVE them!) 
sprinkled on the UTEE, then heated to melt it...

I inked the kraft tag with faded jeans & mustard seed distress inks...

to create the random bleached honeycomb background,
 I misted water onto my craft sheet, 
then pressed my honeycomb background stamp (LCS093) into the water & then stamped over the tag...
this lightens the distress ink & creates a pattern at the same time...

I used jet black archival for stamping my sentiment...
and added some stenciled numbers 
using black soot, on the blending tool...

to create the vintage enamel flowers, 
I lightly painted them with distress paint,
 using my finger to spread the paint...

***a thin layer of distress paint allows the art parts color (kraft) to show thru, creating a worn look***

is painted with barn door distress paint...
dried, then stamped with the coordinating daisy stamp
using jet black archival...
and dried again...

I used the Emboss It Dabber to cover the flower, then sprinkled it with UTEE...

I heated the UTEE to melt it, then sprinkled on a second layer while the UTEE was HOT & melted the second layer...

2 layers of UTEE create a glass like dimensional surface...

the 3 smaller art parts flowers were painted with broken china distress paint & black soot distress paint for the centers, dried, 
then I used the Emboss It Dabber over them
 before sprinkling them with UTEE & heating...

since the flowers are small, 
I only used one layer of UTEE on them...

this Blossom Bucket flower accents the large flower...


here's a better look...

the thin layer of distress paint, 
covered with UTEE makes the flowers look faded & very vintage...

I like that this is so quick & that the UTEE can be easily melted with the Heat-It tool...


I like to include helpful tips with my tutorials...

 here goes...

***TIPS***
  1. you’ll notice that Glue N Seal is an excellent paper adhesive and that it does not bubble vintage paper
  2. the metallic stains add great details, like the base edge & the tiny metallic dots
  3. when using the stains to add an edge to the base, make sure the dabber top is not saturated. a fairly dry dabber top is best
  4. to easily paint art parts, apply a small amount of distress paint onto the craft sheet & spread the paint over the art part with your finger
  5. UTEE is very forgiving. if the UTEE cools before you stamp into it, just heat it again with the Heat-It tool & stamp away!
  6. red rubber stamps are best for stamping into hot UTEE. the melted UTEE will not damage the red rubber stamp
  7.  when stamping with water, press the stamp into the water once only...if there is too much water on the stamp, the stamped image is blurry...
  8. Multi Medium is a great adhesive for adding embellishments over glossy UTEE...
  9. oh my...totally LOVE LOVE the Emboss It dabber...so convenient...

Ranger has donated a GREAT GIVEAWAY prize, for me to share with my blog friends...


just leave a comment on this post
you'll be entered to win these 

H O T
goodies...

(get it? HOT...melt art?)

I see a giant 8 ounce UTEE jar, 2 texture treads, some heat- it inks, and a melt art project sheet...

the winner will receive 
lots of FUN melt art supplies to...


make art!
wendy

Monday, May 20, 2013

metallic embossing pastes ROCK!

in this previous post
I shared how to make custom embossing paste colors,
by combining tim's distress reinkers and 

today...
it's all about the metallic embossing pastes...

first up...


the gold is especially AMAZING...

in the photo below, 
I spread it thru the "yikes, stripes" stencil...
you don't notice any metallic when the paste is wet...
it's more of a butterscotch color...


let it air dry...
and it magically transforms itself 
into this beautiful metallic gold...

look at the big difference!


not sure how the magic happens...
but I LOVE the result...


next...


I spread it thru the "polka dotty " stencil...

yippee...stencils are back in stock!

I applied it fairly thick...

the metallics look great on a black surface...
or on kraft...
and on...
everything...


I let the paste partially dry...
then blasted it with the heat tool to create this awesome texture...


back to the gold paste...

what if I wanted to tone down the metallic...
or create another shade?

rub the coffee archival pad over the DRY paste...

the bottom of the tag is the original gold metallic...

on the top, you'll see the color change where it was swiped with the coffee archival pad...


over the DRY metallic silver paste...

LOVE LOVE LOVE this effect!


what happens if you mix equal parts of gold & silver pastes together?

it creates a beautiful pewter-ish color...

for the experiment below, I spread a thin layer on an atc...
and blasted it with the heat tool...

look at the AWESOME textured result...

I'm in LOVE...


this is part one of the metallic paste experiments...

I have lots more ideas brewing...

but...
think about this...

any color of the distress reinkers can be added to either of the metallic pastes...

a tiny drop of the rusty hinge reinker
mixed into the gold paste 
creates a pretty metallic copper colored paste...

I'm going to swipe an archival pad LIGHTLY over the paste that I heated, so the ink is only on the raised area...
this will create a cool rusty texture...

there are so many metallic possibilities to

make art!
wendy
ps...can you see that archivals are AWESOME!

Friday, May 17, 2013

customized embossing pastes...

I thought I'd show you today how to easily create custom colors of embossing pastes...

it's as easy as 1  2  3...

working on the craft sheet...

put a small amount of my white embossing paste 
and a drop of any distress reinker...
just touch the tip of the eyedropper to the craft sheet & that is plenty of the reinker...


just to show you the small amount I used...
I put the lid from the distress stain near the paste...


now use a palette knife to mix the reinker into the paste...
looks yummy...
just like frosting...

this is peeled paint...
it makes awesome colored leaves...

use less color for a lighter paste...
more reinker makes a darker color of the paste...


I masked off the flower area with post-its...
then using the palette knife, 
I added the green paste thru the stencil...


***remove the stencil...
clean off the paste 
FROM THE STENCIL & PALETTE KNIFE 
before it dries...***

when the green paste is dry...
 mixed a drop of the rusty hinge reinker with a small amount of white paste...


this is a really beautiful color...


now use post-it's again to block off the dry green leaves...

and spread the rusty hinge paste over 
the flower portion of the stencil...

you can do a nice even layer...


or thick & thin like I did in the photo below...
that creates even more texture...

that's how simple it is to create 
custom colored embossing pastes...


(this links to the original 24)
think of all the beautiful colors you can create, 
with just a tiny drop of any reinker...

so not only do the reinkers refresh your distress ink pads,
they do double duty...
 they also create custom colored embossing pastes!

while my paste dries...
I'll plan my background...

then I'll make art!
wendy
ps...what's your favorite color of reinker?
try broken china...
it's A W E S O M E!


Wednesday, May 15, 2013

MEGA THANKS...and more...

MEGA THANKS 
to everyone who came to see us at the MEGA MEET in Novi, Michigan this past weekend...

tim & I had so much fun demoing...
we had THE NICEST people!

AND...

WOW...
you people sure know how to SHOP!

we sold out of so many things on the FIRST day, 
that Ted had to send a cargo van from Cleveland to us,
 so we would have more stamps, stencils, embossing pastes, CFA and another load of tim's idea-ology goodies, inks, paints & stamps...

I thought I'd share one of my demos today...

I showed how to use 2 stencils together...
you can do this directly on a tag...
or...
I cut mine out to make an embellishment...

this is a quickie post...

still working on my CHA releases...
YIKES!

first step...

use stencil tape or a post-it, to tape 
the "yikes, stripes" stencil over a manila tag...
then tape the "never enough hearts" stencil over the stripes stencil...

I used broken china distress ink on the blending tool to add the first color...
that's the vertical lines...

next, turn the stripes stencil 90 degrees & stencil another color...
I used peeled paint...
that's the horizontal lines...

this creates the plaid heart...

I cut mine out, to layer on a tag...
I added brushed corduroy to accent the edges, as you can see below...


on the next photo, you'll see that I cut a 
 down to 5 inches tall...
I'm really liking this size...
a lot...

I inked over the whole tag with brushed corduroy...
then misted water onto my craft sheet, 
stamped my polka dot background into the water, 
then stamped over the tag...

the water will react with the distress ink & lighten it, 
to create the polka dot pattern...

and I used jet black for my sentiment too...

I used my border stencil with black soot distress ink to add the borders at the top & bottom of the tag...

the flourish you see on the heart was also stamped with jet black archival...

was painted with mustard seed distress paint, dried,  
then I used jet black archival with this numbers stamp to stamp over the flower...

the mini black star from my Blossom Bucket line looks cute as a flower center...


I used the fine tip of the peeled paint distress marker to color in the sentiment...

and a waterproof pen to add detail stitching lines around the heart...


I like when art supplies (the stripes stencil
can be used more than one way...

*** TIPS & HINTS***

when using 2 stencils together, the tape is a huge help...
it keeps the stencils from slipping...

when using the stripes stencil, it's easiest to work WITH the lines as opposed to inking across them...

try cutting an inch from the #8 tags...
it makes a huge difference...
it's a fun size...

when stamping with water, stamp into the water only once...
if you stamp multiple times, too much water is picked up & the pattern is lost...

to use the distress paints on art parts...
I like to tap a bit of paint onto the art part (or craft sheet), then spread it around with my finger...

that's it for today...

finishing up new my stencils is at the top of  my TO-DO list today...

thanks for popping by...

I hope you'll have some time to...

make art!
wendy