

the last 3 sets of mini distress pads are HERE!
FINALLY...brushed corduroy! I waited a long time for this cute little guy...
you might want to read all the way to the end...
I have a set of ALL 3 to giveaway!

today I wanted to share another way to use distress inks...
this is a little something I figured out one day & I really like the look...
if you've taken my Ranger technique class, you know that I LOVE the snowcap white pigment pad...
for all it does, it should cost $50.00!
get it quick, before the Ranger guys figure this out...
this post will show you a few of the reasons why I LOVE it...
to create my card for today, I started with Ranger's kraft card stock, cut to 4 ¼ x 5 ¼ inches...
the photo below shows that I masked off half of the NEW vintage lace background stamp, then inked it with the snowcap, removed the tape & stamped it at the bottom of the card...

while the snowcap ink was still wet, I sprinkled on some frosted crystal embossing powder & heated it to melt the powder...

next, I positioned my basically bricks stencil right above the lace & used the tape to protect the lace area...

I used the blending tool & tapped it on the snowcap ink pad, then stenciled over the brick stencil...completely covering the all bricks...
***one thing to note***
the snow cap white pigment pad has a foam pad, not a felt pad like the distress & archival pads...
it's important to tap the blending tool onto the pad & NOT rub it, like we do with distress & archival pads...
brisk rubbing can tear the foam pad...
tapping works just fine...
***one more thing***
when using the white pad, make sure your stamp is clean...
trust me on that one!
with the stencil removed, you can see this snowcap white ink looks great on darker card stock...
I dried the ink before proceeding...
***this is IMPORTANT***...
if the ink is still wet, you won't get the desired results...

next, I inked the mini blending tool...
it's the perfect size for the mini pads!
and I applied peeled paint over the lace, going over the entire bottom of the card...
I used a paper towel to remove the ink from the embossed lace to make it stand out more...

the next step is to ink the top portion of the card with broken china...
just remember to dry after adding ink...
you'll notice that the snow cap slows the drying process when adding distress inks on top of it...
do you see how the snow cap changes the distress to a beautiful chalky matte finish?
and best of all...
that one magic white pad can be used with every color of distress ink to create this chalky finish...
I'm telling you...
it's worth $50.00~

now for some embellishments...
I had 2 scraps of clearly for art (CFA) that were covered with vintage dictionary text...
using jet black archival, I stamped the pansy & the leaves onto the dictionary paper side...

position the stencil over the stamped image & use festive berries to stencil the outer edge of the flower petals & the center accents...

reposition the stencil...
this open stencil allows coloring inside the petals...
I used festive berries again, but I kept it much lighter...
***one thing to note***
this stencil was designed to allow 2 different colors to be added...
to create an authentic looking pansy, use a yellow ink on the outside & a purple inside...or do just the opposite...
or any 2 colors that you'd like...
the pansy is a SiSi (stamp-it stencil-it)...meaning you get the stamp & the coordinating stencil in the same package...

because the leaves will be cut out, I just inked right over the scrap with shabby shutters...
then cut out the leaves & the pansy...

here's my pieces...
I heated them to soften the CFA, then shaped them a bit to add a little dimension...

I stamped the sentiment toward the right, above the lace, using jet black...
I test drove my cut out flower & leaves with the flourishes stamp on the card, to help me decide where to stamp the flourishes...
the flourishes got stamped with jet black...
the color is weird here..sorry...

archival inks are awesome for altering metal...
I used carnation red archival, and pressed the heart charm onto the pad to ink only the raised edge...
then sprinkled it with frosted crystal embossing powder before heating it...to melt the embossing powder...
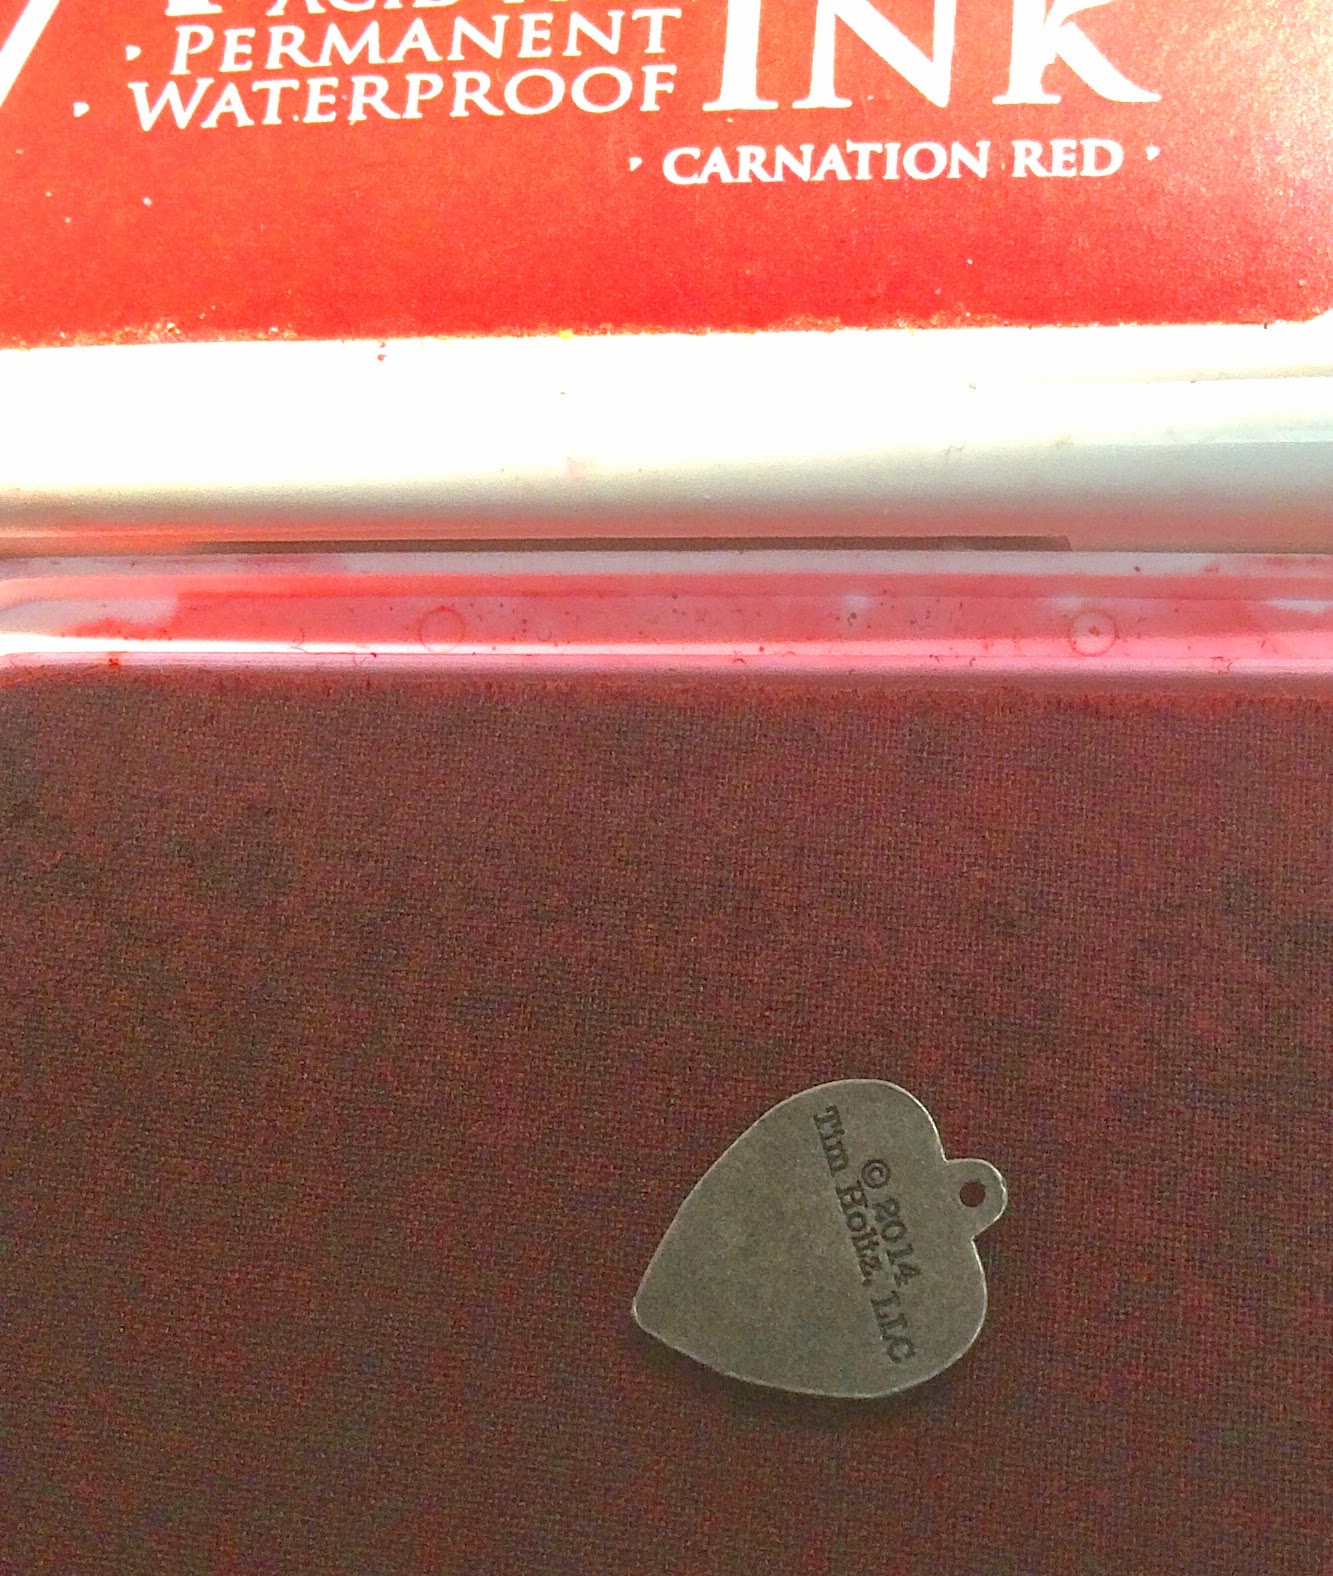
hemostats are a very useful tool...
I grabbed the little loop & that allowed me to blast the heart with the heat tool...and NOT blast my fingers...
***remember***
heated metal is HOT! be careful...
when it cooled off, I added the "love you" insert that comes with the heart charms...

hmmm...
the brick background looked too plain...
I replaced the brick stencil & randomly stamped text using tree branch archival...
***one thing to note***
by replacing the stencil, it keeps stamping off the grout area & you'll only see stamping ON the bricks...
it's a small detail...but it DOES matter!
***another thing***
when stamping thru a stencil it's much easier to use an UN-mounted stamp...
it's much easier to press wherever you need to...

you can see that subtle text adds another layer of interest to the background...

to alter 3 long fasteners, I used festive berries distress paint...
it's great to have coordinating products in the same color palette...
just shake the bottle, press down lightly on the craft sheet & then tap the fastener onto the wet paint dabber top...
again...
that hemostat makes it simple to hold, cover with paint, then heat the fastener to dry...
distress paints are awesome on metal...

this is not a tool that I use every day...
but when you NEED it...nothing else works...
I wanted to add the heart with a mini fastener, but the hole was too small to fit the prongs...
I used this tool to enlarge the hole...it drills right thru like magic!
sad to say...it's discontinued...I hope you snagged one!
if you don't have the tool, you can change things up & use the heart charm with a jump ring instead...

no project is complete without some brushed corduroy around the edges...
it sort of adds a frame...
and leads the eye to the main images...

now...the last details...
I added the painted fasteners to accent the lace on the card bottom...
and then added a piece of red/cream trimmings & the little altered heart charm...
the flower & leaves were added with hot glue...
the hot glue is a good way to adhere the CFA to paper...
next, some pen stitching detail...
and some black glaze pen dots...
and here is the finished project...
added to a black card...
tada...it's pastel distress!

this photo shows how awesome the frosted crystal embossing powder is...
see the texture it adds? I LOVE it with the lace...
and I think it's the perfect compliment to the pastel distress on the card, to create a vintage feminine effect...

this technique works just fine on manila cardstock too...
try it...it's a lighter/brighter look, but still chalky matte & pastel...
but...I think it's extra special on kraft cardstock...
DID I MENTION THAT
I HAVE A GIVEAWAY?
it's compliments of Tim & Ranger...
if you would like a chance to win ALL 3 sets of the new distress minis...
just leave a comment on this blog post...
it's that simple!
I'll draw a random winner on Tuesday, August 19th at 4PM Chicago time...
well...right now I'm in Connecticut...
getting all set up at The Papercraft Clubhouse...
I have big plans to get inky, meet some new art friends, have fun, &
make art!
wendy
314 comments:
1 – 200 of 314 Newer› Newest»Lovely card! I love Kraft paper with white ink! And I love how you added all that color and dimension! Brilliant!
wonderful card, wonderful inspiration as usual!!
Very nice card! Anxious to get my hands on those minis!!
I thought the minis were a little gimicky at first but have to say that I love them. The smaller size allows more flexibility, I think.
LOVE your new lace border, Wendy!
Great things come in small pkgs. Wonderful Mini Distress Ink. Like the creativity with wonderful embellishing. Thanks for giveaway chance.
Melissa
"Sunshine HoneyBee"
The dimensional flower really stands out and is lovely. I really like the versatility you've shown several times with your brick stencil. The chalk "effect" with the distress paint is great.
What great techniques!! Thank you for the chance to win!
I would LOVE to win a set of the NEW Mini Distress inks. They are so fun to use. Thank you. Linda from Alaska
A great, whimsical card! The chalky look of the distress ink is wonderful!
You have the absolute BEST ideas! I love this card. Every last detail of it!
Love Kraft and white! I haven't tried distress inks over dried white pigment ink, and now I need to get on that. I love the Distress Minis--a shoe box holds the whole collection! I would love to win and complete my set.
Beautiful card, great technique.
Love the give away. The mini's...well everybody needs them ;)
Have fun at The Papercraft Clubhouse.
Get inky and make art.
Great card! Iyou can use these minis in so many ways!
Gorgeous just gorgeous! I love how you show us all these amazing techniques! Thanks so much!~kim
Yep I love the kraft paper cards, just adds extra "charm" to the design! Awesome techniques on this card... more must tries :)
Very pretty Wendy...I do LOVE that Vintage lace stamp!!
TFS Wendy!
Thanks for the tip on the white stamp pad. I've been trying to find a good one too. So difficult to find one that works well. I hate spending money on ones that are too transparent.
Wendy -- this is fantastic. I love the lace and I adore the chalky finish you get with the Snow Cap ink and Distress. Gorgeous card. Thanks for sharing these ideas with us. -- Mary Elizabeth
Fabulous card and what great techniques! There is not a shadow of doubt, I now need that Snowcap pad....
Love the new stamps by the way!!
What a gorgeous card!! I have got to get the Snow Cap ink...I love the effects you got with it!! And the Vintage Lace stamp is just stunning!! Happy Friday :)
Lisa
A Mermaid's Crafts
Love what you did and the card is fabulous. Between you and Tim Holtz I don't need to buy any other products!! lol You two really compliment each other!!
Your ideas and creativity is amazing. Thanks for sharing and the chance to win!!
Great techniques! I am going to rush out and get some of the Picket Fence ink right now!
Love the brilliant use of distress inks - that's a great technique to use the white ink first and it is one I haven't used for ages - thank you for the reminder!
Cool card. Love the colors and the white ink pad. I use it a lot. All so very happy to see my brushed corduroy in mini size.
Whoa! All of those amazing layers and the details!! Simply stunning. I agree the tension between lace and distress is fantastic. Very clever. and thank you for the opportunity to win those adorable mini distress inks.
Wow Wendy. Love this idea is so effective. I'm gonna heave to give it a go thankyou for sharing your ideas
I love that card! I love anything with bricks, so this one really floats my boat. Thanks for the give-a-way too.
Love the new Distress Minis. So convenient for crops. Thank you for this opportunity!
And your sample is amazing ... I have the bricks, but I need that lace stamp!
I always love your projects, and the ease of which I can follow your detailed instructions. Thanks for all you do and the giveaway!
Incredible card! Can't wait to see you in Westbrook CT and learn some of your tricks!
Wow! Thank you SO much for that detailed tutorial. It really helps with newbies like me.
Goodness! I didn't think I was going to like the card when you started but boy was I wrong. I just love it and thank you for all the details of how you made it!
Just fabulous!! I love using Snow Cap, too.
Oh my, I love this idea of using the Snow Cap ink pad to create a chalky background. It's brilliant! Thank you so much for providing all the details on how you made this card!
What a beautiful card w/ the tutorial. Love your new vintage lace stamp.
Love the mini Distress pads - great all the colors will be out. Like all your techniques on your card - thanks for sharing
Beautiful card. Love all your helpful tips. Thanks for the chance at the mini sets!
Wow what a fab cards and top tips. Now to hunt down the snow cap ink x
WOW that is an awesome card....love the techniques used...gotta try them!
Great technique! It's amazing all the different ways you can used those lovely minis!
Beautiful and thankyou for the wonderful tutorial. I like the very white embossing powder just what I have been looking for. xx
Beautifully done! Thanks for the step by step instructions with photos!
Very cool card! Love the blue brick with the lace..awesome!
Love the card now I need to get busy creating TFS
Oh my gosh...another technique to play with this weekend..supposed to be rainy so this is perfect timing! And a giveaway to boot! Count me in!
Loving the new lace stamp. It is on my wish list.
That pad is now on my wish list. Thanks for the tip on how to keep the pad intact too. Live your new stsmps
I desperately NEED/WANT these little jewels. Haven't been able to pick any up yet. Love your blog!!
Enjoyed seeing all the steps of your project. I sure would love to get these newest minis!
I have the first nine sets. I WANT that last three. I use distress ink all the time and I love the colours. The minis make it possible to carry all of my favorite inks and asmall amount of space and they are SO convenient to use! Thanks, Tim.
I own all the full size pads but have not gotten any of the minis yet. I would love to have them! Can't wait to try the white ink pad. I need that too!
This card is Beautiful! love the technique. the colors are awesome! thanks for the chance to win!
I like the detail in your card, the ink just sets everything off.
You always give such great tips, I love the one where you painted the heart with the red - thanks so much and thanks for the chance to win the minis too! Anne x
Great card! Love your work and products! The mini distress pads are wonderful, aren't they!!
Once again you never cease to amaze with your awesome projects.
Love the card, so many great details, love all the colors :-)
I had never thought of your technique with the white pigment ink--I love it! Beautiful card, thank you for the chance to win!
I always knew I needed the snowcap pad & this fabulous project just confirms it to me, really cool that all the minis are now available so here's hoping I can win myself some :-)
Sally
That is a wonderful card! Beautiful! I love the lace stamp so much. Thank you for the giveaway! I really need those distress minis.. Please pick me Wendy! :)
Love your card and the give away too! Thanks for sharing how you made the card. Really like that lace stamp!
Ok, yes now I saw why I neeeeeed that white ink. Nice card. Thanks for the tutorial. Thanks for the giveaway.
so many techniques on such a beautiful card. Thanks for the inspiration and the instructions.
Thanks for sharing these lovely techniques!
nice card, I love techniques used! thanks for instructions
After taking your class I bought the white pad and LOVE IT !!! Super cool techniques as always .. thanks Wendy !
Wow Wendy great tips and tricks. That card is fabulous. Eye catching. I need to use my snow caps more. Ty.
Love the card and as always you give such useful tutorials!!! Thanks so much!
I love Distress. Thanks for the chance to win.
LOVE your project!! So many techniques that are either new to me or remind me to use those I learned in the past. Thanks for the great tutorial!!
Impressed with your card tutorial...beautiful card and great demonstration. Thanks!
your working process is incredible, thanks for show and thanks for the chance to win
love the look of this product combination. thanks as always for sharing.
The Frosted Crystal EP looks so cool, I'll have to add it to my wish list!
LOVE this card -- my lace border stamp (along with a BUNCH of your other new goodies) shipped today, and I am too excited to sleep !! Thanks for the inspiration (AGAIN), and the giveaway opportunity !
That card is amazing, love white and will have to get that Snow Cap ink. Cannot wait for the three new mini's for my collection. Thanks.
What a beautiful card. Thank you for sharing your talent and for the precise instructions to help those of us that are slightly challenged.
Oh wow! All 3 sets!!! What an amazing giveaway. Your project is great. I love all the special notes along the way for all those things you learned along the way ( and to save us from getting it wrong).
Stunning card Wendy!!!!
Amazing detail on the card. Absolutely stunning. Great instructions as well so hopefully I can make something just as beautiful. Thanks for the chance to win.
You are so talented! Love your art.
What great techniques! Thanks for sharing.
As usual, another beautiful card!
Have fun Wendy I know I would. I'm headed to Moline to take class with Dina Wakely. Maybe I can pick up some of your new stamps and stencils there.
Love the card. Thanks for the chance to win.
Great tutorial, I see why you love the white ink pad, lovely card! Thanks for a chance at the mini ink pads.
That lace background is fast becoming one of my favorites ever ! And the minis are so easy to work with ! Thanks Wendy!
Love the snowcap ink with the kraft paper. What a beautiful card!
Great way to keep some small inks in the RVida Loca!!!
Great new ways to use the distress and the Snow Cap!!!!
Thanks for the great op to win!!!
I've never used Ranger's white ink before. I have a different make and not all that happy with it. Time for a change I think.
Lovely card.
Fantastic tutorial the card turned out beautiful! thank you so much for the chance to win!
I love the white on the craft card stock - it looks fantastic. I will definitely have to try it - thanks!
Love how vividly that Snow Cap shows up on the kraft cardstock, and wow .... it looks so great with the color! Beautiful techniques.
Loved the techniques you showed, great card and tnx for a giveaway!
Super technique for a card. Need to get some of that embossing powder. Thank you so much for a chance to win!
Beautiful card! I love the mini ink pads and the colors!
I must have all these cute mini ink pads! Thanks for the tutorial on how you made your fabulous card.
Love it!!!!! Taking your class tomorrow can't wait!!!!
FUN stuff! Love the ink pad minis too! Can't wait to see you at both classes tomorrow and Sunday! Yay!
Great job on the card.
Love the card, the step by step instructions and the pansy SiSi ... That is on my immediate shopping list
Another beauty of a card, and thanks for the chance to win the minis - my fingers are crossed!
Beautiful card and great technique. Would love to get the new inks especially shabby shutters!
First, you started with my favorite card stock..kraft...and you added white. I never would have thought of bricks and lace, but what a great look. The card is beautiful and I'm always amazed at the great results with Distress Inks. Thanks for the tutorial, too!
What a fun project, Wendi, and thanks for the nice detailed instructions! I love distress inks, and am just starting my collection of the minis - would love to win these!
I love this! Loved the vintage lace stamp as soon as I saw it! What you did with it is gorgeous!
Love the card and your detailed instructions! Especially love the technique with the snowcap ink pad and distress inks!! Running out to buy that pad! Thanks so much for the chance to win some mini distress inks!!
beautiful!! I love the distress ink over the snow cap.
Fabulous! Love that lace stamp, too.
Beautiful card! I love creation proces!
Wow! Love your tutorial and the snow cap pad too...who am I kidding, I love it all!
Fantastic. I love the use of the white pigment with Distress ink.
Can't wait to get the last 3 sets to make my collection complete! See you in class! *so excited to see you again*
Thank you for your tutorial .... and a chance to score some wonderful ink pads . . .
I love your card and the step by step of how you achieved your look.
Love love Tim Holtz. Your card was lovely. Thank you for the chance to win :)
Great tut. I seen that tool at our local scrapbook store closeout. Now I wish I'd bought it. Too late now.
What a fab technique for inking on kraft! Love it! Need that white ink now...
Love all of your artwork Wendy!
Would love to win the new set of colors. Love your technique with the white ink on kraft. Aw, I just love all your wonderful ideas.
Wow-I knew none of those things about the Frost White-which could be why I was disappointed in it. Time to get it back out and try again. Thank you for the fantastic tutorial-free schooling-you got to love it!
Very striking technique! Love the colors!
Wow. beautiful card. thanks for showing all the steps too. I agree the white ink is magical. I love how it helped transform your card. thanks for the chance to win too.
What a great card. Thank you for such a great instructions. I like how you added the text to the brick background. Thank you for sharing such great ideas.
I've been pining for your lace stamp since I first laid eyes on it. LOVE this card. So many awesome techniques and ideas to try : ).
Wendy this is just gorgeous!!! Betty is out of the ink but getting more next week. I can't wait!!!
Great card love the lace stamp !!!
Thank you for the tip on the snow cap ink pad - I now have one on order! Your card is beautiful and I love the techniques you used. Hoping to finish out my mini set too and since I don't do well on drawings I have already asked my retailer to let me know when her order arrives!
Thank you for all the great tips and clear instruction and pictures...I can't fail!
The white ink is just what I need before I begin my Christmas cards.
The lace stamp is gorgeous.
Thank you again, julie
Yep, the minis are "so stinkin' cute"! I have not had a chance to experience them yet-would love to win so I can try them.
What else to say but WOW what a card!! Distress inks are the bomb!!
So pretty! I love that lace stamp.
Good luck everyone, we do love any Tim giveaways,rhondaparkins@gmail.com
Wendy I love everything about this card. I really think that everybody should have those stamps to play with. Thank you for sharing and for giving us a chance to win some Distress minis!
Lots of great information! Thanks so much and thanks for the chance to win. :o)
I will have to dig out my Snow Cap and give this technique a try, thanks for sharing this gorgeous card with us!
Love the distress inks and all of the instructions and helpful hints for using all of the products!
Man! I think I have like 8 more products on my must have list just from this post! Better start saving my pennies or maybe win some minis to make a dent :)
I see why these mini pads can be so much fun to use. Wonderful techniques. Sincerely, Elaine Rico
I loved "watching" you create this! It was neat to see all of the techniques you used. They all came together wonderfully! Thanks for sharing!
You finally come to CT and I'm gone!!! UGH!!! Anyway, thank you for sharing the lovely project! As always, it's wonderful. You are a master with an ink pad, as with everything else! -J Newcomb
Wendy, you make it look so easy!! Another great project.
Thanks for sharing all those awesome techniques! I think I need that snowcap white pad!
So pretty. You are really good with stencils compared to me!
Wendy I love your kraft card! You are incredible, your techniques it's incredible! Thanks for the chance to win, i love mini distress!!!! BArbarayaya
Thanks for sharing these great techniques. It is so cool to use the white ink as a base to create any color you want for an image. Always love white embossed on Kraft! Thanks again!
Love these new mini Distress inks. They are just the right size. Also I love your blog and follow it.
love the white ink - great with the distress ink! thanks for the chance to win!
I loved your demo, of course,! I have never used the snow cap like that before so here I go again! Learning something new from a great artist! Thank you!
I loved your demo, of course,! I have never used the snow cap like that before so here I go again! Learning something new from a great artist! Thank you!
Wow, that snowcap pad IS fabulous, love the effects you achieved with it. Thanks so much for your tutorial and the opportunity to win Tim's newest DI release, love those minis!
I love the brick wall!! What a great tutorial. Hope you have a fabulous crafty weekend.
I love all your projects and these mini ink pads are so handy.
I love your art, your techniques, your products! Thanks for the continuing inspiration! Count me in on the giveaway of those minis!!!
Beautiful card
and thanks for
showing all the
different techniques.
Carla from Utah
Each time you use the vintage lace background stamp, I want it more and more.. Hurray for more mini ink pads.
Wendy, your tutorial and tips are awesome! What a lovely card. Thank you for sharing.
Thanks for sharing this cool card with us. Really like the colours and little tips you provide along the way. cheers :)
Wow, seems like a very fun card to do!! Love the colours, specially the red details!
XOXO Kicki
what a great card and I really like how great the snow cap ink looks once its stamped. I've been needing a new white and now just to find it. Thanks!!!
Love the snow cap paint; will have to look for the stamp pad now.
Thank you for a great tutorial. Love the card. Can't beat Ranger products!
Step by steps like this are just awesome...I learn so much...thanks so much for sharing your creativity...must get a snowcap pad now. Thanks for offering the minis as a prize, I am still trying to build up my collection of ordinary sized pads, some minis would be such fun x
thank you for divide this a technique
thank you for divide this a technique
Awesome tutorial. Love the details. Your card is stunning.
I am a convert to Snowcap White! Thanks for the tutorial and the chance to win those cute little minis.
Привет!
Здорово ты управляешься со всем этим богатством, и получается замечательная красота!
Я бы тоже, конечно, хотела попробовать...
Hey there! Cool do you cope with all this wealth, and get a great beauty!
I would also, of course, wanted to try ...
What great techniques!! Thank you for the chance to win!
Your card is stunning.
It´s intersting to watch how many different things one can do with the simple equipment most of us have at home...just to think about it and try. Thank you for sharing your work with us! Great card. I like exploring new color combinations, possibilities of using things together to achieve new results, being inspired by other people...
FABULOUS card and FABULOUS tutorial too - I feel like I have attended a class, learning lots of inky secrets :)
EXCITING inking - LOVE the effect of Snow Cap White with the Distress Inks!!!
THANK YOU for sharing your CREATIVE INSPIRATION and for the chance to win some INKY AWESOMENESS too!!!
Beautiful artwork, wonderfully detailed tutorial much appreciated. Must get the snow cap pad, I've recently started collecting the distress mini inks, thank you for a fab read :-) x
I have the lace background stamp and have used it repeatedly. Love it and your new card!
I agree there is so much you can do with white ink. a good white ink pad is a staple in any crafter's supplies. thank you for sharing your talents here and for the chance to win mini distress pads!!!
stamping sue
http://stampingsueinconnecticut.blogspot.com/
What a great card. Thanks for the inspiration.
Fabulous card. Love the idea that the snow cap ink makes the Distress inks look chalky.
what a great tutorial! Thank you for the ideas and inspiration. I love working on kraft colored paper it has such a different effect with ink and art.
I love your stenciling thru another stencil technique! It does make a difference! thanks for all your tips! And the beautiful card!
Great card! I love the lace and the white snow cap ink. Thank you for sharing with us.
Your project is very beautiful. And I love your tutorials, they're always very detailled. Thanks for the chance, Johanne Lacombe
Love this card. Great techniques used in this creation. Thanks for sharing.
Beautiful!!! Have fun in CT. Thanks for a chance to win!
Thanks for sharing all these different ways of using the mini's. They look soYummy,I need to taste them soon.
I love learning something new, thank you for that.
Wow! So many techniques! I love your detailed posts!
Great card, and loving the new minis! Such a great product!
So many new to me techniques. Thanks so much Wendy.
Gorgeous card, thanks for sharing every step so we get a chance to try these awesole techniques ourselves! And thansk for the chance of winning such a great blog candy! :)
What a Beautiful card! <3 giveaways!
What a fantastic card! Thanks for the fab picture tutorial. Love when you do that. These minis are so darn awesome!
What a special Thank you card! Very nice stencil technique! Thanks for sharing!
Wow. This card is GORGEOUS!! Thanks for spotlighting the snow cap ink pad!
I love the techniques you used especially with snowcap and frosted embossing very exciting! The new distress minis are what we artists have been waiting for yum! Thankyou Ranger and TIM!
Your card is amazing and the techniques you used, very cool! I have all of this stuff but I didn't know exactly what I had until your post! ~Thank you!
Thanks for sharing this fantastic card. That being said, now I have to search the internet universe for somewhere that will have Snow Cap ink in stock :) Thanks for the chance to win! Tracy P. sprty_grrl03@yahoo.com
I love it when old products and new products are combined for terrific new projects. Lovely!
Thanks for such a Great step by step tutorial.
Wow, that's a lot of technical information! You go girl! Fabulous techniques. Need those minis!
Post a Comment