here's how I got started...

here's how I got started...
a 20 minute podcast by Crazy BeYOUtiful
Showing posts with label tim holtz detail water brush. Show all posts

Monday, April 14, 2014

perfect partners...distress & archival inks...


today's post is to celebrate the release of 

and the good news...

there's no long wait...
they start shipping to stores TODAY...
yippee!

what's a celebration without a giveaway?
pssst...keep reading...

from the moment I opened my first distress pad (vintage photo) I was HOOKED...

TOTALLY hooked because of the beautiful colors & the special properties of the distress inks...

so today, I wanted to share how well distress & archival inks work together...
like the title says...
they're perfect partners...

in a previous post, I showed how to create a stamped spotlight frame...


below is the finished large art journal page, made to fit my art parts journal covers...
I used my fav specialty stamping paper as the page base...

the subtle brown in the background is created with brushed corduroy distress ink...


because archival inks are permanent & waterproof when dry, I knew I could stamp the weeds with archival inks, then add the detail shading/shadows with distress inks, working right over the archivals...

I knew my archival stamping would remain crisp & clear with no bleeding...

it's a cool effect...

the weeds were stamped with dandelion & fern green archival...
then dried...

I scribbled some distress ink onto my craft sheet, then picked up the color with the detail waterbrush & painted away...
make sure it's not perfect...
it should be more of an uneven watercolor effect...

distress ink in any form will work...I especially like the cute new mini pads, the regular size distress pads or the distress markers...

I painted tumbled glass & iced spruce distress inks unevenly around the weeds & added some peeled paint to accent the centers, all using the detail water brush...

iced spruce is the perfect color for adding shading...it coordinates with everything!

even though the weeds are completely flat, they look very dimensional because of the distress ink shading...
and that's another reason why I think distress inks are MAGIC!

I cut her out &  accented her with several of the distress markers...
and gave her a heart charm to hold...

I thought the page needed a few remnant rubs...

I added some stamping...
the lacy background inside the circle is the lace background stamp...
it was inked with tree branch archival...
then stamped inside the circle frame...

***TIP***...use the left over typing paper that was used to cut the circle as a stencil/mask...
position it in place over the circle...

it will allow you to easily stamp inside the circle & keep the background masked off...

a sentiment (be true) & the lace borders were stamped in jet black archival...

I added some stenciling with the checkmate stencil, using watering can archival...


oh...those extra leaves were cut from the thistle stamp...

I traced around the circle & the background stamp with the Stabilo pencil & rubbed it with my finger to soften the pencil line...

below is the result...
I LOVE that the weeds look raised!


now it's...
GIVEAWAY TIME!

I have 3 new mini distress sets to GIVE AWAY to a lucky blog friend...


just leave a comment & I will be back on Wednesday to announce the winner...

congrats tim!
I adore your new distress minis!
well actually...I  LOVE ALL your distress products!

remember...

distress & archival...
are perfect partners when you...

make art!
wendy
ps...pop over to tim's blog & you'll see a list of our friends who are participating in the mini distress giveaway!
visit all the blogs, leave a comment & you'll have LOTS of chances to win new inks to...make art!


Friday, November 15, 2013

this is SO much FUN...


and like the Geico commercial says…
so easy…
even a caveman can do it! 

no…I haven't had a mojito yet…
just incase you're wondering…

I discovered a super simple…super fun…super quick way to create an artsy watercolor art journal page…

this is a page from my small journal & the page is manila card stock, cut to 3 1/4 x 4 ¾ inches......

grab the fern green archival...


and the leafy stamp

then stamp the right side of the page first, then the left…without reinking, for a lighter second generation image…
this makes it look further in the background...


here comes the fun…

scribble a distress marker onto the craft sheet & pick up the color with the detail water brush

RANDOMLY…start adding uneven flowers, by lightly taping the water brush wherever you want to add a flower…

YES…this goes thru "the uglies" before it gets cute…
but...trust me…

I started these flowers with the tumbled glass distress marker


do the same thing with the broken china distress maker
adding more flowers…

give it a quick blast with the heat tool...


now dispense a small amount of faded jeans distress stain onto the craft sheet & use the detail water brush to add darker dots to the flower centers…

I like the stain for the centers because the stain is undiluted…
and it really accents the flowers & makes them stand out...

getting better...


this just might be my new fav color…
it coordinates well with everything…


use a blending tool or Cut N Dry foam to stencil the stripes borders

I used the rusty hinge distress marker to color the flower…


below is the finished page…

I used potting soil archival to fill in some areas with the vintage mesh  background stamp...

I stenciled TIME with brushed corduroy, 3 times…
and used watering can archival for the very light postal mark…
that stamp is in the set called "art gone post" & it's LCS051...

to easily color tim's industrious border stickers
I removed the sticker from the sheet & placed it on the craft sheet…
it stays nice & secure, but pops off easily & the adhesive is unharmed...

I rubbed the cornflower archival pad over the trim…
then lightly hit the edges with potting soil archival
dry it with the heat tool…

such a quick way to alter & change them to any color you need...

***tip***
if you don't like the color…cheapo rubbing alcohol will remove the archival from the sticker & you can start all over again…
the sticker is not damaged!

the skinny industrious trim at the bottom is the divider piece between the stickers…colored the same way…
it's adhesive...don't waste it!

I stamped 2 flowers on manila scraps, colored them with the broken china distress marker & cut them out & glued them on…

the finishing touches are some remnant rubs for the 3 mini words...

and look at the butterfly rub

you can alter the remnant rubs with ARCHIVALS!
yippee…
just swipe the craft nib onto the archival pad & color away…then dry!

this discovery made me very happy!

a little shading around the page edge, some glaze pen dots & some pen stitching…
done & FUN!


so much fun that I HAD to play again…

on the sample below, you'll see that I used distress watercolor cardstock

same process as above…
but with a less distressed…
more clean & simple result...

this time I used the shaded lilac & dusty concord distress markers  for the flowers & I used dusty concord distress stain to create darker flower centers…

BE AUTHENTIC is stenciled with jet black archival & again…
the little remnant rub butterfly was colored with orange blossom archival

I think I'll use the sewing machine to stitch a border, then add it to an art journal page…

but...

this would also make a fun EASY card…

or…

I could put it in a little frame & have a simple gift done…
with so many distress colors to choose from, there's something that can coordinate with any decor…
or anyones favorite color...

with the holidays fast approaching…
this makes a cool gift…
just sayin'...


and this one took 15 minutes tops!


Rick's comment…hey…that almost looks hand painted..
me…hello goofy…it was…
Rick…I'm going back to the barn…lol…

I like the combo of archival ink and distress…

my leaves/stems archival stamped image remained unaffected by  the water & distress…

using distress is an easy way to create an artsy watercolor effect…

the REAL star? the detail water brush!

I LOVE this thing…because the bristles are a nylon-ish material…the point is still perfect, even though I use this brush almost every day…

if you don't have one…you can tell Santa that this would look good in your stocking!

below is another older waterbrush project…


and this is where the idea came from for the flowers on todays post...

stop the press!
popover & find out how to create this…


ok...that's it…
back to more CHA stuff…
and scheduling for next year...

I hope you can find a few minutes this weekend to play and

make art!
wendy
ps…GO BEARS!

pps…one more thing…I've had several requests to participate in this number deal…
someone (actually 3 someones) sent me a number & I'm supposed to list that many unknown facts about me…oh boy…
this could be interesting & a potential blog post for next week…
stay tuned for some deep dark secrets!...


Wednesday, July 31, 2013

and the winners ARE...

HOLY COW!!!

I had THE BEST DAY reading all the FACEBOOK comments...

501 of them to be exact! 

THANK YOU ALL SO MUCH!!!

you made me VERY HAPPY!

MANY THANKS to those who clicked 
LIKE on my FACEBOOK PAGE...
MWAH!

here's a little card I made using some of the archivals...
combined with distress...
I can not make anything without distress...

the sentiment says it all for me today...


I used orange blossom archival to stencil the flower...
dried it, then went over the flower with the Perfect Medium pen & added some embossing powder...
this makes the flower a focal point...


I used potting soil archival for the random background stamping...LOVE my new vintage mesh background stamp LOTS...


the flower stem/leaves were stenciled with fern green archival...


watering can archival was PERFECT for stenciling the stripes at the top & bottom of the card...

I also used it to stamp thru the stencil...with a tiny text stamp...


I always save jet black archival  for my main image or sentiment...
you can see that it really stands out...

the flower center was inked with the brushed corduroy distress marker & I used the rusty hinge marker to add the mini hearts...

a few water drops from the detail water brush added another layer of interest to the background...

and you'll also see some inky dots, flicked on with the detail water brush & brushed corduroy distress stain...

very simple...very fun & you can see how well the 5 archivals work together and they perfectly coordinate with distress...


since there were so many comments...

instead of 1 winner...

this 6 pack of fun will be shipped to 2 people...


Rick (aka head of shipping & receiving) scrolled thru the comments and chose these names...

congrats to...

Nonnie Chervenak love them all, but 

especially the
fern green....


and congrats to...


Kate Christopher Yetter Love the colors you 

chose for 

your inks ,so you!


please email me (wbv1213@me.com) with your shipping info & these will be on their way!

this was so much fun that I will do it again when I return...

Ted gave me NEW stamps & NEW stencils to share with friends...

I'll give some away here, on my blog & 
again on my FACEBOOK PAGE...

ok...gotta pack now...

I'm headed to INK ABOUT IT in Westford Mass...

after that...

I come home for about 20 hours (anything to see my hubby & sleep in my own bed!)

then head to THE QUEEN'S Ink, in Savage Maryland
to take 2 full days of classes with my friend Finn...aka Anna Dabrowska...

I CAN NOT WAIT!

to...

make art!
wendy

Friday, July 5, 2013

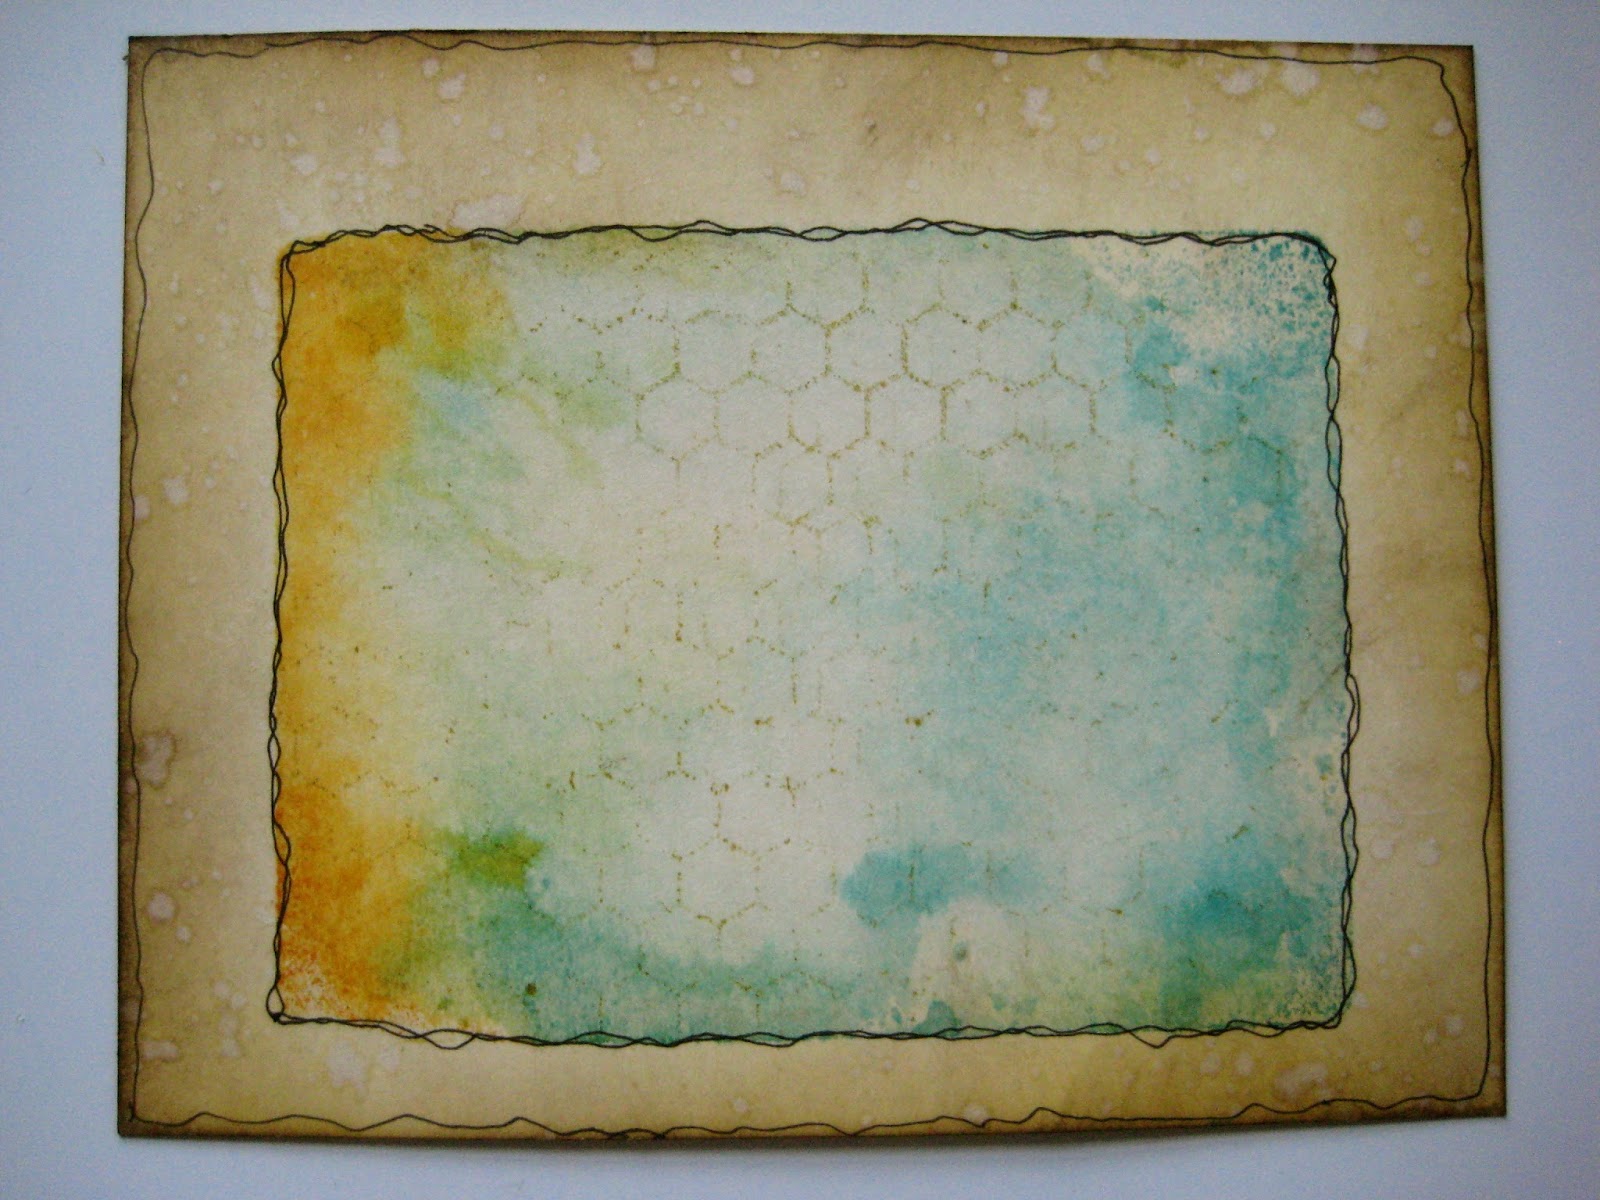
grid block stamping...

I have a fun technique to share today...
just like the title says...

it's grid block stamping...

grab 2 or 3 distress pads...

I chose wild honey & broken china...


grab a mister filled with water, a grid block & any stamp...

since the grid blocks are thin, 
the UN-INKED stamp acts as a handle...

I chose a 3 x 4 inch grid block...
and added a stamp to the middle...


swipe the ink pads directly onto the grid block...

mist with water & press onto your chosen surface...

same material as the tags we love...

look how cool...
dry this before moving on...


next grab a background stamp & some saffron archival...

ink the stamp, then press the grid block onto the inked stamp, to pick up the honeycomb pattern...


press the grid block over the rectangle...


remove the grid block & dry...

plan B is to use post-its to block off the area, 
but the grid block is a perfect fit...

don't panic...
rubbing alcohol will remove off the archival from the grid block...

ah...just what I wanted...
a random honeycomb background, 
and it's only over the rectangle...


next ink the edges with scattered straw...


add some walnut stain...


put the grid block back in place to mask the rectangle...

then using the detail water brush, filled with water, 
tap the brush sharply onto your finger to add water droplets to the edges only...

let the water sit a few seconds before drying...

since distress inks react with water, 
it makes a really easy/subtle pattern in the background...


use a waterproof pen to add doodling detail to define the rectangle and the card stock edges...


ok...
bad news...

now here's where the technical difficulty happened...

I was having so much fun, that I grabbed some new stamps...

duh...
hello...

I can't show them just yet...
some days my brain does not work...

so here's the best I can do for now...

you'll see that I used some broken china stain on the water brush to add some random inky dots...
I did put the grid block back to mask off the rectangle, before adding the dots...
I wanted the inky dot only outside the rectangle...

just pick up the stain with the water brush & tap over the chosen area...

I used black soot on the blending tool to stencil some numbers...
just move the stencil down & you can create any sized numbers border you need...

 the little peek in the bottom left corner is this bird stencil...


this is a great technique for a card front, a tag or an art journal page...

I've been doing this if I have a hard time getting started...

 just get SOMETHING down & it seems to speak to you & lead you to what comes next...

with 9 grid block sizes...
there are plenty of choices for the rectangle size...
and there's a cute 2 x 2 square too...

now about that winner...

thanks & CONGRATS to


Blogger Lori said...

Can't wait to see the new stencils! That is an awesome tip about the hitch fastener...hmmm.....as for a tip, how about the old standby...odd numbers are better! Pretty lame, I know, but that's the only one that comes to mind right now. LOL
June 29, 2013 at 8:54 PM
 Delete


please send me your shipping info & hubby will get a little package off to you...

BREAKING NEWS!

I'll start showing new products on the 10th...
with the grand finale on the 17th...

until them...

here's a little share...


when I showed this to Rick he said & I quote...

"well, that's certainly the truth"...

lol...

it just happened to be right after the credit card bill arrived!
YIKES!

happy weekend...

I hope you'll try grid block stamping when YOU...

make art!
wendy
ps...let me know how you like this fun technique!