here's how I got started...

here's how I got started...
a 20 minute podcast by Crazy BeYOUtiful
Showing posts with label Stamper's Anonymous. Show all posts

Friday, February 5, 2016

distress crayons on clearly for art...

is a cool inexpensive product
 that can be used many ways...

the clear and white work really well
 with alcohol inks...

the black CFA looks great 
with embossing pastes added thru stencils...
I especially like the metallics...
and I have a cool technique coming soon, using the clearly for art blackout with 

as you know, 
I love the clear (CFA) covered with 
that way you get the benefits of the strong, moldable CFA...
but you can add inks to a paper surface & see the true beautiful ink colors...

so when I got the distress crayons
I was hoping that they would be 
another product to use with CFA...
and it works...
IF you use plan B!

ok...I started with 


and I scribbled them over a 5 or 6 inch square piece of the clear...CFA...
and blended them with my fingers...


next, I placed the new "lots of dots" stencil over the crayons and wiped thru the stencil with a baby wipe, to remove the crayons...

tim demoed this at CHA & I LOVE IT!

the CFA is shiny & the distress crayons give it an amazing sort of a cloudy/chalky finish, but the shine is showing thru the dots for contrast...


I die cut some flowers...
and I wanted to show you that if you did want shiny flowers, mold them so the shiny side is up & the distress crayons are on the bottom...
either way works...
shiny on the right...
crayon side on the 2 on the left...


HERE'S WHERE I WENT WRONG...

I didn't put a base down on the CFA and if you really rubbed the flowers, the crayons did rub off...

PLAN B...

this works perfectly...

I started again with the CFA, but this time I painted on a thin layer of the 
new collage medium & let that dry...

I followed the same steps...

I scribbled the crayons & blended them, used the "lots of dots" stencil again & now the colors don't get rubbed off...

so it is very important to use
the collage medium as a base layer 
BEFORE adding the distress crayons, 
if you want to add them to CFA...

next...

I was wondering if the heat from the heat tool
 (I used to shape the flower, ) 
would affect the crayons...
it doesn't bother the crayons at all...
they remained stable...

so here's the page from 

LOVE this color combo!

if you enlarge the photo, those subtle vertical  lines are from the old wood floor stamp...
I misted rubbing alcohol onto my craft sheet, stamped into it & stamped over the page to bleach out the background archival inks...

see those dots right above "observation"?
 same thing...
I used the lots of dots stencil to remove some ink & create bleached dots...
this time I used the rubbing alcohol on 
make sure it's just moist...
NOT dripping wet/saturated...

were stamped with jet black archival...
I LOVE adding the lace border to accent lots of other borders...
for me...
the more detail...
the better...

the leaves/stem were stamped with leaf green...
those little leaves peeking out at the bottom are a small part of this stamp...

I added some remnant rubs to reinforce 

LOVE is from the new "just say it" background & it's sitting on a mat mini button...

a black mat mini heart accents the flower center...
here's the 4 ½ inch square page...


interesting things to note ...

yes, the CFA color on the flower is stable...
rubbing doesn't remove the color, because I added the base of the collage medium...

water misted over the flower doesn't bother the crayons either...

BUT...
if you mist with water & rub over the crayons,
all the color is removed!
these crayons are really 
a very unique product...

one other thing is that the crayons allowed me to add an adhesive tape strip under the flower to add it to the page & it does not show thru...

I think that's another big benefit...

ok...remember that GIVEAWAY?

CONGRATS TO the WINNER of 
BLOOMING ART...


Blogger Lisa said...
I would love, love for this stamp set to come live at my house!! I'm off to listen to the podcast!! Have a great evening !! Big hugs :)

Lisa
A Mermaid's Crafts
February 2, 2016 at 5:38 PM
 Delete


please email me, with your shipping info...

the crayons are lots of fun!

I hope you'll try them on CFA, 
when YOU

make art!
wendy


Tuesday, January 1, 2013

brand new studio 490...day 1...


FINALLY...
I can share what I've been working on since 
the day after the last CHA...
seriously...
it takes that long!

and believe me...
it's so hard for me keep my lips zipped about new things...

just a reminder...
you should be able to click the photos to enlarge them,
 to read the sayings...

and the numbers on the art parts packages will tell you how many of each are included in the package...

let's start with a stamp set...

this is called
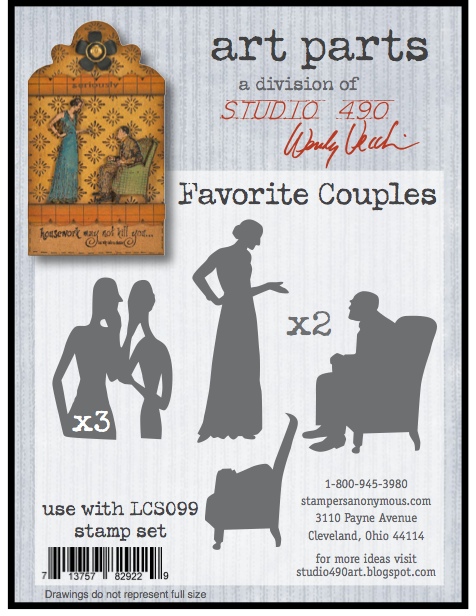
COUPLES ART...

it has 2 really fun couples and 
some fun coordinating sayings...


and for sure we needed coordinating art parts to make these couples stand out...
this art parts set is called 

FAVORITE COUPLES...

HIS CHAIR is a 2 piece art part...
when glued together it looks like he is actually IN the chair...
it's seriously so stinkin cute!

the mini couple on the left is...
Fred & Ethel!
my new BFF'S!


next up another stamp set...
this is

GOSSIPING ABOUT ART...

I have had a blast with these girls...

more fun sayings are included to use with them...

won't they be fun for journal pages?
lots of ideas are brewing...


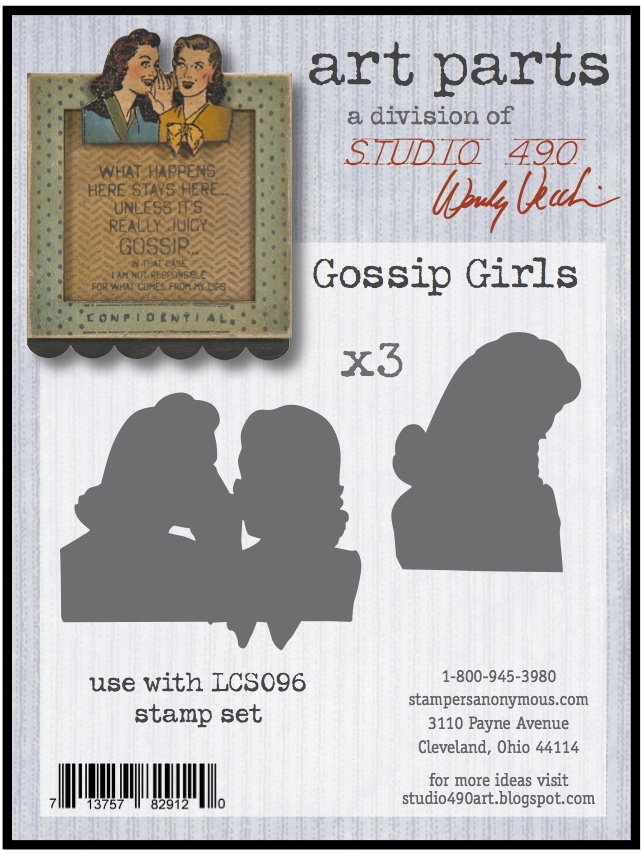
and we have a coordinating art parts set called

GOSSIP GIRLS...
it's simple to color them with tim's distress markers...


I have one more stamp set for today...

this is 
BUSY MAKING ART...

2 smaller bugs for smaller projects...
the numbers border is fun to emboss, 
then color in the individual numbers...
great for cards too...

love the saying...

the stripes background is so FUN to press into wet embossing paste...
it makes a really cool textured background...
I'll show you soon...


and I LOVE LOVE LOVE these new art parts...

this is 
SCALLOP TAGS with trim strips...
the tags are 6 1/2 x 3 1/2 inches ...
a fun size...

not too big...
not too small...
and a great solid surface...

LOTS of the stamps & art parts we already have work well on these tags...
I want to use them every day...


moving on to some new resin pieces from 
BLOSSOM BUCKET...

yep...


I LOVE THIS ONE!


this 

GOLD & SILVER GIFT BOX 
is just PERFECT on a card front,
 for any gift giving occasion...

it looks more "classy" when used on a black background...
and more "funky" if on kraft...


as in the past...
the Blossom Bucket pieces all have flat backs for easy gluing...
and the details on the fronts are amazing...


I'm always wishing for something 
for a quickie get well card...

now we have this 
BANDAID...
it looks so authentic & cute!

and it's good for any age group...


these next pieces turned out even better than I expected...

lol...here's 

THE CURE!!!

I see lots of fun possibilities here...


like this one...
if you had too much bubbly last night...

it's perfectly sized to use with my 
 telephone...
both are back in stock again...


phew...
that's day one...

I have a TON more to share in the coming days...

any thoughts?

I hope you'll tell me what you're thinking...

while I 

make art!
wendy
ps...see you tomorrow...
can't wait!

Friday, December 14, 2012

from the bottom of my happy heart...

thank you to everyone 
for the awesome birthday I had yesterday...

230 Facebook comments...
97 emails...
29 texts...

wow!
I'm totally amazed!


and group members/ art friends 
made the day EXTRA special with these AWESOME cards...

they have been arriving for over a week...
but I used EXTREME WILLPOWER
and waited until yesterday to open them...
let me say...
it about killed me...
patience is NOT a virtue that I'm familiar with...

I wanted to share these cards with you...
I think you'll find lots of inspiration & GREAT ideas...

for me, it was super extra fun to see how others use my products...

this is from Debby Podgorski...
LOVE the colors...
love the embossing paste used with my stencil...
I think the saying is perfect for the card she designed...


this next one is from Lori Hassler...
love the front...


flippin LOVE the inside...
look how this guy can carry balloons...
and the strings dangle...
genius...
pure genius!
who doesn't LOVE a pop up card...
simply...amazing!


this next one came all the way from the UK and was created by Gabrielle...

I hate bugs...

but I sure do LOVE this one...
he's done to perfection!
clear embossing onto the art part really makes him POP!
 I adore the colors Gabrielle chose... 
the mini art parts frame works well to accent the sentiment...
look...


next...
 this beauty is from Eileen Bellomo...
I LOVE the bright colors & 
adds just the right amount of texture...
the raised sentiment is a nice touch...
I rarely use purple, 
but I LOVE it when someone else does & does it well...


Dorothy McCarthy created this next one...
 I LOVE how my guy is a perfect fit on that circle stamp...
looks like he's stepping up to deliver that flower!
VERY cool!

the circles are embossed on glossy paper...
for extra detail...


this is a very fun creation from Susan Kesselman...
and the door actually opens to reveal the greeting...
pretty cool huh?

I think this is a great idea for a guy card too...
or...
just add a different wreathe & it fits any holiday!
note to self...
remember that...


Susan Salyer sent the next one...
LOTS of texture from gesso?...I think...
I'm wondering how she shrunk down my flower image to fit the domino...
hmmm...

this is so sweet!


next up is my Mrs Worry...
she makes me laugh...
this is a really cute small card, 
created by folding a tag in half...
Michelle Salazar did a GREAT job!
note to self...
fold tags to create cards...
mini is fun!


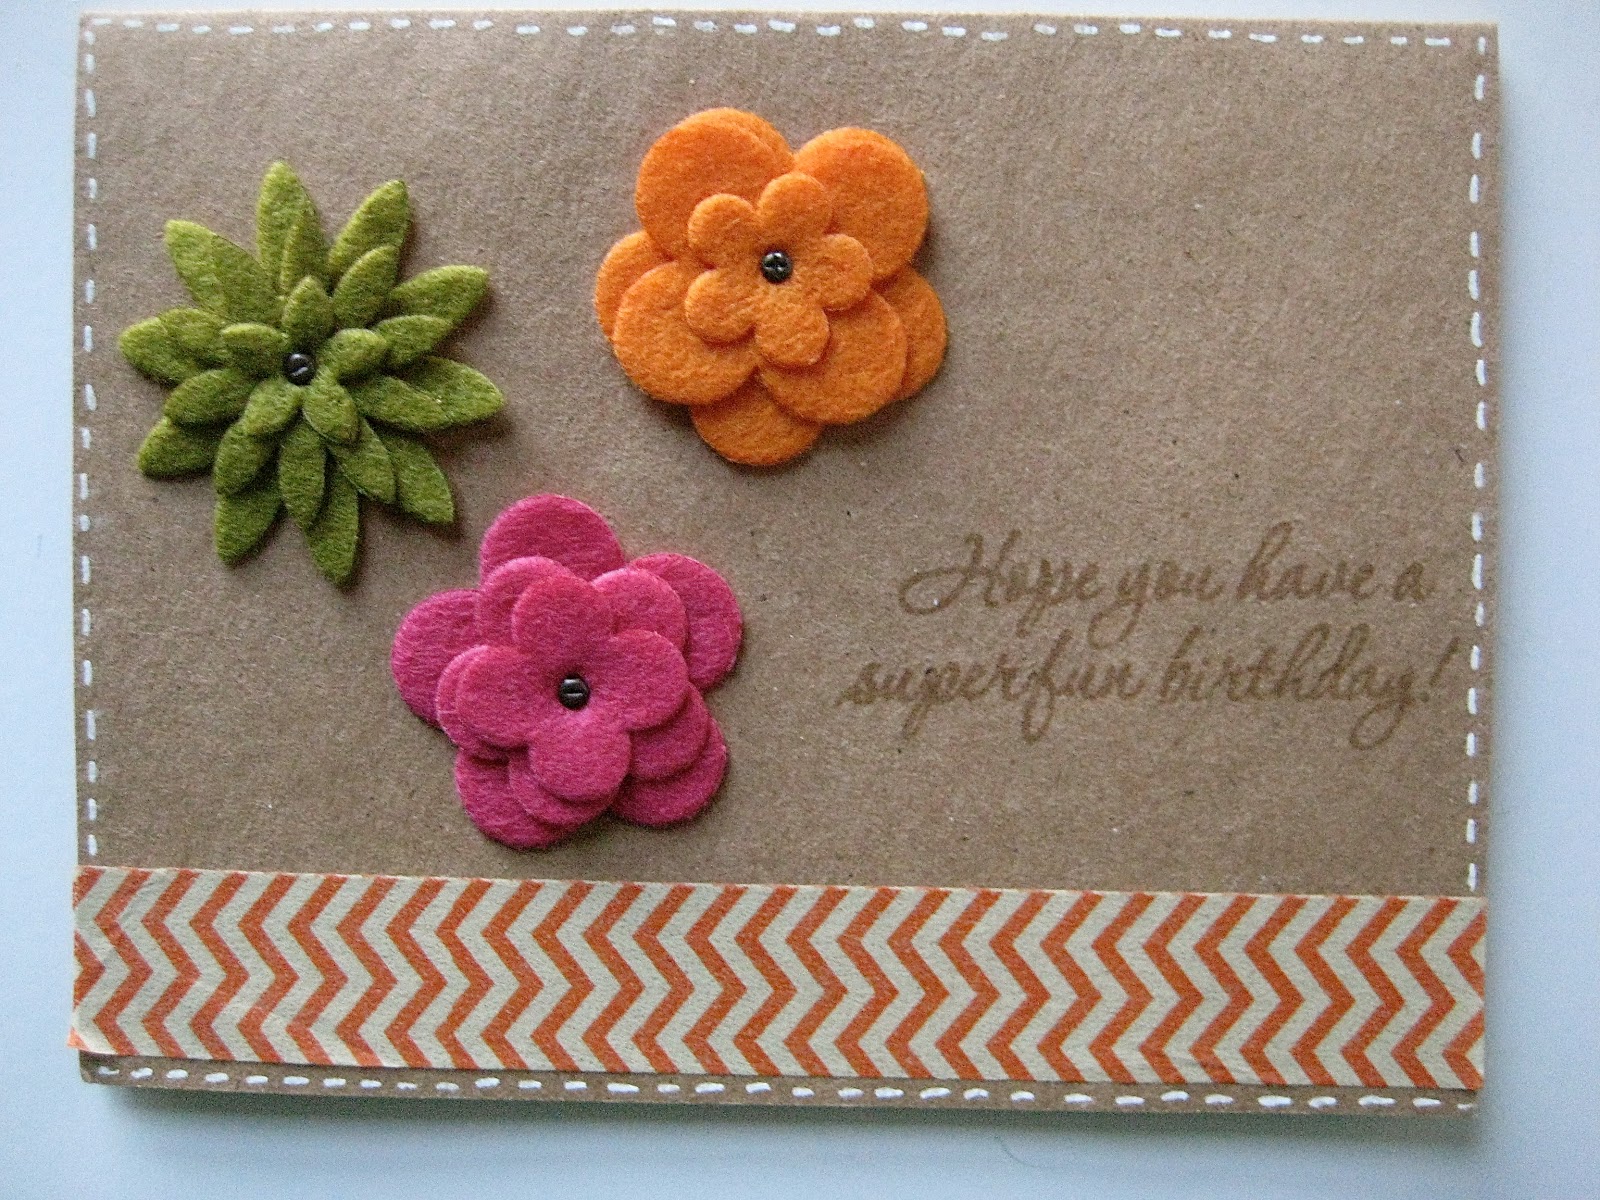
the next is a card from my friends Heidi & Steph at Simon Says...
hello?
felt flowers?
YES please...
love them, especially on a  kraft card!
the white pen stitching is a small detail, 
but finishes the card off perfectly...


now...
take a look at this giant card...
I totally love what Wanda Hentges created...
really BEAUTIFUL colors...
the texture on the 3 layer flower is done with embossing paste...
I LOVE the honeycomb stamp, stamped into the paste...

and I love the random bricks stenciled onto the background, with a variation of the colors...
the flourish stamps make the perfect leaves & grass!
simply...awesome!


 Margie Kemper sent the next card...
what a beautiful background...
love the colors...
for sure I LOVE the flower!
I hope the photo shows the tiny embossed border...
it's a great detail & really frames & finishes off the card!


I hope you enjoyed seeing these awesome creations...
they sure made me HAPPY!


once again...
THANK YOU SO MUCH!!!
blog/group friends are THE BEST!

since I had a "play day" road trip with Rick yesterday...
I really gotta HIT IT today...

my deadlines are coming too fast...

with CHA so close to Christmas...
there really won't be much time for teasing this year...
 bet you're sad...lol...
or not?

decent sized peeks will start soon after Christmas...
believe me...
I. CAN. NOT. WAIT. TO. SHARE.

I have been having a blast using all the new *items* and

 I LOVE getting ready for CHA, because I can...

make art!
wendy
ps...I thought about saying...
GO BEARS...
but who would I be kidding?
YIKES! not happening!
so sad...


Wednesday, October 3, 2012

mixed media tag for Ranger...

Fed-Ex will be here EARLY tomorrow...
so today is all about the final packing & shipping of supplies 
for The Queen's Ink workshops...

I thought you might like to head over to the Ranger website  
to see a fun fall tag I created for them...

here's just a tiny peek...


you'll find the tutorial and the full tag HERE...

I had some emails asking about the stamp sets I used,
so here are the items that are not listed on the Ranger site...
(all the Ranger products are listed on their site...)


Stampers Anonymous Wendy Vecchi Studio 490 stamps Be Inspired Make Art, Seriously Art, Botanical Art, Clearly For Art, Art Parts Tag Topper (these are soooo fun!)

Tim Holtz Idea-ology Type Charm, Paper String, Alpha Tiles, Mini Pin, Sanding Grip

Blossom Bucket Wendy Vecchi “Embellish Your Art” Yellow Flower...
this is brand new & will be arriving SOON!

Misc. hot glue gun


this is a really dimensional tag & using clearly for art with Claudine's sticky back canvas open the door to LOTS of awesome possibilities...
think about it!

I had so much fun...

mak(ing) tag art!
wendy


Friday, February 10, 2012

fab Friday...4 GIVEAWAYS...

let's make this a FAB FRIDAY,
by giving away
4 brand new
hot off the press
studio 490 stamp sets...

but first...
a little project to get you in the mood for Valentine's day...
this has LOTS of my favorite things...

idea-ology lightbulb...I told you I LOVE these things...
sitting in a NEW art parts gear...
LOVE the Blossom Bucket heart & telephone...
and the BB BLACK METAL SHELF...another addiction...


the "register of shipments" is from tim's new destinations paper stash...
the background is graphic 45...


remember...
clicking on the GREEN link,
will magically transport you right to the IN STOCK products...

here's today's first giveaway...
this is called...


the second is...


here's #3...


and #4 is...


and here's some examples of them inked & stamped...

the collage background on the art parts heart...

is the base for this next one...

I LOVE how much difference one extra layer makes...
check out the TAPEPAX image...
the little diamond center is raised...
small detail with a big impact...

the gal's dress was stamped with the
it's a good way to use up paper scraps...
just stamp & layer...


this time she has a dress that was stamped on CFA which I covered with sticky back canvas...

this is done on the

the curio knob is perfect for holding the art parts keys...

the tree stamp is an oldie from my first release...
& I still love it...

and there's the Eiffel Tower...


stamped over kraft with vermillion archival...


and the lace border...
stamped in olive archival...

it's so fun to add stamping on the lips...
makes it look like words are coming out of her mouth...lol!

if you stamp on Blossom Bucket embellishments...
use archival & dry it...
then it's permanent!


the flower, is from accents for art...
I used the telephone dial as the flower center...
and loaded up the art parts fence with

this is the back of the new gatefold journal...


this is like paper dolls for adults...

instead of using the coordinating art part for the flower...
this time I covered my clearly for art with tim's tissue wrap...
using Glue N Seal to attach it...
then inked it with alcohol ink...
heated it...
shaped it...

this creates a fragile looking paper flower...
but it's sturdy, because of the CFA, used for the base...

I used a favorite Blossom Bucket embellishment for the flower center...
I'll be buying LOTS of these...

so...the giveaway scoop...
you have until 7am my time on Monday to leave a comment...

it's simple...
comments win stamps...

just ask...

Candy C said...

Congrats to the winners!!! Fabulous stamp sets! I also love the new set you are offering...Call It Art!! IT is a wonderful set! I love the old telephone and the vintage image of the gentleman. Very cool. Thanks for the opportunity to win this set! <3 Candy

February 8, 2012 4:37 PM

who won ...


please email me at wbv1213@me.com with your shipping info...

***don't forget***
to pop over to the

to see more results from the designer challenge...

that's it for FAB FRIDAY...

have a great weekend & remember to...

make art!
wendy
ps...see you on Monday with the names of 4 fab WINNERS!