blog posts!
WOW...
when I started this blog, I wondered if I would have enough to talk about...
#700 posts later, I guess I did...
THANK YOU ALL for your support,
friendships developed thru the blog and for the wonderful comments & emails you send...
#700 would not have happened if I was here talking to myself!
I appreciate each & EVERY one of you...
LOTS...
as promised, I have another tutorial to share today...
it's a little THANK YOU of sorts, to celebrate...
and just a hint...
you may want to read the entire post...
when I first started to demo for Ranger, they asked me to focus on the Adirondack line of products...
so, I'm always thinking of what I can do to show
how versatile these products are...
that pretty much explains my fascination with their
it is seriously amazing, because it works with so many products...
the more I play...
the more fun things I discover...
not only is it an awesome ink for stamping on dark surfaces, but
I have found that it can be used with many of Ranger's products, to alter the look of those products...
in the past I have showed how to use the snow cap pigment pad with tim's distress inks, color washes & new distress stains
and now I can add something else...
SERIOUSLY...
it's cool that one little magic ink pad can do so much!
here's a simple ATC, using this new technique...

they are a transparent ink, intended to be used on glossy paper, metals, acrylic/plastic & basically NON porous surfaces...
they dry in about 5 to 7 seconds & therefore if they are used on plain matte paper, art parts, grunge or cardstock, you have no time to blend/mix the colors...
they are NOT to be put in a mini mister & sprayed...
EVER...
remember, I WAS a nurse...
alcohol is something you would NEVER want
sprayed into your eye...
I get asked this question
in every Ranger ink class that I teach...
PLEASE...DO NOT DO IT!
OK...moving on...
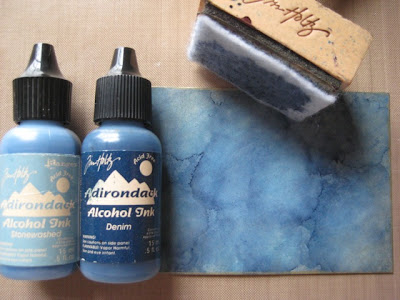
here's a glossy ATC from Ranger...
it's inked with the ink applicator (using felt).
I chose denim & stonewash alcohol inks...
just touch the tip of the bottle to the felt, squeeze a bit & then tap the ink applicator to the surface...
here is the result...
a vibrant beautiful background
that will be very fun to stamp on on later...
and because it's on glossy cardstock, you can see the result is a shiny surface...
hello...that makes sense...duh...
the next photo is Ranger's manila ATC...
now NORMALLY, you couldn't use the alcohol ink on the matte finish cardstock & be happy with the result...
BUT...
I tapped the snow cap white pad over the ATC...
and dried it,
then applied the same alcohol ink colors, to show the difference....
the result is a matte finish with more muted colors, that are now opaque instead of transparent...
I LOVE IT!
you'll see too that I added some shading to the edges with walnut stain distress ink, using the blending tool...
it's cool to have this option...
hmmm...
I wondered if it would still be possible with this technique to
YES! it works just fine...
I didn't use it on these ATC's, but it does work!
hmmm...
how about the metallic mixatives?
YES...they work too...
wondering if the snow cap/alcohol ink will work on my art parts??
YOU BET...
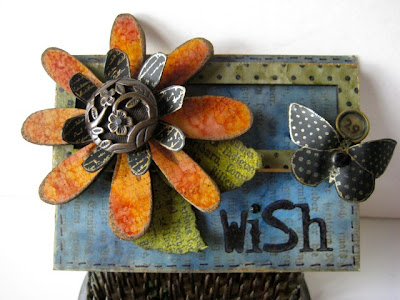
I did it here...
here's the art parts flower now...
the ATC is stamped with coffee archival ink & my text stamp...
the screen background was lightly stamped over the flower, using coffee too...
the flower & mini butterfly were stamped on clearly for art blackout, using the gold paint dabber...
I decided not to use the stem that you see above...
instead I cut some leaves from grungeboard, using tim's new mini branch/leaves die...
it's a GREAT way to use up those small grunge scraps...
the leaves were inked with peeled paint distress stain...
sure wish we had the other 24 colors...
and the finishing touches are the accoutrements button
& the charm clip for the butterfly head...
so the moral of the story today is to PLAY...
if you have an idea...
just TRY IT!
that's what I do...
what's the worse thing that could happen if it's ugly ???
you ruin a tag...
no big deal...move on!
no celebration is complete without a...
GIVEAWAY...
and I have one TOTALLY AWESOME GIVEAWAY...
when Heidi from Simon Says Stamp found out this was post #700...
she asked if I would like to giveaway...
GET READY for this...
drumroll.............
I am over the moon happy to have this awesome gift from Simon Says Stamp, to give to one lucky commenter here...
to enter...
simply leave a comment...
it couldn't be easier...
Heidi will ship the VAGABOND directly to the lucky winner...
wherever YOU live!
the random winner will be chosen @ 7am (my time)
on Monday morning...
that's MAY 2nd...
GOOD LUCK TO YOU...
and...
we'll have a SECOND WINNER too...
that lucky person will receive a package of goodies from me!
that VAGABOND is soooo much fun to use when you...
make art!
wendy
ps...I'll be up @ 3am tomorrow...
got my seat reserved to see THE wedding...
I can't wait!
THE Linda Elbourne, who just happens to be the design team coordinator over @ Simon Says, will be holding Kate's bouquet & she promised to wave to ME! just me... lol!
now that will be something to see!


