

I *may* have mentioned a time or 2...
or 50...
that I LOVE tim's new distress stains...
and that we NEED the other 24 colors...
just a reminder for Justin & Alain...
anyway...
I had a little idea that I wanted to try...
I tested these 6 distress stain colors...
but it will work with all 12...

Ranger's snow cap white pigment ink...
always get the re-inker for the pad...
I like the pigments nice & juicy...

I tapped the pad over the entire tag...
and covered it completely...
I DRIED it...
the pigments will air dry in about 15 or 20 minutes,
depending on the humidity...
that's a unique feature of Ranger's pigment inks...
but I'm impatient,
so I just blasted it with the heat-it tool for a few seconds...
once dry,
I used the distress stains right over the snow cap
to create a chalky like effect...
the tag on the right has the stains applied
directly to the naked manila tag...
here's the side by side comparison...
note too, that you can still add distressing to the edges with the blending tool...
I used walnut stain (pad) on the outside tag edges for this sample...
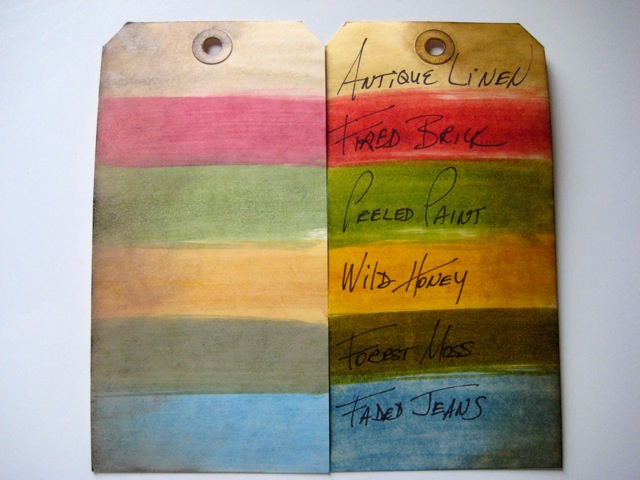
you can see that the stains on the manila tag
on the right, are transparent & vivid...

are chalky/shabby looking...
and the stain colors are more pastel-ish...

the distress stains make this technique quick & EASY for creating large backgrounds...
just use Ranger's new manila cardstock...
it's the same great material as their tags...
now we can use the same inky techniques to make larger than tag size backgrounds...
the moral of today's post...
by using the snow cap white pigment pad with the distress stains, you have even MORE options to...
make art!
wendy
ps...another technique coming later this week...
stay tuned!
47 comments:
Loving the pastel look to the stains over the white!
Good morning, Wendy - thanks for the tip! I guess I'll have to pick up the white pigment ink pad!! :) Have a good day!
Very cool. Thanks for sharing.
Wendy,
Thanks for the tip. Love the two different looks, pastel and bright. I need to make a sample tag too so I don't forget there is another option.
Gail in Oklahoma
GORGEOUS!!! AM so going to get a Snowcap reinker next week.. you know, when I am .. in ... America!!! TFS x
Fabulous!!!! I've loved this technique since you first introed it with the D. ink pads!!! Way, way cool!!!! We haven't had an update on your brother in awhile... how are things going??
i feel i'm going to use this... a lot! love the look of it. thanks so much for sharing your talent and ideas!
Lovely look! I so need that re-inker!
Wow, that is a really cool technique!! I'm working on a little art journal and I will have to use that on one of my pages. Love the effect!! Thanks Wendy!!
Love it, thanks Wendy. I haven't had the opportunity to play with them yet and can't wait to play. Love the two options you showed us today.
Once again it is a great technique! Can't wait to try it. Love both looks: The transparent and the shabby chic. TFS
Great discovery, so at least now we have 24 colors if we do this. We still NEED the other 24, but this discovery will help! Are you listening Justin and Alain?
Oh i do like the subtle tones, think i need me a snowcap ink pad! Thanks for sharing Wendy :D
This looks fantastic! Can't wait to try this. Thanks Wendy
I love the look, very soft ! I agree with you though Wendy, We need all the colors :) Have a great day !
The soft shabby look is really cool looking. Thanks for sharing this with us. We really need the stains in all of the colors. Please Ranger?
I just inked up my Snow Cap pad so it's ready to go! I love the soft look. TFS
You are just so clever. Thanks for the tip.
I just love your blog so full of new ideas for me to try! Thanks Wendy
I like the fact that you can tone down the colors to have more options, but favorite are the natural vibrate methods, thank you for all the great tips.
Gloria
I love that look and just for the record I think we need all 24 colors too!
Love the chalky look! Now to place them on my shopping list. Woohoo!
Graet idea !..love the chalky look!
Fun. Now if I could just get my hands on those stains.
Great tip, how do you think of these thing? I will have to check it out. Thanks!
Excellent!!!
Thanks for sharing that.....it doubles up the options!!!
xoxo Sioux
I haven't go the white ink pad yet so I'm going to try Gesso until it comes in?
Great idea! Can't wait to see the next technique!
Wonderful technique, love the shabby chic look . Thanks Wendy :)
I love this technique.....I too love, love, love the distress stains and really do hope they come out with all 36 colors cause I "need" them all!!!
LOVE it! thanks for the tip
Great idea! Now instead of just 12 Distress Stain colors, it's like having 24. What a bargain!
I really like the white-washed look. We definitely do need all of the stain colours. Tim are you listening? Thanks Wendy!
Wonder how Snow Cap paint robber would work...maybe I will give it a try!!
Thanks for the how to. I love the look. I agree we need all of the colors. So much fun and so much to do with these stains. TFS!!!:-D
Pretty pastel colors!!! Are you going to make art with the tag?
How cool! I agree with you about needing the other colors. And the BEST news! My Art Parts and Clearly for Art on (almost) on their way to my house! WOO HOO! I can't wait! Now where was that post with the fabric and Clearly... :)
I have that pad and never used it much. Thanks for the inspiration
This is the first way I used the stains and of ciurse what was I covering but art parts--- a perfect trio if I do say so myself!!! LOVE IT! THANKS AGAIN
love this idea! I'm going to have to get the pigment ink pad or maybe try it with the white paint dabber instead?
Have a great day!
That's great Wendy, twice the colours for the addition of a snow cap ink pad and re-inker. I love the distress stains this just expanded the results with them. Thanks
thanks so much!!will be adding this to my shopping list! thanks
kazx
Thanks for sharing. I am playing with them now and love them. I noted how vibrant they are on watercolor paper...and how lovely and muted they are on glossy cardstock. Totally different looks. Thought I would share.
Man, I'm glad I bought the reinker for this little gem of a pad, can't wait to try this technique. Thanks so much for sharing your ideas with us.
Congratulation on your 7ooth. Keep it coming
I had NOOOO idea what to do with these things! I have the inks, I'm good with paint, but stains? Thanx Wendy!
Post a Comment